Bromeliads - Care and How to Grow Indoors
Bromeliads are a wide range of plants which grow mainly in the tropical areas of the USA and Mexico. Bromeliads are can be Epiphytic plants that they manage to obtain all the moisture they need from the air some are terrestrial, living their entire lives on the ground. It is often mistakenly assumed, that all bromeliads are epiphytes. Not so!
They grow in a wide range of habitats within these regions as diverse as rain forests, scrubby wild land and desert situations. Bromeliad is the general family group name, whereas being epiphytic describes the manner in which some of them grow. Their origin, will determine how they are cared for when grown as indoor plants. The care of bromeliads is not onerous - simply needs to be right.
Those that grow as tree clinging plants prefer a moist growing environment for most of their lives. High humidity is the most difficult of environments to emulate indoors, so the rain forest dwellers might prove to be short lived.
Bromeliads which grow on the ground and hence do well as pot plants normally grow in near desert conditions in arid landscapes of the tropics or sometimes on stony ground. This is the easiest group of bromeliads to care for, and can generally be grown as other indoor pot plants. This group have adapted cell structures that allow them to store moisture within. Some are classed as succulents.
Whilst it can be easily understood how they can get their moisture requirement in the humid enclosure of rain forests, one can only wonder at their storage mechanisms for those that live in semi-desert areas as terrestrial plants Cryptanthus being typical. The Pineapple a terrestrial bromeliad - has been adopted for commercial growing in SE Asia, and is subject to the varied climatic conditions which often includes weeks of no rain in baking temperatures of 35 deg or more.
Foliage of Bromeliads
The leaves invariably form a whirl of leathery straps, either blunted or pointed at the ends. Some are serrated viciously so, as with the pineapple whilst others are smooth. The foliage is an attractive aspect, and will in any event last much longer than the flowers.
The whorl of foliage emanates from the base, overlapping tightly to form a virtual waterproof urn in many instances. Leaves can vary in colours from silvery grey, through to many shades os pink and orange, with some even being a fiery red.
Flowers of Bromeliads
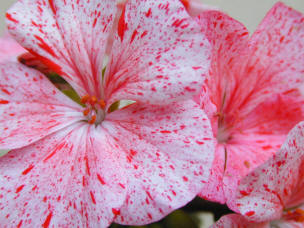
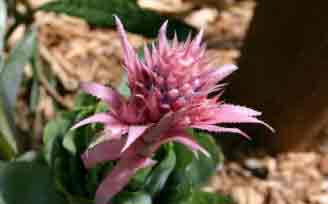
The flowers of bromeliads are often quite spectacular with shades of yellow, pink and crimson often bi-coloured. Some of the family group are noted for their central crown of flowers deep down in the urn, whilst others radiate from the centre on long stalks erupting in some of the gaudiest displays seen in the plant kingdom.
Unfortunately, the flowers herald the demise of the plant, for they only flower once in their lifetime from the same urn. However, before this, then ensure that life continues, by sending out offshoots from the base of the plant which are affectionately known as Bromeliad Pups.
As can be seen in the images below, all of the Bromeliad flowers are quite spectacular - almost artificial - though not all are happy to extend from the comfort of their central urn!
Care of Bromeliads
The care regime for bromeliads depends entirely as to the individual types and their original habitat. Terrestrial types invariably need dry conditions, though will tolerate humidity. Good light is essential even bright sunlight. Many can be grown outdoors during the summer months and make spectacular patio features!
The rainforest types will require high humidity, and good organic compost when grown as pot plants and generally need more care than the terrestrial types. Acid composts are necessary, and watering should be carried out either with distilled water, rain water and tap water only if from a non-alkaline area.
Feeding Bromeliads
The rainforest bromeliads will be happiest if fed a liquid feed throughout the growing period of summer. The feed should be weak and regular. Every two weeks seems to be satisfactory care, and should be watered into the compost. Where grown attached to an old trunk or moss pole, foliage feeding is good.
Propagation of Bromeliads
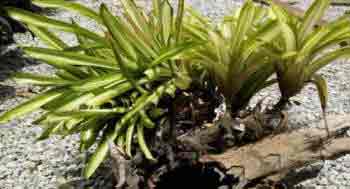
The plant in the image above, has never flowered, but has sent out many offshoots which can easily be cut off the parent plant. Normally, after flowering, the central whorl of the main plant will die off but you will be provided with offsets (Pups) which can easily be propagated to form new plants.
Simply place the offshoot into a small pot of well draining compost which will simply have to be kept moist. The Pup offshoot will soon root into the soil, and can either be grown o0n as a pot plant or transferred to the crotch of an attractive log, or wired to a suitable host wood seems to be the best, though moist moss sticks suit as well.
Comprehensive Guide to Propagate Bromeliads
Basic Facts About BromeliadsBromeliads are an incredibly diverse family of plants native to tropical and subtropical regions. They come in a wide range of sizes, colors, and shapes, including popular varieties like Pineapple (Ananas comosus), Air Plant (Tillandsia), and Queen's Tears (Billbergia nutans).
Bromeliads are known for their striking foliage and dramatic flowers. They are typically epiphytic, meaning they grow on other plants or structures for support instead of in the soil, but some species are terrestrial. They prefer bright, indirect light, well-draining substrate, and high humidity.
Materials Needed for Propagation- A mature bromeliad plant with pups (offsets)
- A sharp, clean knife or pruners
- A pot with drainage holes
- Bromeliad or orchid mix, or a DIY mix of equal parts perlite, coarse sand, and peat moss
- Rooting hormone (optional)
- Step 1: Select a Healthy Bromeliad Choose a mature bromeliad that has produced pups. Pups are the small plants that grow from the base of the mother plant. They should be one-third to half the size of the mother plant before they are removed for propagation.
- Step 2: Remove the Pup Using a sharp, clean knife or pruners, cut the pup away from the mother plant. Try to include some roots if possible. If the pup is tightly attached, you may need to remove some of the mother plant's lower leaves for better access.
- Step 3: Let the Cut Dry Allow the cut on the pup to dry for a day or two before planting. This helps prevent rot.
- Step 4: Plant the Pup Fill a pot with your chosen planting medium and make a hole in the center. Place the pup in the hole, ensuring that the base where it was cut is level with the surface of the soil. Firm the soil around the pup to keep it upright.
- Step 5: Water and Care for Your New Plant Water the soil lightly, keeping it barely moist until new growth indicates that the pup has rooted. Place the pot in a location with bright, indirect light and high humidity.
Post-Propagation Care
Once the pup has taken root and started growing, care for it as you would any bromeliad. Water the central cup of the plant, allowing the water to overflow into the soil. Allow the soil to dry out before watering again. Fertilize sparingly during the growing season with a balanced, water-soluble fertilizer diluted to half strength.
Potential Challenges and SolutionsChallenge: The pup wilts or turns brown after planting.
Solution: This could be a sign of overwatering or rot. Make sure the soil is well-draining and only barely moist. If rot is suspected, remove the pup, cut away any rotten parts, let the cut dry, and replant in fresh, dry soil.
Challenge: The pup isn't growing.
Solution: Be patient. Bromeliads are slow growers, and it can take a few months for pups to establish their roots and begin growing. Ensure the plant is receiving appropriate light and humidity.
With patience and care, propagating bromeliads can be a rewarding experience. Enjoy watching your new plants grow and flourish!
Problems with Bromeliads
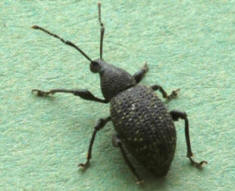
The normal range of houseplant pests can be anticipated and should be searched out regularly. These include red spider mite, mealybugs and of course aphids. Scale is rarely a problem, though should not be discounted.
Bromeliads rarely suffer from any fungal disease. If it is present, it normally signifies that there is a basic problem with the plant. Fungal diseases are not normally the cause of any demise.
Types of Bromeliads suitable as House Plants
- Cryptanthus - Terrestrial Bromeliads which are normally found in dry forests, growing in the soil or rocky slopes. They are known as Earth Star or Starfish plants because of the rosette of low foliage.
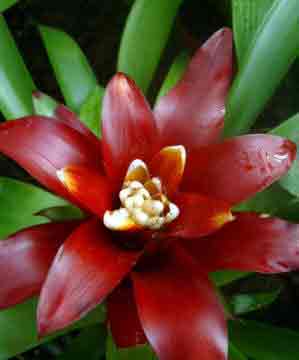
- Neorogelia As seen in the opening image a top, normally spread by rhizomes, are can either be epiphytic or terrestrial. Flowers are sunk into the typical bromeliad urn.
- Aechmea Large whorls of rosette foliage in wide range of options. Normally epiphytic though some are terrestrial. Rainforest is the normal habitat.
- Vriesea These are typified with spectacular, large foliage clumps, and protruding, showy flowers. Can either be terrestrial or tree huggers. One of which claims the name of King of the Bromeliads. Can form a small shrub.
- Guzmania Pointed foliage is typical with spectacular flowers held aloft. Essentially a rainforest inhabitant normally epiphytic.
- Tillandsia The cute air plants which include the mossy specimen known as Spanish Moss. Totally epiphytic, and happy on rocks or dry tree stumps and branches. The trailing moss type best being anchored wherever it can form a waterfall of silver foliage.
- Nidularium The Birds Nest Bromeliad aptly describes its habit of growth. Not too far distant in appearance from the Neorogelia.
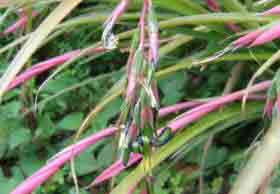
- Billbergia These can be either epiphytic of terrestrial types (living on rocky ground) with long flower stems with the drooping flower heads being an identifying feature.
Best Selling Gardening Products
Popular Gardening Sections


Problems
Identify Weeds in The Garden - How to deal with weeds. Diseases and Pest which harm your garden and plants, learn how to prevent, deter and erradicate your garden problems.
Garden Problems
Pruning
Pruning Guide. Shrubs flower better with correct pruning. Many illustrations and examples of what to do - and when. Includes evergreens, roses, flowering shrubs, spring flowering shrubs and pruning for stem effect. This is our most viewed and comprehensive section,
Pruning
Gardening Businesses
Gardening Businesses listed in the UK counties and USA states. County and State Listings of businesses involved in Garden supplies and services. If you wish to be added to the Directory, please send us your information. Having problems, use the search box
Businesses
Gardening
In this section you will learn about Gardening Basics, Containers, Landscaping, Propagation and Soil.
Gardening
Gardening Gifts
Gardening Gifts and Reviews, Read Before you Buy
- Gardening Gifts Ideas
- Gifts For Her
- Gifts For Men
- Power Tool Gifts
- Cheap Gifts
- Personalised Gifts
- Wildlife Gifts
- Family Gifts