Child's Play: Creating Child-Friendly Gardening Projects for Spring
Spring is just around the corner, and what better way to usher in the budding season than with gardening projects that captivate the imaginations of little ones? Bringing children into the garden doesn't just paint smiles and make memories; it sows the seeds of responsibility and germinates a lifelong appreciation for the marvels of nature.
In this blog, we'll dig into a treasure trove of kid-friendly projects—from enchanted fairy gardens to dino-mite herb plots—that are as entertaining as they are educational. Get ready to dig your hands into the earth and watch in wonder as your mini gardeners grow alongside their plants.
One of my Favourite things to do is, spending time with my children in the garden. Here are 9 ideas of what to do with your children, the one thing I cant teach them is Patience, my boys are so impatient, bless them, I was no different at that age.
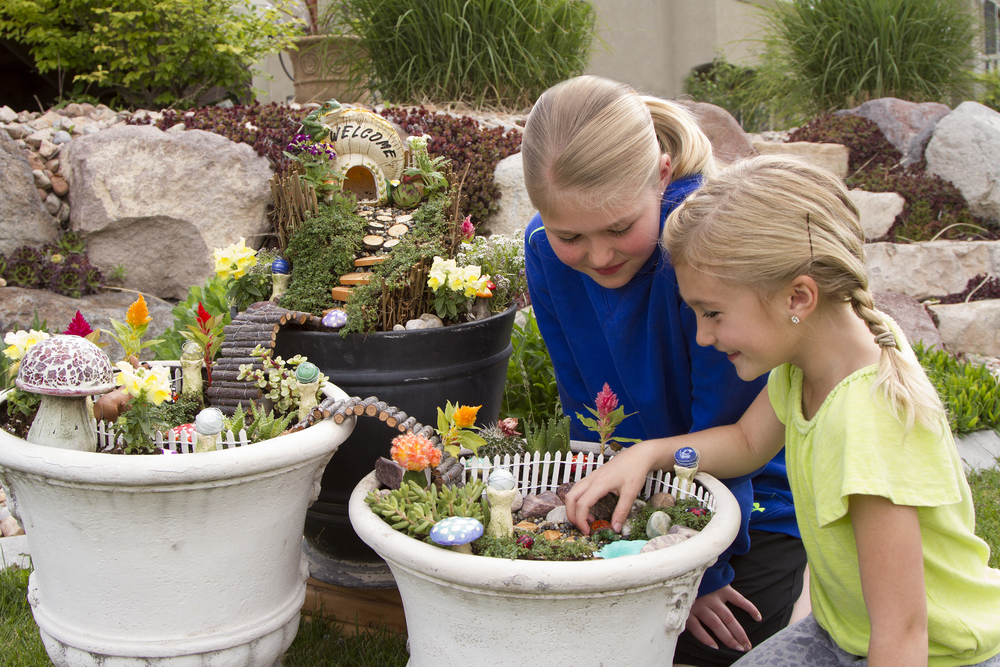
Fairy Garden Fantasies
Flutter into whimsy with a delightful fairy garden—a magical miniature world that can fit into a corner of your outdoor space or even into a pot. Gather pebbles, twigs, and little plant cuttings to create fairy-sized abodes, pathways, and lush landscapes. Such enchanting projects invite children to learn about plant care and recognise different plant types, all while nurturing their creativity.
A step-by-step guide on how to make a fairy garden with your children.
 Materials Needed:
- Container or flower pot (Buy Today, Delivered Tomorrow)
- Potting soil (Buy Today, Delivered Tomorrow)
- Miniature plants (like succulents) (Buy Today, Delivered Tomorrow)
- Fairy garden figurines (fairies, gnomes, animals, etc.) (Buy Today, Delivered Tomorrow)
- Small pebbles or gravel (Buy Today, Delivered Tomorrow)
- Moss (Buy Today, Delivered Tomorrow)
- Twigs and other natural materials
- Choose Your Container: Start by choosing a container for your fairy garden. You could use anything from a simple flower pot to a fancy glass terrarium. Make sure it has drainage holes to avoid water logging.
- Prepare the Soil: Fill the container with potting soil. Leave about 1-2 inches from the top to allow room for your plants and decorations.
- Arrange Your Plants: Now, start arranging your miniature plants in the soil. Make sure to space them out to give them room to grow. Consider where you're going to place your fairy figurines when arranging your plants.
- Add the Fairy Figurines: Once your plants are arranged, start placing your fairy garden figurines. You can create little scenes or just spread them out randomly. It's your fairy world!
- Create a Path: Use small pebbles or gravel to create a path in your fairy garden. This gives it a more realistic look and adds a fun element of design.
- Add Moss: Moss can be used to cover any exposed soil and give your fairy garden a lush, magical feel.
- Natural Decorations: Use twigs, leaves, pinecones, or whatever natural materials you can find to add more details to your fairy garden. You could create a mini fence, a tiny house, or even a fairy swing!
- Water Your Garden: Gently water your fairy garden, being careful not to disturb your figurines or decorations.
Remember, the most important part of creating a fairy garden with your children is to have fun and let their imaginations run wild! Enjoy the magic of creating your own little fairy world.
Discover Dinosaurs and Herbs
Travel back to prehistoric times with your own dinosaur herb garden! Select a variety of herbs, like rosemary or thyme, plant them in a large container, and add some playful toy dinosaurs. This hands-on activity serves as a verdant vessel for storytelling about the age of dinosaurs while introducing kids to aromatic plants that once covered our ancient Earth.
A Step-by-Step Guide Materials Needed:
- Different herb seeds or seedlings (Melissa for Stegosaurus, Thyme for T-Rex etc.) (Buy Today, Delivered Tomorrow)
- Pots or containers (Buy Today, Delivered Tomorrow)
- Potting soil (Buy Today, Delivered Tomorrow)
- Dinosaur toys or decorations (Buy Today, Delivered Tomorrow)
- Gardening tools (small shovel, watering can) (Buy Today, Delivered Tomorrow)
- Fossils (optional)
- Planning the Dinosaur Garden: Start by discussing with your children about the types of herbs you want to plant. Melissa (also known as Lemon Balm) could represent food for herbivorous dinosaurs like Stegosaurus, while Thyme could represent what a T-Rex might have stomped around in. This is a great opportunity to talk about different types of dinosaurs and their habitats.
- Choosing Your Containers: You can use regular pots or get creative with containers like large plastic dinosaur eggs. Make sure they have drainage holes at the bottom.
- Preparing the Soil: Fill your containers with potting soil. Leave an inch or so from the top to allow room for planting.
- Planting the Herbs: Dig a small hole in the soil and place your herb seeds or seedlings inside. Cover them with soil and press down gently to make sure they're secure. Remember to keep each herb's specific sunlight and watering needs in mind.
- Adding Dinosaur Decorations: Now comes the fun part! Add dinosaur toys or decorations to your garden. You could even add "fossils" by burying small dinosaur toys or bones in the soil for your little paleontologists to discover.
- Caring for the Garden: Teach your children how to care for their new garden. This includes regular watering but not overwatering, placing the garden in an area with the right amount of sunlight, and checking the plants regularly for any signs of disease or pests.
- Enjoying the Garden: Finally, enjoy your dinosaur herb garden! This is not only a fun project but also an educational experience for your children. They'll learn about gardening, herbs, and dinosaurs all at once.
Remember, the goal is to have fun and learn together. Happy gardening!
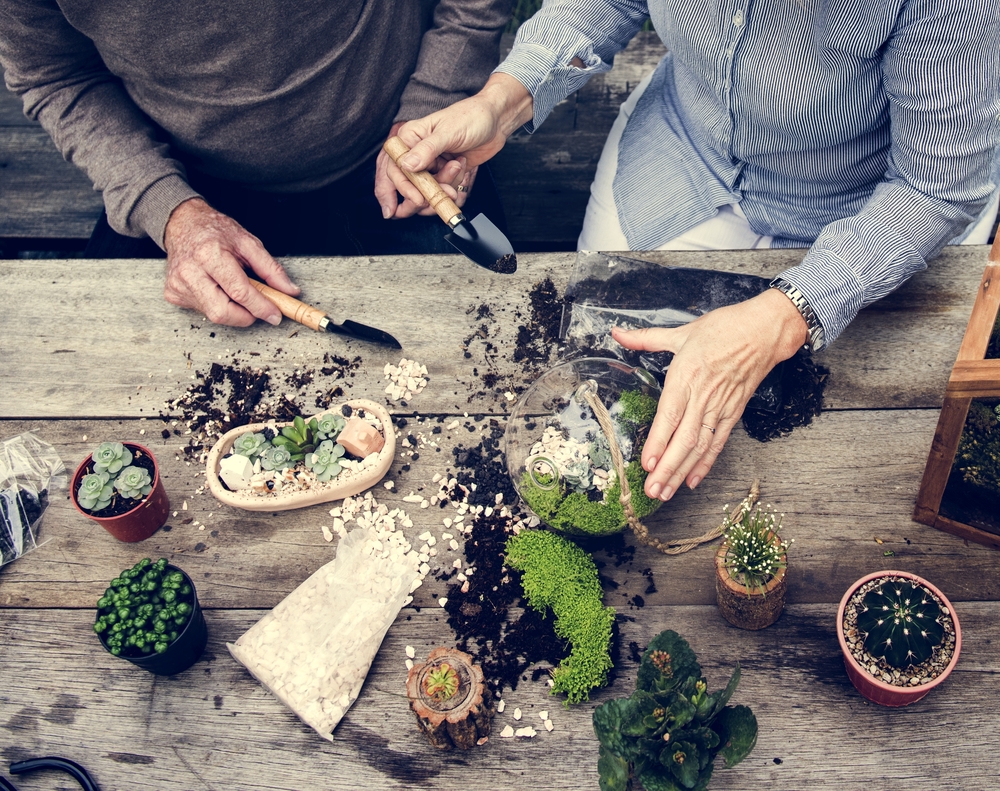
Glass Jar Terrariums
Create a mini ecosystem in a jar! Fashion a glass jar terrarium with soil, small plants, and perhaps a touch of figurine fun. As the sun's warmth helps these mini-worlds maintain moisture, children get to witness the water cycle's magic in real time. It's an engaging way to explore the delicate balance ecosystems hold.
How to Make a Glass Jar Terrarium: A Fun and Engaging Guide for UK Gardening Enthusiasts
Hello, gardening enthusiasts! We have a delightful project that's perfect for introducing your little ones to the magic of gardening. Today, we're going to create a mini indoor garden, a glass jar terrarium, which will add a touch of greenery to your home while teaching your children about the fascinating world of plants. So, roll up your sleeves and let's dive in!
 Materials Needed:
- Glass jars or containers with lids (Buy Today, Delivered Tomorrow)
- Small stones or pebbles (Buy Today, Delivered Tomorrow)
- Activated charcoal (Buy Today, Delivered Tomorrow)
- Potting soil (Buy Today, Delivered Tomorrow)
- Small plants (ferns, mosses, and succulents work wonderfully) (Buy Today, Delivered Tomorrow)
- Decorative elements (optional) (Buy Today, Delivered Tomorrow)
- Choose Your Containers: Start by selecting a glass jar or container. It could be an old pickle jar, a mason jar, or even a glass teapot – any glass container with a lid will do the trick.
- Layering the Base: Next, add a layer of small stones or pebbles to the bottom of your jar. This helps with drainage, preventing water from pooling at the roots of your plants.
- Add the Charcoal: Sprinkle a layer of activated charcoal over the stones. This absorbs odours and helps prevent fungus – keeping your terrarium fresh!
- Time for Soil: Now, add a layer of potting soil. The depth will depend on the root size of your plants, but around 2-3 inches should suffice for most small plants.
- Planting Time: Gently place your plants into the soil. Ferns, mosses, and succulents are excellent choices as they thrive in the humid environment of a terrarium. Arrange them in a way that pleases your eye, but remember to give each plant enough space to grow.
- Add Some Flair: This is where you can let your creativity shine! Add decorative elements like miniature figurines, colourful stones, or even tiny fairy lights. Make it a magical miniature world!
- Care for Your Terrarium: Place the lid on your jar and put your terrarium in a spot where it will receive indirect sunlight. Water sparingly, as the enclosed environment retains moisture.
And voilà! You and your children have created a captivating little ecosystem right inside a glass jar. It's a fantastic way to spark a love for gardening in young hearts. Plus, these terrariums make for enchanting décor, don't they?
Remember, every terrarium tells a story – the story of a mini world you've created with your children. So, let these glass jar terrariums be the start of many gardening adventures to come! Happy gardening, UK friends!
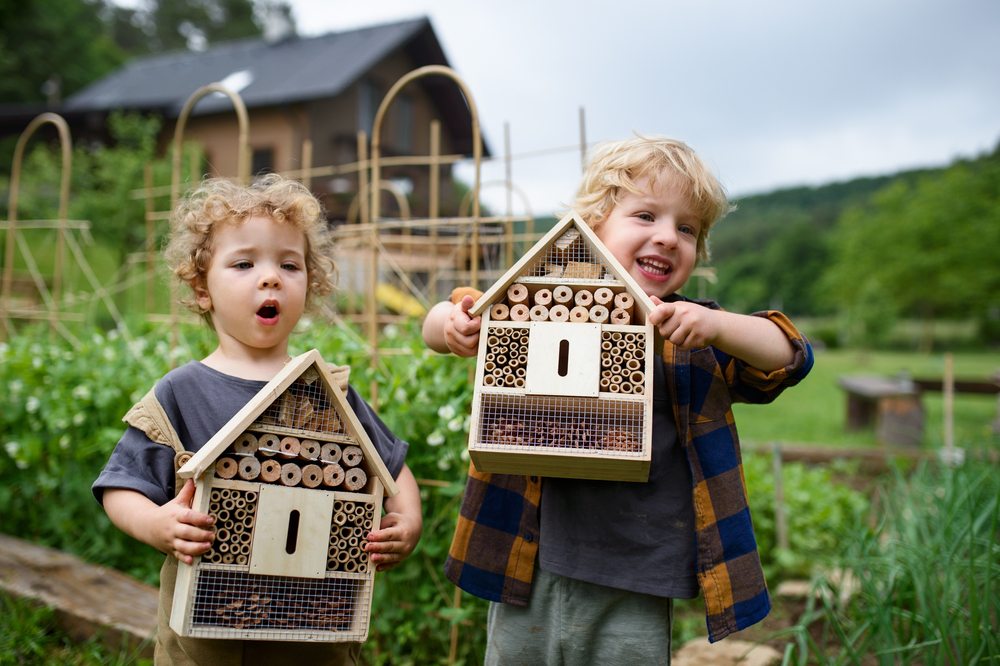
Brilliant Bug Boxes
Ignite curiosity for our six-legged companions by creating a bug box. This can be a haven for beneficial insects, like ladybirds, and a fantastic visual lesson on the importance of biodiversity. Help children understand how bugs contribute to a well-rounded garden and a healthy environment.
How to Create a Buzzing Bug Box: A Step-by-Step Guide for UK Gardening Enthusiasts
Hello, fellow gardeners! Today we're embarking on an exciting, eco-friendly adventure that's perfect for getting your little ones involved in the wonders of gardening. We're creating our very own bug box or "bug hotel", a safe haven for all the friendly critters that help our gardens thrive. So, let's roll up our sleeves and start building!
 Materials Needed:
- A wooden box (an old wine crate or drawer would work perfectly) (Buy Today, Delivered Tomorrow)
- Various natural materials (straw, bamboo canes, pine cones, bark, etc.) (Buy Today, Delivered Tomorrow)
- Twigs and sticks
- Garden wire or string (Buy Today, Delivered Tomorrow)
- Non-toxic wood glue (Buy Today, Delivered Tomorrow)
- Choose Your Box: Start with a sturdy wooden box as your base. This will be the main structure of your bug hotel. Make sure it's clean and free of any harmful substances.
- Gather Natural Materials: Now, it's time for a nature scavenger hunt with your children! Look for materials like straw, bamboo canes, pine cones, and bark. These will form the "rooms" in your bug hotel.
- Create the Rooms: Cut your materials to fit inside your box. Arrange them in a way that creates lots of nooks and crannies for bugs to crawl into. Use non-toxic wood glue to secure everything in place.
- Secure Your Hotel: To ensure your bug hotel is safe from falling over, secure it with garden wire or string. You could attach it to a tree, fence, or simply stake it into the ground.
- Wait for Guests: Place your bug hotel in a quiet corner of your garden. Then, sit back and watch as your hotel begins to attract a variety of guests, from ladybirds to bees!
Creating a bug box is not only a fantastic way to teach your children about the importance of bugs in our ecosystem, but it also provides a safe space for these beneficial critters, especially during the colder months. Plus, it's a wonderful addition to any UK garden, adding a charming, rustic touch.
So, let's celebrate our buzzing, crawling, and fluttering friends by giving them a cozy retreat right in our backyards. Happy building, UK gardeners!
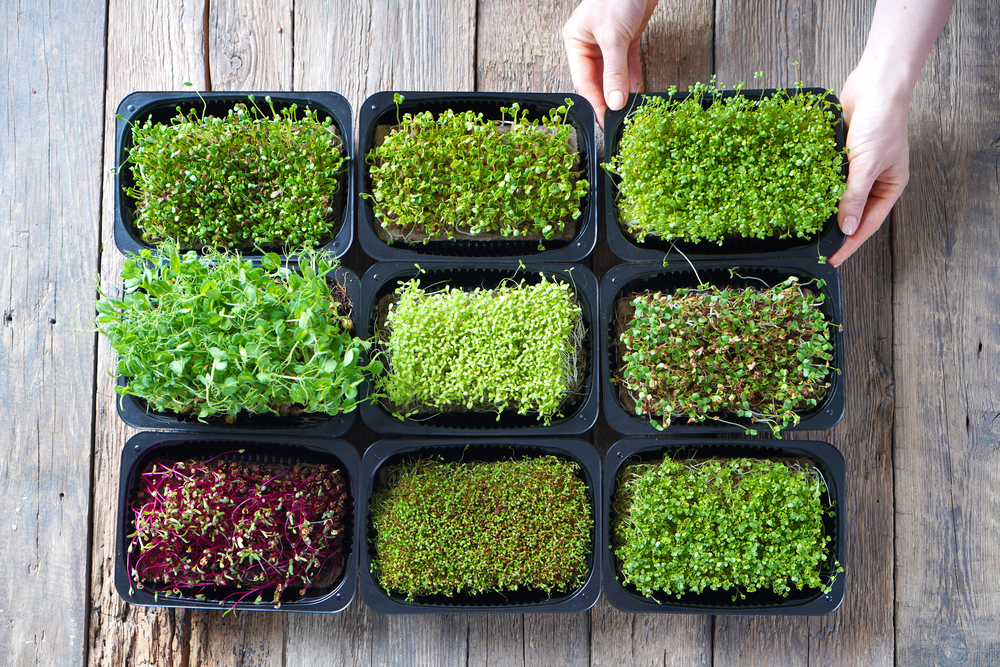
Mighty Micro-Greens
Grow a superhero of the plant world—micro-greens! These tiny powerhouses are quick to grow and packed with nutrients. Seeing the rapid transformation from seed to sprout teaches patience and gratification from the fulfilment of consistent care.
How to Grow Mighty Microgreens: A Step-by-Step Guide for UK Gardening Enthusiasts
Hello, green-thumbed friends! Today we're embarking on a super-powered journey to grow our very own superheroes of the plant world - microgreens! Not only are they packed with nutrients, but they're also incredibly easy to grow, making them the perfect project for little gardeners. So, let's put on our gardening capes and get started!
 Materials Needed:
- Microgreen seeds (such as amaranth, basil, beet, broccoli, buckwheat, cabbage, chard, cilantro, collard, corn, fennel, kale) (Buy Today, Delivered Tomorrow)
- Growing containers or trays (Buy Today, Delivered Tomorrow)
- Growing medium or mat (Buy Today, Delivered Tomorrow)
- Drinking water
- Choose Your Microgreen Seeds: Start by choosing your microgreen seeds. Each one has its unique flavour and nutrient profile, so feel free to mix and match!
- Prepare Your Trays: Next, prepare your growing trays. Fill them with your chosen growing medium or mat.
- Soak Your Seeds: Take your microgreen seeds and soak them in drinking water for around 6-8 hours. This helps to kickstart their germination process.
- Sow Your Seeds: After soaking, evenly scatter your seeds across the surface of your growing medium. Press them lightly into the soil but don't bury them; they need light to germinate.
- Water Your Microgreens: Gently water your seeds, ensuring the soil is moist but not waterlogged.
- Watch Them Grow: Place your tray in a spot where it will receive lots of light but not direct sunlight. Over the next 1-2 weeks, you'll see your superhero microgreens start to sprout!
- Harvest Time: Once your microgreens have grown their first set of "true leaves," they're ready to harvest. Simply snip them off at the soil level with scissors.
And there you have it, a tray full of nutrient-packed microgreens, grown right in your own home! They're perfect for adding a fresh, healthy crunch to sandwiches, salads, and smoothies. Plus, with their vibrant colours and interesting textures, they're sure to be a hit with the kids.
So, let's don our gardening capes and start growing these tiny but mighty superheroes of the plant world. Happy gardening, UK friends!
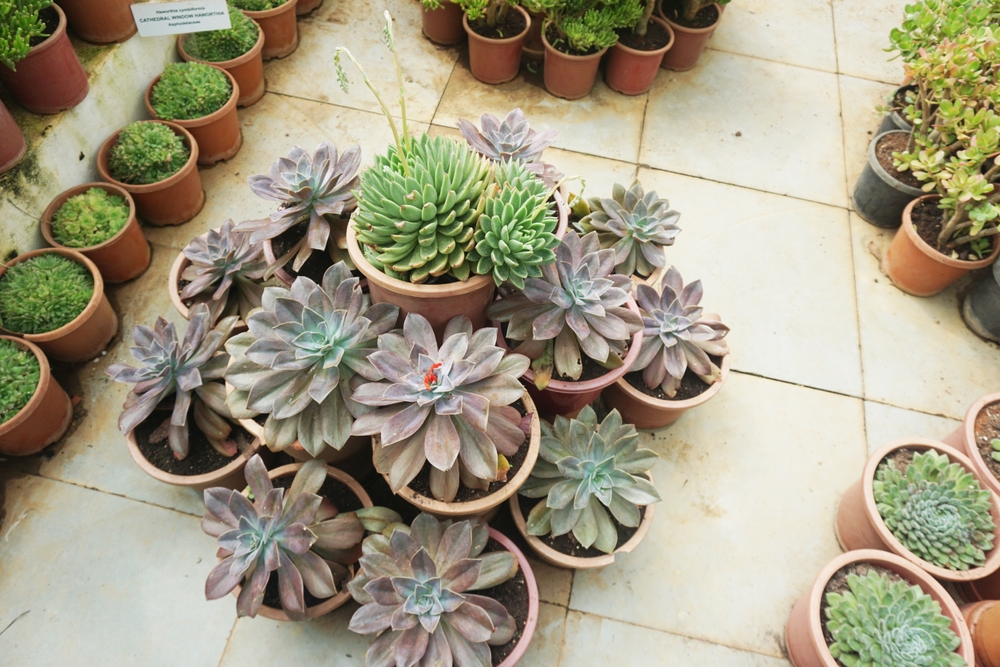
Sculptural Succulents
Create a striking display with sculptural succulents. These hardy, drought-tolerant plants are a wonder to observe and handle, teaching children about various adaptations plants have made to survive in different environments.
How to Cultivate Captivating Sculptural Succulents: A Step-by-Step Guide for UK Gardening Enthusiasts
Hello, green-fingered friends! Today, we're embarking on a thrilling horticultural adventure that will captivate both you and your little ones. We're going to learn how to grow sculptural succulents, the artful superheroes of the plant world! Not only are these plants incredibly resilient, but their unique shapes and forms make them a fascinating addition to any home or garden. So, let's dive into the wonderful world of succulents!
 Materials Needed:
- Succulent plants (such as Echeveria, Crassula, Sedum, Sempervivum) (Buy Today, Delivered Tomorrow)
- A pot with drainage holes (Buy Today, Delivered Tomorrow)
- Cactus or succulent soil mix (Buy Today, Delivered Tomorrow)
- Gravel or small pebbles (Buy Today, Delivered Tomorrow)
- Watering can (Buy Today, Delivered Tomorrow)
- Choose Your Succulents: Begin by choosing your succulent plants. These can be found in any good garden centre. Look for species with unusual shapes and forms, like the rosettes of Echeveria, the stacked leaves of Crassula, or the sprawling stems of Sedum.
- Prepare Your Pot: Next, prepare your pot. Ensure it has drainage holes to prevent water from pooling at the bottom. Add a layer of gravel or small pebbles for additional drainage.
- Plant Your Succulents: Fill your pot with cactus or succulent soil mix and gently plant your succulents. Be careful not to damage their delicate leaves. Arrange them in a way that allows each plant enough space to grow and show off its unique form.
- Water Wisely: After planting, give your succulents a good soak. Then, let the soil dry out completely before watering again. Succulents are drought-tolerant and prefer to be under-watered than over-watered.
- Let Them Shine: Finally, place your pot in a bright spot where it will receive plenty of light but not direct sunlight, which can scorch the leaves.
And there you have it! Your very own collection of sculptural succulents, ready to bring a touch of natural artistry to your home. These resilient plants are not only a joy to look at, but they also offer a fantastic way to introduce your children to the diverse world of plants.
So, let's roll up our sleeves and start sculpting our green spaces with these captivating plants. Remember, every succulent tells a story – a story of resilience, adaptability, and the beauty of nature. Happy gardening, UK friends!
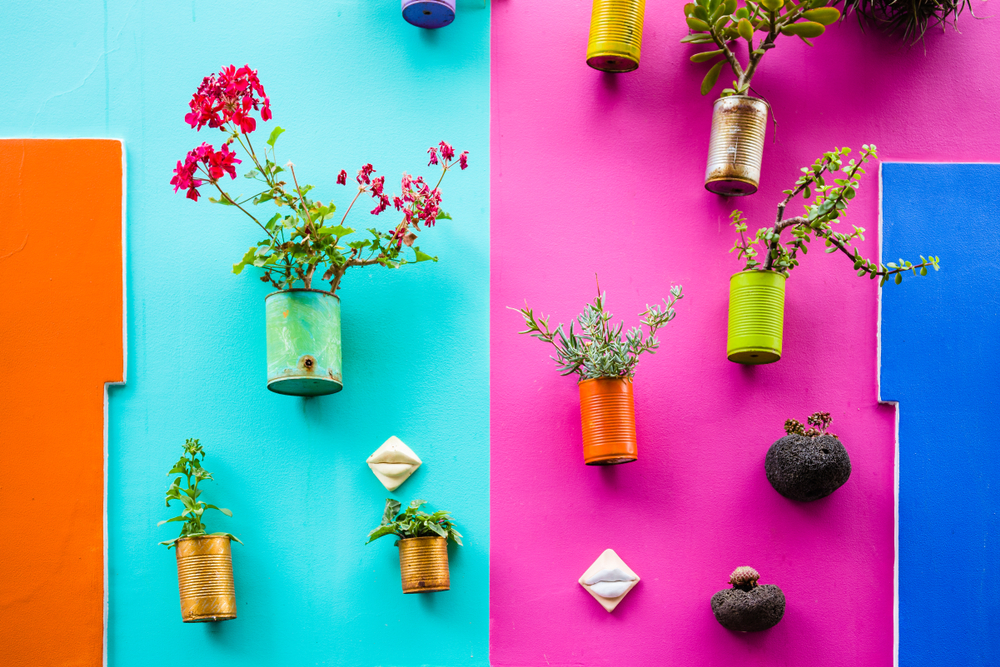
The Tin-Can Orchestra
Unlock the rhythm of growth in hanging tin-can planters. Reuse old cans by decorating and filling them with flowers or herbs. This sustainable practice echoes the values of repurposing with panache, bringing an eco-friendly beat to the gardening experience.
How to Create Dazzling Hanging Tin-Can Planters: A Step-by-Step Guide for UK Gardening Enthusiasts
Hello, fellow green thumbs! Today, we're embarking on a creative journey that'll add a splash of colour and life to your garden or balcony. We're going to transform ordinary tin cans into extraordinary hanging planters! This fun-filled project is not only environmentally friendly but also a fantastic way to get your little ones excited about gardening. So, let's roll up our sleeves and dive into the world of DIY gardening!
 Materials Needed:
- Clean, empty tin cans (any size will do!)
- Acrylic paint in various colours (Buy Today, Delivered Tomorrow)
- Paintbrushes (Buy Today, Delivered Tomorrow)
- Drill with a small bit
- Garden twine or sturdy string (Buy Today, Delivered Tomorrow)
- Potting soil and plants (succulents or herbs work great!) (Buy Today, Delivered Tomorrow)
- Prepare Your Cans: Start by making sure your tin cans are clean and free from any sharp edges. If necessary, use a file to smooth down any rough spots.
- Drill Drainage Holes: Next, carefully drill a few drainage holes in the bottom of each can. This will ensure that your plants don't become waterlogged.
- Unleash Your Creativity: Now comes the fun part! Grab your acrylic paints and let your imagination run wild. Paint each can in vibrant colours, patterns, or whatever designs you fancy. Don't forget to let your children have a go too!
- Let Them Dry: Once you've finished painting, set your cans aside to dry completely. This should take about 2-3 hours.
- Drill Hanging Holes: Once dry, drill two holes near the top of each can on opposite sides. Then thread a length of garden twine or sturdy string through the holes to create a hanger.
- Plant Time: Fill each can about two-thirds full with potting soil, then plant your chosen plants. Succulents or herbs are excellent choices for these hanging planters!
- Hang Them Up: Finally, find a sunny spot in your garden or balcony and hang up your new planters. Make sure they're secure and within easy reach for watering.
And voila! You've just created your very own hanging tin-can planters. Not only have you given a second life to something that would have ended up in the recycling bin, but you've also added a unique touch of charm and colour to your outdoor space. Plus, you've spent a fun afternoon crafting with your kids!
So, let's continue to transform our green spaces into vibrant places of joy and creativity. Remember, every tin can is a blank canvas waiting to be turned into a masterpiece. Happy gardening, UK friends!
Veg Patch in a Pot
Cultivate a deeper understanding of where food comes from by growing vegetables in containers. Cherry tomatoes, radishes, or carrots are all within the realm of possibility and provide a tangible lesson in the care and time it takes to grow the food that sustains us.
How to Create a Mini Veg Patch in a Pot: A Step-by-Step Guide for UK Gardening Enthusiasts
Hello, budding gardeners! Today we're embarking on an exciting horticultural adventure that's perfect for little hands and big imaginations. We're going to create our very own mini veg patch in a pot! This project is not only educational but also a fantastic way to get your children excited about healthy eating and nature. So, let's dive in!
 Materials Needed:
- Large container or pot (with drainage holes) (Buy Today, Delivered Tomorrow)
- Good quality potting soil mix (Buy Today, Delivered Tomorrow)
- Vegetable seedlings or seeds (e.g., tomatoes, lettuce, radishes, or carrots) (Buy Today, Delivered Tomorrow)
- Watering can (Buy Today, Delivered Tomorrow)
- Choose Your Container: Start by choosing a large container or pot with drainage holes. This will be your mini veg patch. Make sure it's deep enough to accommodate the roots of your chosen vegetables.
- Prepare Your Pot: Fill your container with good quality potting soil mix, leaving about an inch of space from the top. This type of soil is perfect for container gardening as it provides the right balance of nutrients for your plants.
- Plant Your Veggies: Now it's time to plant your veggies! You can use seedlings or seeds, depending on the age of your children and how quickly they want to see results. Tomatoes, lettuce, radishes, and carrots are all great choices for a mini veg patch. Remember, when planting tomato plants, plant them a bit deeper than they were in their original pot, covering the lowest pair of leaves.
- Water Wisely: After planting, give your mini veg patch a good watering. However, be careful not to overwater - the soil should be moist but not waterlogged.
- Watch Them Grow: Place your mini veg patch in a sunny spot and watch your veggies grow! Teach your children to check the soil regularly. If it feels dry to touch, it's time to water.
- Harvest Time: Once your vegetables have grown to their full size, it's time to harvest. This is arguably the most exciting part for kids - pulling their homegrown veggies straight from the pot!
And there you have it, your very own mini veg patch in a pot! This project not only teaches children about the life cycle of plants but also encourages healthy eating habits. Plus, there's nothing quite like the taste of homegrown veggies.
So, let's continue to sow the seeds of knowledge and nurture our love for nature. Remember, every pot is a miniature garden waiting to burst into life. Happy gardening, UK friends!
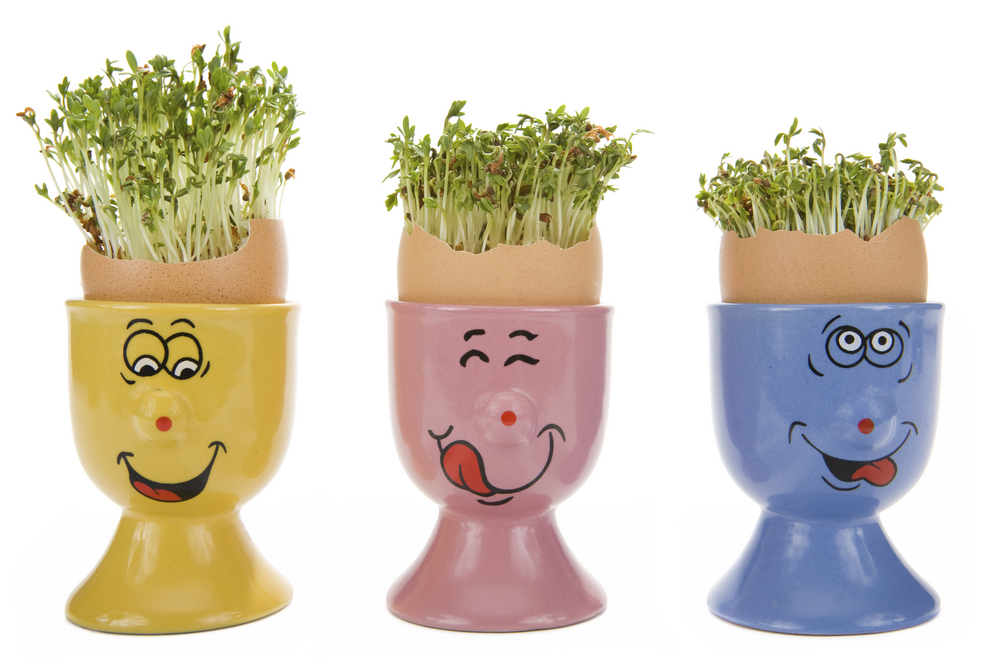
The Cress Hair Salon
Quick-growing and virtually instant, cress heads are an old-time classic that's perfect for today's budding gardeners. With a little soil, some seeds and a smattering of imagination, children can give their cress-planted pots 'haircuts' as they learn about germination and plant growth.
How to Create a Quirky Cress Hair Salon: A Step-by-Step Guide for UK Gardening Enthusiasts
Hello, enthusiastic gardeners! Today we're going to embark on an entertaining and educational journey that's perfect for your little ones. We're creating a quirky cress hair salon! This delightful project is not only a fantastic introduction to gardening for children but also a great way to spark their creativity. So, let's roll up our sleeves and dive into the world of green hairdos!
 Materials Needed:
- Empty eggshells or small, shallow containers
- Permanent markers (Buy Today, Delivered Tomorrow)
- Cotton wool (Buy Today, Delivered Tomorrow)
- Cress seeds (Buy Today, Delivered Tomorrow)
- Spray bottle filled with water (Buy Today, Delivered Tomorrow)
- Prepare Your 'Heads': Start by cleaning out your eggshells or containers. These will serve as the 'heads' for your cress hair salon. If you're using eggshells, try to remove the top third of the shell so you have enough room for the cress to grow.
- Craft Your Characters: Now, it's time to unleash your creativity! Use permanent markers to draw faces on your eggshells or containers. You can make them as simple or as detailed as you like. Remember, these are your salon customers, waiting for their cress hair to grow!
- Create a Comfy Bed: Next, fill each 'head' with cotton wool. This will act as the bed for your cress seeds. Make sure it's packed in well but not too tight - your seeds need room to sprout!
- Sow Your Seeds: Sprinkle a generous amount of cress seeds onto the cotton wool in each 'head.' There's no need to cover them with more cotton wool; they germinate best when exposed to light.
- Water Wisely: Using your spray bottle, gently mist the seeds and cotton wool until it's thoroughly damp but not waterlogged.
- Wait for the Magic: Place your 'heads' in a sunny spot and wait for the magic to happen. You should start to see sprouts within a couple of days. Remember to keep the cotton wool moist by spraying it with water every day.
- Style That Hair: After about a week, your cress hair should be long enough to style! Your children can have fun giving their characters haircuts and creating funky hairstyles.
And there you have it - your very own cress hair salon! This whimsical project not only teaches children about the life cycle of plants but also encourages them to think creatively and have fun with gardening.
So, let's continue to cultivate our love for nature and nurture our green thumbs. Remember, every seed is a potential masterpiece waiting to spring to life. Happy gardening, UK friends!
Our green-fingered children will not only cultivate plants but also virtues like patience, responsibility, observation, and nurturing. The wonder of seeing something grow from a tiny seed or cutting, under their care, can be a profound experience. And who knows? Today's playtime in the dirt could lead to tomorrow's environmentally conscious adult, ready to take on the world in full bloom.
In every gardening venture, no matter how small, remember the ultimate goal: to instil a reverence for life and the natural cycles that sustain it. Encourage questions, foster exploration, and reap the bountiful harvest of knowledge and joy that comes from gardening. Spring into action, and turn those little thumbs a vibrant shade of green!