
From Soil Testing to Compost: Building a Thriving Garden Foundation
Welcome to the enchanting world of gardening, a realm where each tiny seed carries the immense promise of growth, beauty, and bountiful harvests. As you stand eager to plant these seeds and bring your garden to life, remember, there's an unseen hero beneath your feet, quietly awaiting its moment of recognition – the soil of your garden. This isn't just any dirt; it's the foundation upon which your garden's health, vitality, and productivity rest.
For beginner gardeners embarking on their horticultural journey and green-thumbed enthusiasts looking to deepen their connection with nature, understanding the soil in your garden transcends mere benefit; it's absolutely essential. Knowing its texture, nutrient content, and pH level can transform your gardening practice from a game of chance into a science, empowering you to make informed decisions that will encourage your garden to thrive in ways you've only imagined.
Have you ever wondered what truly lies beneath the surface of your garden? Understanding your garden's soil is akin to unlocking the secret to a thriving, lush green space.
Our latest guide is a treasure trove of wisdom for anyone starting on their gardening adventure, shedding light on the mysteries of soil type, texture, and structure.
The Vital Role of Soil in Gardening
Imagine trying to build a house without inspecting the land it's to stand on. Just as the foundation is crucial to the house, the soil is the bedrock of your garden. It supports your plants, offering them nourishment, a drinking source, and a firm place to anchor their roots. But not all soil is created equal, and the secret to a thriving garden lies in understanding and nurturing your soil.
In the heart of every garden, beneath the vibrant blooms and lush foliage, lies the unsung hero of horticultural success: the soil. This humble earth is more than just dirt; it's a bustling metropolis of nutrients, organisms, and minerals, each playing a vital role in the health and beauty of your garden. It's the stage upon which the drama of growth unfolds, where roots reach deep to anchor and draw sustenance, and where the magic of photosynthesis begins.
The Essence of Soil
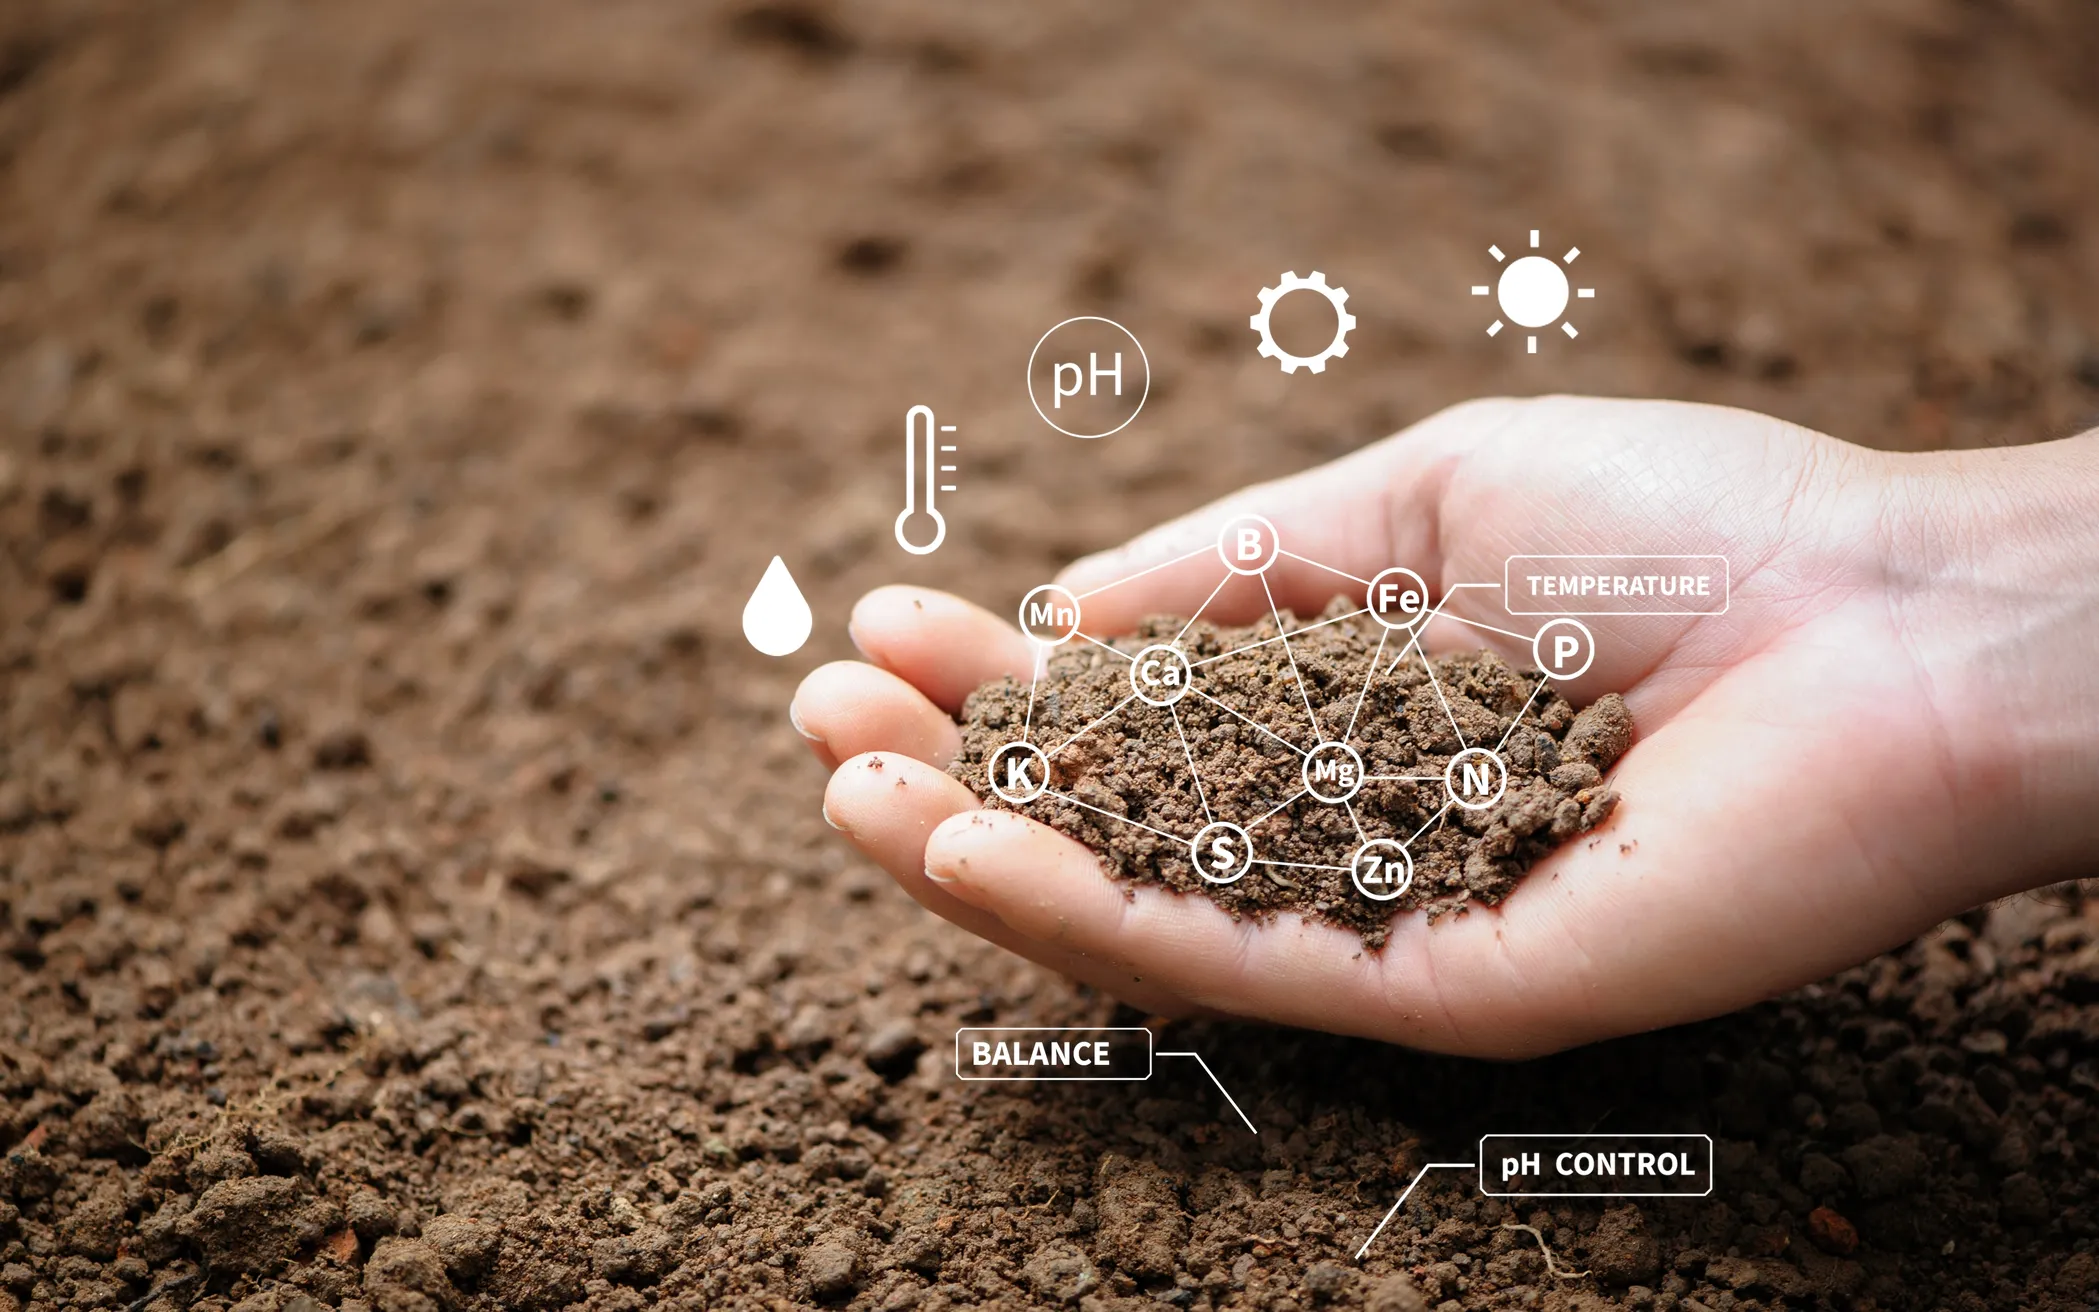
To truly grasp the importance of soil in gardening, we must first understand its composition. Soil is a living tapestry woven from organic matter, minerals, gases, liquids, and countless microorganisms. Each component interlocks in a delicate balance, creating an environment ripe for plant life.
The Cast of Nutrients
Just as we need a balanced diet to thrive, plants rely on a mix of essential nutrients found in their soil. Nitrogen, phosphorus, and potassium often take leading roles, supported by a cast of secondary characters like calcium, magnesium, and sulfur. These nutrients are the key to vigorous growth, robust health, and bountiful yields.
Water and Air: The Lifeblood of Soil
The spaces between soil particles are the veins through which water and air flow, providing hydration and oxygen to plant roots. Too much clay, and the soil becomes a waterlogged wasteland; too sandy, and it cannot hold moisture long enough for roots to drink. Achieving that perfect loamy texture—rich, crumbly, and teeming with life—is the gardener's art.
pH: The Scale of Success
The pH level of your soil can unlock nutrients' availability or lock them away, rendering them inaccessible to your plants. Most garden plants flourish in slightly acidic to neutral soil (pH 6-7), where the broadest range of nutrients is available. Testing your soil's pH is akin to reading the script before the play, setting the stage for a successful performance.
Nurturing Your Soil
- Testing the Terrain: Begin with a simple test of your soil's texture, pH, and nutrient levels. Many garden centers offer kits, or you can engage the services of a local extension office for a more detailed analysis.
- Adding Organic Matter: Compost, leaf mold, or well-rotted manure enriches the soil, improving its structure, fertility, and water-holding capacity. This organic augmentation is like rehearsing your garden's performance, ensuring each plant can shine.
- Balancing the pH: If your soil's pH is off-key, amend it gently. Lime can raise acidic soil toward neutrality, while sulfur can lower the pH of alkaline soils. Proceed with care; sudden changes can disrupt the microbial harmony.
- Regular Aeration: Like aerating a wine, loosening the soil allows it to breathe, encouraging root growth and enhancing drainage. A garden fork can be your instrument for this task, puncturing the soil to invite air and water deeper into the earth.
- Mulching: A layer of mulch acts like a curtain, reducing water loss, regulating soil temperature, and suppressing weeds. Organic mulches even break down over time, contributing to the soil's nutrient content.
Monitoring the Results
Watch your plants for signs of soil health: strong growth, vibrant colors, and bountiful blooms or harvests. Like critical reviews after a play's debut, these indicators will tell you if your soil management practices are hitting the mark.
In the grand garden theatre, soil plays a pivotal role, supporting and nourishing the botanical performers. By understanding and nurturing your soil, you'll ensure that your garden remains a captivating show, season after season. The secret to a thriving garden, it turns out, lies not in the stars but in the soil beneath our feet.
Importance of Soil Testing for Gardeners
Imagine stepping into your garden, not just as a gardener but as a detective, piecing together clues that reveal the secrets beneath your feet. Soil testing is your magnifying glass, unveiling the hidden mysteries of your garden's very heart and soul. In the diverse landscape of the UK, where each garden tells its own story through the soil it's rooted in, understanding that narrative becomes crucial. Whether you're nestled in the sandy soils of Cornwall or atop the heavy clays of Yorkshire, a soil test serves as your first step towards cultivating a garden that's not just alive, but thriving.
Unearthing the Secrets: The Why and How of Soil Testing
A soil test provides a snapshot of the current health status of your garden's soil. This isn't just about knowing your soil type; it's about understanding its nutrient levels, pH, and more. Here’s how it sets the stage for gardening success:
- Nutrient Profile: Like diagnosing a patient, a soil test identifies nutrient deficiencies that could stunt your plants' growth. It's about feeding your garden precisely what it needs.
- pH Levels: Discover whether your soil is more Jane Austen (acidic) or Charles Dickens (alkaline), setting the scene for which plants will thrive under your care.
- Tailored Amendments: Armed with knowledge, you can adjust your soil conditions to meet the needs of your dream garden, whether that means adding lime to sweeten acidic soil or sulphur to temper alkaline earth.
Step-By-Step Guide to Soil Testing
- Gather Your Tools: You'll need a clean bucket, a garden trowel, and either a home testing kit or the details of your local soil testing service.
- Collect Samples: Dig several small holes, about 6-8 inches deep, from various parts of your garden. Mix these samples together in your bucket to get a representative blend of your garden's soil.
- Test at Home or Send It Off: Use your home testing kit following the instructions closely or send your sample to a professional service for a detailed analysis.
Interpreting the Tales Told by Your Soil
When the results come in, it's like reading a map to buried treasure. Each number and indicator points towards actions you can take to enrich your soil:
- Nutrient Adjustments: If nitrogen is low, consider adding composted manure. Low potassium? Wood ash or kelp meal might be the answer.
- pH Corrections: Lime can raise an acidic pH, while sulphur lowers an alkaline one, creating the perfect environment for your plants to flourish.
- Organic Matter: Regardless of your soil type, incorporating organic matter like compost can improve structure, water retention, and nutrient availability.
From Testing to Triumph
With the wisdom gleaned from your soil test, you're ready to turn challenges into victories. Tailoring your gardening strategies according to the specific needs of your soil can lead to lush lawns that feel like walking on clouds, vegetable patches that become the envy of your neighbourhood, and flower beds that look as though they've been painted into existence.
Remember, soil testing isn't just a one-time affair; it's an ongoing dialogue with your garden. Regular testing every few years keeps you attuned to the evolving needs of your soil, ensuring that your garden continues to grow and change, just as any great story does.
In the end, a soil test is much more than a simple check-up; it's the foundation upon which all successful gardens are built. By starting your gardening adventure with this crucial step, you're not just growing plants; you're nurturing a thriving ecosystem right in your backyard.
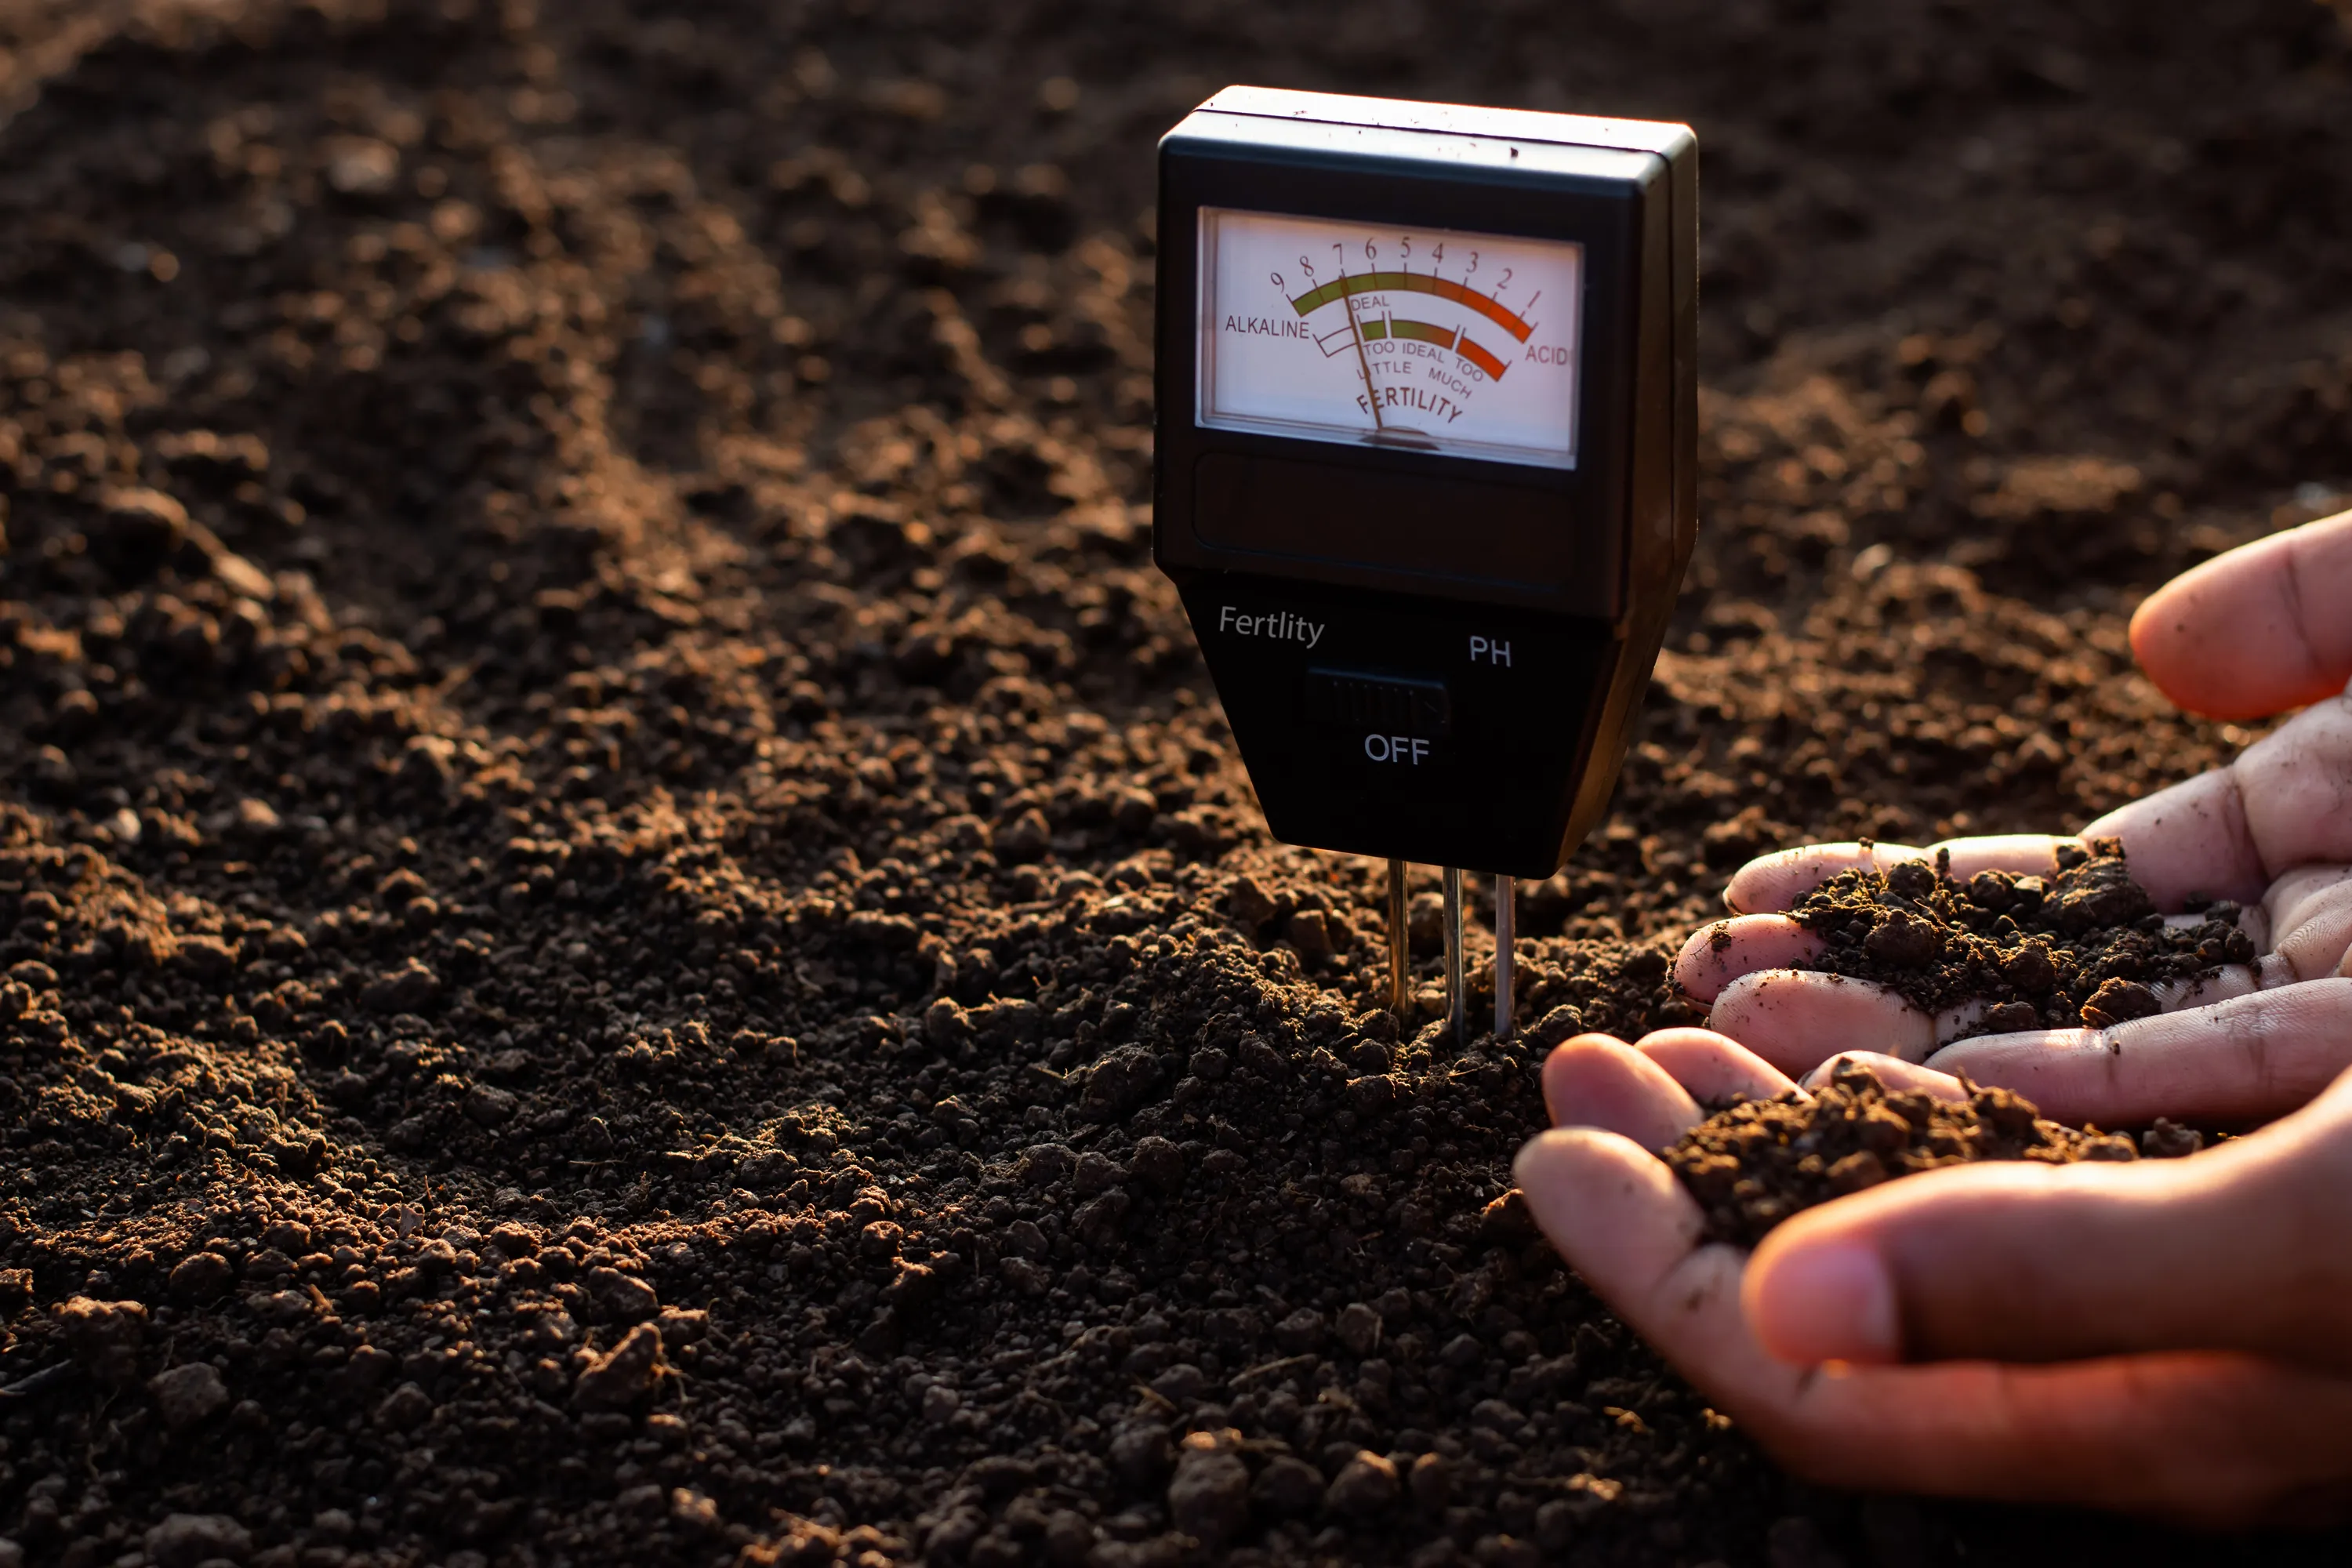
How to Perform a Basic Soil Test at Home
You don't need to be a scientist to perform a soil test. With DIY kits available online and at garden centres, you can easily assess your soil's pH level and nutrient balance. Simply follow the kit's instructions to collect a soil sample and wait for the magic to happen. Observing the change in colours can be quite an enchanting experience itself!
Step 1: Gather Your Kit and Tools
Your adventure begins with acquiring a DIY soil test kit. These handy kits are readily available online or at your local garden centre, inviting you into the fascinating world of soil science. Along with your kit, arm yourself with a clean trowel, a bucket, and perhaps a notebook to jot down your observations and results.
Step 2: Collect Your Soil Samples
Don your detective hat and head out into your garden. You’ll want to collect soil from several locations, especially if you have different areas for flowers, vegetables, or lawns. Dig a few inches down – about 6-8 inches is perfect – and collect a small sample. Mix these samples together in your bucket. This mixture will tell the story of your garden’s overall soil health.
Step 3: Prepare Your Sample
Following your soil test kit’s instructions, prepare your soil sample. This usually involves drying out the soil and removing any stones, roots, or debris. The cleaner your sample, the more accurate your reading will be.
Step 4: Perform the Test
Now, for the magical part! Add your soil sample to the provided test containers, mix with water (distilled water is best for accuracy), and add the chemicals from the kit. Watch as the solution changes colour – it’s like a potion revealing its secrets. Each colour corresponds to different pH levels or nutrient contents, depending on the specific test you’re performing.
Step 5: Decipher the Results
Refer to the colour chart included in your kit to interpret the results. The changes in colour will tell you whether your soil is acidic, neutral, or alkaline, along with levels of key nutrients like nitrogen, phosphorus, and potassium. These insights are the keys to unlocking the potential of your garden.
Step 6: Take Action
With your newfound knowledge, you can now tailor your gardening practices to suit the needs of your soil. Need to adjust the pH? Lime can sweeten acidic soil, while sulphur can help lower the pH of alkaline soil. Nutrient deficiencies can be addressed with specific fertilizers or organic matter like compost.
Step 7: Keep a Record
Document your findings and actions. This record will serve as a valuable reference, guiding your future gardening adventures and helping you track the progress of your soil’s health over time.
Performing a soil test at home is not just a step towards a healthier garden; it's an invitation to connect more deeply with the natural world right beneath your feet. It’s a process filled with wonder, discovery, and the promise of lush, vibrant growth. As you unlock the secrets of your soil, you’re not just cultivating plants – you're nurturing a living, breathing ecosystem that will reward you with bountiful blooms, delicious harvests, and a garden teeming with life. Happy gardening!

Interpreting the Results: Understanding pH, Nutrients, and Texture in Depth
The results from your soil test uncover a wealth of information that is invaluable for any gardener or farmer. Understanding the pH level of your soil is the first step, as it reveals how acidic or alkaline the soil is. This insight is crucial for planting because different plants have specific pH levels at which they flourish. For example, blueberries thrive in more acidic soil, while cabbages prefer a more alkaline environment.
The nutrient profiles obtained from the soil test are equally telling. They indicate whether your soil is deficient in essential nutrients like nitrogen, phosphorus, or potassium – each playing a pivotal role in plant health. Nitrogen is vital for leaf growth, phosphorus for roots and flowers, and potassium for overall vigor.
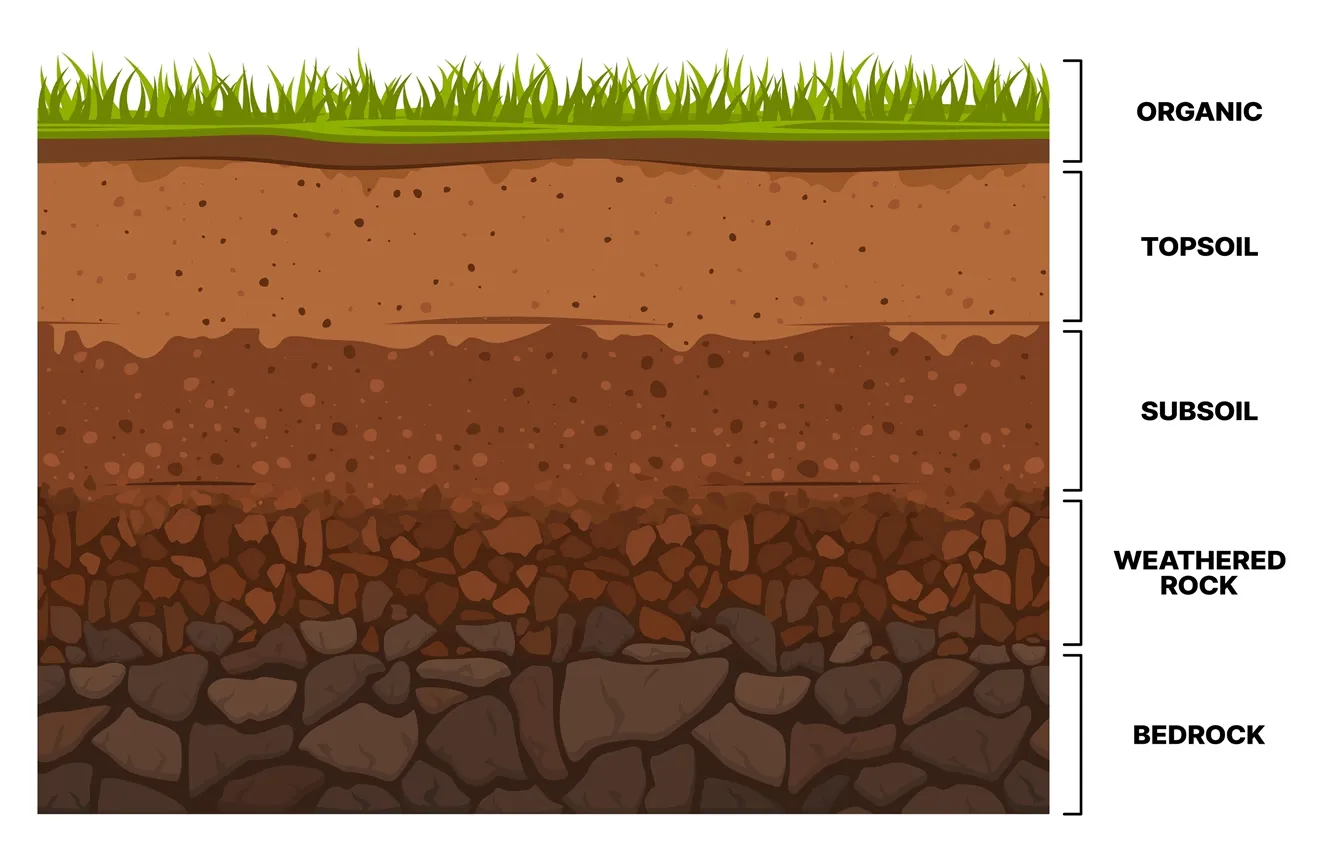
Lastly, the texture of your soil, whether it's sandy, clay, or loamy, provides key information about its drainage capabilities and nutrient retention. Sandy soil drains quickly but doesn't hold nutrients well, making it challenging for plants that require constant moisture. Clay soil, conversely, retains water and nutrients much better but can become waterlogged and hard for roots to penetrate. Loamy soil, a balanced mix of sand, silt, and clay, is often considered the ideal gardening soil because it holds moisture and nutrients well while still providing good drainage.
By diving into the details provided by your soil test, you can make informed decisions about what to plant, how to amend your soil, and the best ways to care for your garden or farm to ensure a bountiful harvest.
Types of Soil Amendments: Organic vs. Synthetic
Understanding your soil's composition is the first step in optimizing your garden's health. Once you've unlocked the secrets of your soil's needs, the next move is to choose the right soil amendments to enhance its quality. Organic amendments such as compost, manure, or leaf mould are invaluable for improving soil structure, enriching the soil with essential nutrients, and encouraging the proliferation of beneficial microbes that support plant growth. These natural options not only nourish the plants but also contribute to the long-term health of the soil ecosystem.
On the other hand, synthetic fertilizers offer a rapid solution to nutrient deficiencies, providing plants with an immediate boost of essential chemicals. However, it's crucial to weigh the pros and cons of synthetic options. While they can significantly improve plant growth and yield in the short term, their long-term effects on soil health and environmental sustainability might not be as beneficial. When choosing between organic and synthetic soil amendments, consider the long-term sustainability of your garden and the overall health benefits to both plants and the soil ecosystem.

Step-by-Step Guide to Amending Your Garden Soil
Transforming your garden's soil into a rich, nurturing foundation for your plants is akin to preparing a lavish feast for esteemed guests. It's about creating an environment where your plants can thrive, bloom, and yield bountifully. Amending your garden soil is a vital step in this process, ensuring that every seedling and root has access to the nutrients, moisture, and support it needs to grow strong and healthy. Here's how to enrich your garden's soil, step by step, turning it into a paradise for your plants.
Step 1: Choose Your Perfect Amendment
First, consider what your garden truly needs. Is it more organic matter to boost nutrient levels and improve texture? Perhaps compost or well-rotted manure will do the trick. For improving drainage in heavy clay soils, coarse sand or perlite might be your best allies. Peat moss or coco coir can help sandy soils retain moisture. Selecting the right amendment is like choosing the ideal ingredients for a recipe; it sets the stage for everything that follows.
Step 2: Spread the Wealth
With your chosen amendment at the ready, it's time to spread a generous layer over your garden beds. Aim for about 2-4 inches of material, ensuring even coverage. This step is akin to laying out a welcome mat for your plants, offering them the nutrients and structure they need to grow.
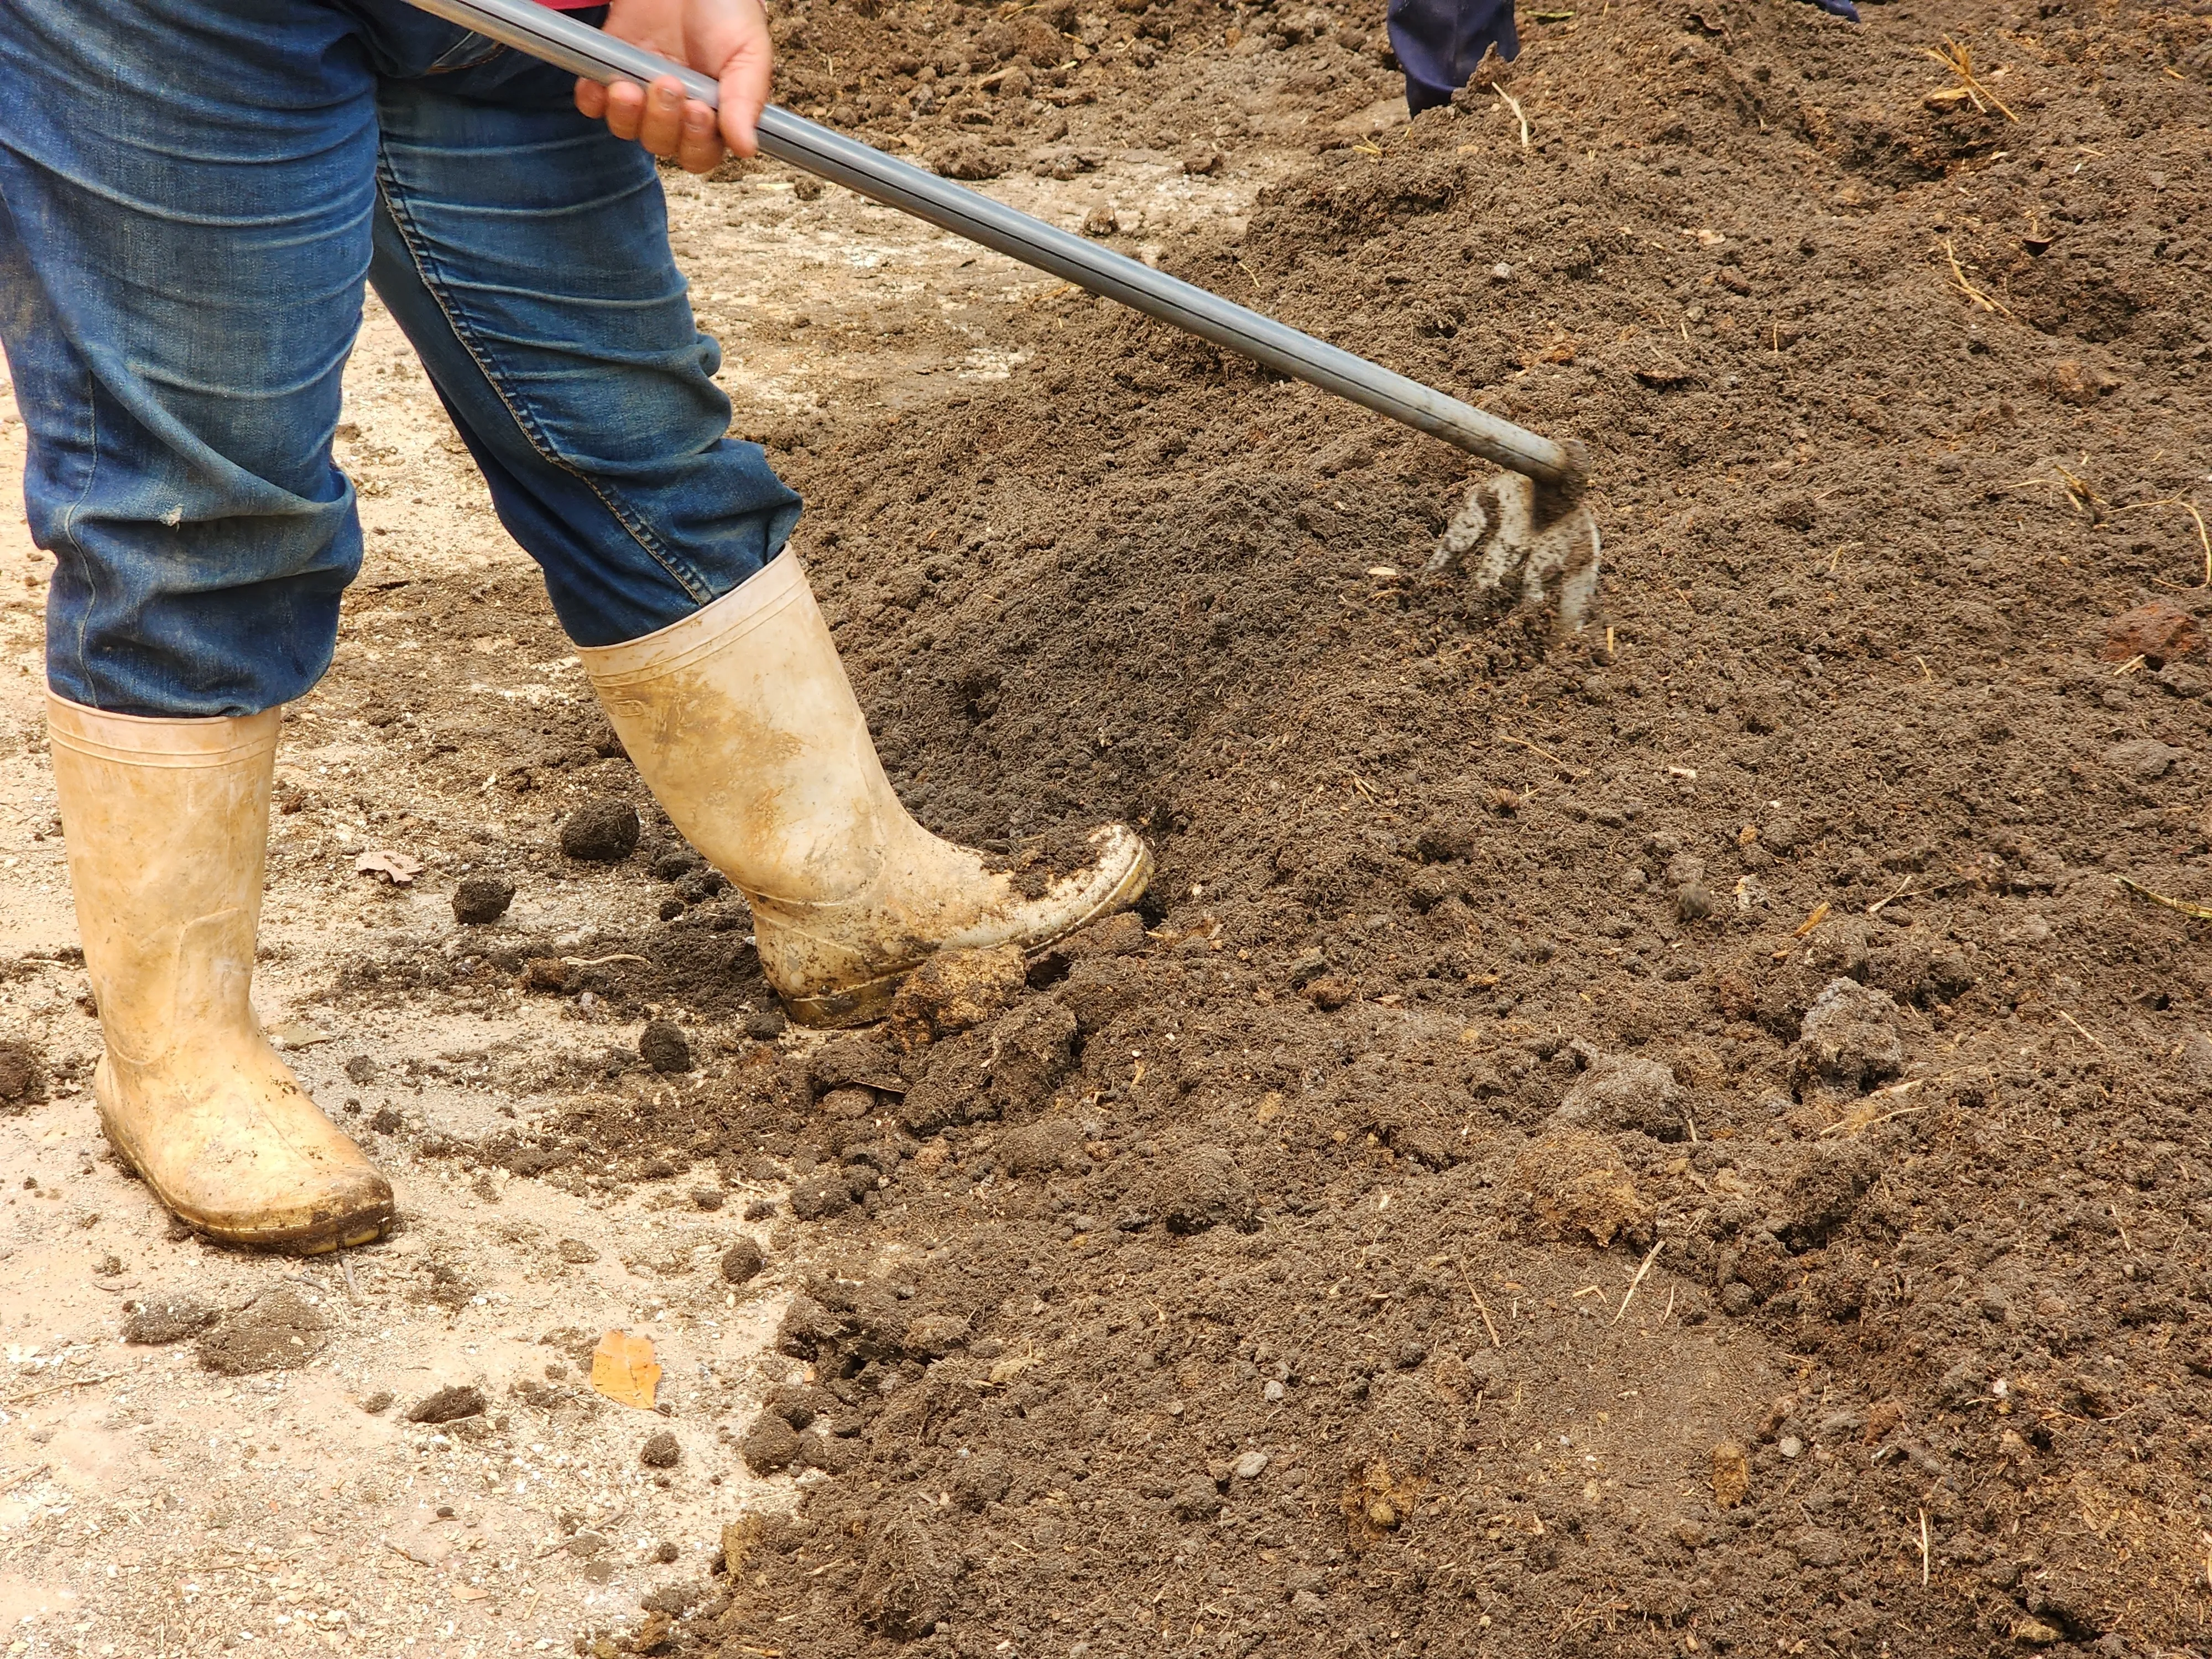
Step 3: Blend It Into the Soil
Now, grab your garden fork or tiller and gently mix the amendment into the top 6-8 inches of soil. This is where the magic happens, as you blend the old with the new, creating a harmonious mix that will support your plants. Be thorough but gentle; aim to integrate the amendment fully without disturbing the natural structure of the soil too much.
Step 4: A Gentle Watering
With the amendments now nestled into your garden bed, introduce them properly with a light watering. This helps to settle everything in place and starts the process of incorporating the organic matter into your soil. Think of it as lightly toasting a glass to celebrate the union of soil and amendment.
Step 5: Patience and Observation
Gardening is an art of patience and observation. After amending your soil, give it some time. Wait a few weeks as the organic matter begins to break down and integrate into the soil. This period allows the amendments to start working their magic, improving the soil structure and nutrient content.
Step 6: The Encore Performance - Testing
Once a few weeks have passed, perform another soil test. This will reveal how the amendments have altered the soil composition and whether additional adjustments are needed. Just like tweaking a recipe to perfection, adjusting your soil's condition is a process of trial and improvement.
Final Thoughts
Amending your garden soil is not just about adding nutrients; it's about creating a living, breathing ecosystem that sustains and supports your plants. With each step, you're not only nurturing your garden but also deepening your connection to the earth. It's a rewarding process that pays dividends in the form of lush foliage, vibrant blooms, and bountiful harvests. Remember, the most beautiful gardens are often the result of thoughtful preparation and care, starting from the ground up.

Seasonal Soil Maintenance for a Healthy Garden
Soil, much like the garden it supports, requires continuous attention and care to remain fertile and healthy. Engaging in regular practices such as seasonal aeration helps the soil breathe and absorbs water more efficiently, which is crucial for plant growth. Proper watering techniques, tailored to the needs of the specific season, ensure that plants receive the right amount of moisture without over-saturating the soil. Additionally, replenishing the soil with organic matter annually enriches it with essential nutrients, promoting beneficial microbial activity and improving soil structure. By adhering to these practices, gardeners can ensure their soil remains healthy, leading to a flourishing and vibrant garden. Remember, the foundation of a thriving garden is its soil health.
Conclusion: Empowering Beginners to Grow a Thriving Garden
Venturing into gardening might seem daunting at first, but understanding the foundation – your garden soil – places you on solid ground. Soil testing is the first step towards cultivating a space where plants flourish and produce bountifully. Remember, each gardening season brings with it a chance to learn, adapt, and grow both your garden and your skills.
By starting with the basics of soil testing and amending, you're not just planting seeds; you're sowing the seeds of knowledge that will bloom into a lifelong gardening passion. Welcome to the rewarding world of organic gardening in the UK, where your green adventure begins from the ground up.