
Propagating in March: A comprehensive list of hardwood and softwood cuttings that are best to start in March to produce healthy plants
Welcome, dear UK gardeners, to the enchanting world of propagation through cuttings! March stirs in the garden, a time of awakening and preparation. As the soil warms and the days lengthen, our thoughts turn to the propagation of our beloved plants. Today, we'll dive into the art and science of starting plants from hardwood and softwood cuttings, a rewarding venture that beckons with the promise of new growth.
Understanding Cuttings: Hardwood vs. Softwood
Hardwood Cuttings come from dormant, mature stems in late autumn to winter. They are called 'hardwood' because they are cut from the woody part of the plant that has hardened after a season of growth. These cuttings are generally more resilient and don't require a high humidity environment to root.
Softwood Cuttings, on the other hand, are taken from new, flexible, green growth in late spring to early summer. These cuttings are from the current year's growth and haven't yet developed a hard outer layer. They tend to root quickly but require more care to ensure they don't dry out.
Propagating plants from cuttings is not just about creating new life; it's a dialogue with the past and a promise for the future. It's about continuity and renewal.
The Ideal Candidates for March Propagation
As March rolls in, it's an opportune time to start with hardwood cuttings from the previous season's growth, as well as prepare for early softwood cuttings. Let's explore the best candidates for each type:
Hardwood Cuttings to Start in March:
-
Forsythia (Forsythia x intermedia)
- Climate: Thrives in temperate climates.
- Care: Plant in a mixture of sand and peat; keep moist. Forsythias root easily and will brighten your garden with vibrant yellow blooms.
Propagation of Forsythia is quite easy with semi-ripe cuttings, or simply a 30cm length of stem inserted into garden soil during the autumn or early winter. This needs to be ripened current season growth.
- Dogwood (Cornus spp.)
- Climate: Prefers cooler, moist climates.
- Care: Choose a well-drained spot or a pot with a gritty compost mix. Dogwoods are valued for their stunning winter stem colour.
Ah, the noble Dogwood (Cornus spp.), with its mesmerizing blooms and elegant stature, holds a special place in the hearts of UK gardeners. Whether it’s the Cornelian cherry dogwood (Cornus mas) that heralds spring with its yellow flowers or the striking red stems of the Cornus alba 'Sibirica' illuminating the winter landscape, Dogwoods have a charm that's hard to resist. So, let's embark on a delightful journey to propagate these beauties, ensuring your garden is graced with their presence for years to come.
- Step 1: Choose the Right Time The timing for taking Dogwood cuttings can vary depending on whether you're working with hardwood or softwood cuttings. For hardwood cuttings, late autumn to early winter is ideal, just as the tree enters dormancy. Softwood cuttings, however, should be taken in late spring or early summer when new growth is mature yet still tender.
-
Step 2: Preparing Your Cuttings
-
For hardwood cuttings:
- - Select a healthy stem from the current or previous year's growth, about the thickness of a pencil.
- - Cuttings should be 6-9 inches long, with a cut made just below a node (where leaves attach to the stem).
-
For softwood cuttings:
- - Choose new growth that is not too green or too woody. The cuttings should be 3-5 inches long.
- - Make your cut about an inch below a leaf set for optimal rooting potential.
-
For hardwood cuttings:
-
Step 3: Rooting Your Cuttings
- - Fill a pot with a gritty, well-draining compost mix. For softwood cuttings, ensuring high humidity is crucial, so consider using a propagator or covering the pot with a plastic bag with a few holes for ventilation.
- - Dip the cut end of your cuttings in rooting hormone to encourage root development. This step is more critical for hardwood cuttings.
- - Insert the cuttings around the edge of the pot. For hardwood cuttings, burying them two-thirds deep is sufficient. Softwood cuttings should be inserted deep enough to support themselves.
- - Water well and place the pot in a sheltered spot or cold frame. Softwood cuttings prefer indirect light, while hardwood cuttings are less fussy.
-
Step 4: Aftercare
Patience is key when propagating Dogwoods. Keep the soil moist but not waterlogged. For softwood cuttings, maintaining high humidity is essential, so mist regularly if not using a propagator.
Roots typically develop within a few weeks for softwood cuttings and by the next spring for hardwood cuttings. Once rooted, you can gradually acclimate them to outdoor conditions before planting them in their final position.
Final Thoughts
Propagating Dogwood is a wonderful way to multiply these striking plants, ensuring that their beauty continues to thrive in your garden. Whether you’re drawn to their spring blossoms or vibrant winter stems, each cutting holds the promise of new growth and new beginnings. So, arm yourself with patience and a sense of adventure, and watch as your garden transforms with each Dogwood that takes root, a testament to the cycle of life and the joy of gardening.
- Willow (Salix spp.)
- Climate: Adaptable, but loves wet conditions.
- Care: Willows root effortlessly. Stick cuttings in moist soil, and they're likely to grow. They’re fantastic for creating natural, living structures.
Ah, the enchanting willow tree, with its gracefully drooping branches and soothing, whisper-like rustle in the breeze, is a symbol of elegance and resilience in gardens across the UK. Propagating a willow tree is an adventure, a step into the art of creating life from a mere cutting, a testament to nature's incredible ability to regenerate and flourish. Let’s embark on this magical journey together, transforming a simple branch into a majestic willow tree.
The Magic of Willow CuttingsWillows are among the most willing of participants when it comes to propagation. Their branches, filled with natural rooting hormones, eagerly transform into new trees with just a bit of help from us. This process is not only simple but also incredibly rewarding.
Collecting Your Willow CuttingsThe best time to take willow cuttings is in late spring, when the tree is bursting with energy and growth. However, the forgiving nature of willows means you can take cuttings almost any time of the year, especially if you can provide them with enough water and care.
- 1. Select Your Branch: Look for a healthy, year-old branch, about 1 to 2 inches in diameter. A length of 1 to 6 feet is ideal, depending on how ambitious you feel and the space you have available.
- 2. Make Your Cut: Using sharp, clean pruning shears, make a clean cut at both ends of the branch. A diagonal cut at the bottom increases the surface area for rooting.
- 1. Prepare the Soil: Choose a spot with damp soil, as willows love moisture. If planting directly in your garden, ensure the area doesn’t dry out too often. Alternatively, you can start your cuttings in pots filled with a moist potting mix.
- 2. Planting: No rooting hormone is needed here—the willow’s natural abilities take care of that. Simply push the bottom 6 to 8 inches of your cuttings into the soil. If you’re planting multiple cuttings, space them about 2 feet apart to give each one ample room to grow.
- 3. Water Well: After planting, water the cuttings generously. Keeping the soil consistently moist is crucial for willow cuttings to thrive.
In the weeks following planting, ensure the soil remains moist. The magic of willow propagation is evident fairly quickly, with cuttings beginning to root and leaf out within just a few weeks. As they grow, you can reduce watering slightly, but remember, willows are lovers of water, so never let them dry out completely.
Watching Your Willow FlourishAs your willow begins to establish itself, it's a beautiful reminder of the cycle of life and the joy of gardening. From a simple cutting, you’ve given birth to a stunning tree that will grace your garden with beauty and tranquility for years to come.
Propagating willows is not just gardening; it’s an act of creation, a dialogue with nature, and a journey filled with anticipation and excitement. So, as your willow grows, remember the simple cutting it once was and marvel at the wonders of nature’s resilience and regenerative power. Happy gardening!
- Ribes (Ribes sanguineum)
- Climate: Fares well in most UK climates.
- Care: Plant in a light, sandy soil mix. Ribes, with their lovely spring blossoms, are a delight.
- 1. Preparation of Cutting Select a healthy, vigorous branch from the current year's growth. Look for stems that are about pencil-thickness. Using clean, sharp secateurs, cut a section approximately 6-8 inches long. Ensure your cutting includes at least three sets of leaves at the top. Remove the lower leaves to expose a few inches of stem, which will be planted into the soil. This helps to prevent rot and encourages root formation.
- 2. Choosing the Right Medium For Ribes sanguineum, a well-draining propagation medium is key. A mix of two parts peat-free compost and one part perlite or horticultural sand ensures the perfect balance of moisture retention and drainage. Fill a pot with your prepared mix, ready to welcome the new cutting.
- 3. Planting Your Cutting Dip the cut end into rooting hormone powder or gel. This step is optional but can enhance rooting success. Make a hole in the propagation medium with a dibber or a pencil to avoid damaging the cutting when planting. Insert the cutting into the medium, ensuring at least two nodes (where the leaves were removed) are below the surface. Firm the medium around the cutting to secure it in place. Water gently to settle the medium around the cutting.
- 4. Creating the Right Environment Cover the pot with a clear plastic bag or place it in a propagator. This mini greenhouse effect maintains humidity around the cutting, crucial for root development. Position the pot in a bright spot but away from direct sunlight, which can overheat and stress the cutting.
- Rose (Rosa spp.)
- Climate: Most varieties are temperate climate lovers.
- Care: Use a potting mix rich in organic matter; ensure good drainage. Roses can be a bit more challenging but oh-so-rewarding.
Ah, the rose – queen of the garden, muse of poets, and symbol of love and beauty across centuries. Cultivating roses from cuttings is not just gardening; it's an act of creation, a way to weave history, fragrance, and color into the tapestry of your garden. Whether you're nestled in the rolling hills of the Cotswolds or in the heart of bustling London, let's embark on this enchanting journey to propagate your very own rose plants. With enthusiasm and expertise, I'll guide you through each step, ensuring that your roses thrive and flourish.
Taking the Cutting- Preparation: Clean your pruning shears with alcohol to prevent disease spread.
- Cutting: Select a 6-8 inch section of stem, cutting at a 45-degree angle just below a leaf node (where leaves attach to the stem).
- This angle increases the surface area for rooting and water intake.
- Prepping the Cutting: Remove the leaves from the lower half of the cutting to prevent moisture loss. You may dip the cut end in rooting hormone to increase success rates.
- Temperature: Rose cuttings thrive at temperatures between 18-24°C (65-75°F). Use a heat mat if necessary to maintain this temperature range.
- Lighting: Bright, indirect light is ideal. Avoid direct sunlight, which can scorch the cuttings.
- Humidity: High humidity is crucial. Cover the cuttings with a plastic bag or place them in a propagation dome to maintain moisture.
- Planting: Insert the cutting into the prepared soil mix, ensuring at least two nodes are buried. Water gently to settle the soil around the cutting.
- Care: Keep the soil consistently moist but not waterlogged. Ventilate occasionally to prevent mold growth.
- Root Development: In 4-8 weeks, roots should begin to form. Gradually acclimatize the new plants to outside conditions before planting in their final location.
- Fertilizers: Once established, feed your roses with a balanced, slow-release fertilizer to encourage healthy growth. Complement with organic matter like compost to enrich the soil.
- Watering: Roses prefer deep, infrequent watering to encourage strong root development. Allow the soil to dry slightly between watering.
- Pruning: Regular pruning maintains plant health and vigor. In late winter, prune to shape the plant and remove any dead or diseased wood, encouraging fresh growth in spring.
By following these steps, you invite not just a plant, but a story into your garden. Each bloom that unfurls in the sun is a testament to patience, care, and the magic that hands can create from the soil. So, don your gloves, sharpen your shears, and let the symphony of scent and colour begin. Happy gardening!
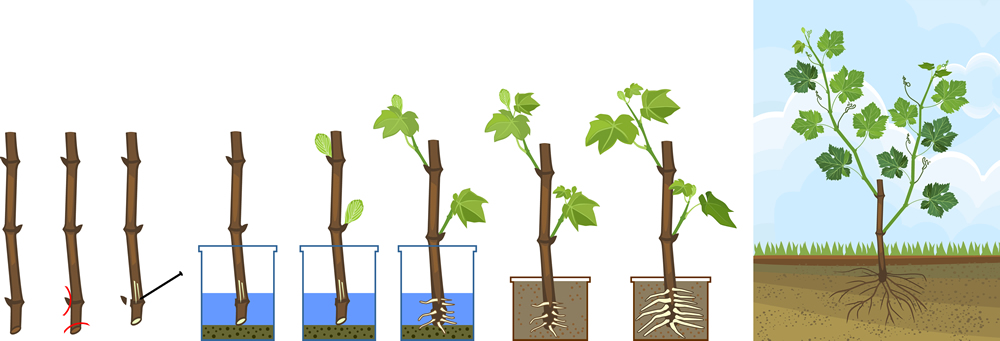
Growth stages from propagule (stem cutting) to young rooted grapevine plant
Preparing for Softwood Cuttings:
While softwood cuttings are typically taken later in the spring, March is the perfect time to prepare. Gather materials and plan for these beauties:
-
Lavender (Lavandula spp.)
- Ideal Climate: Loves full sun and well-drained, sandy soil.
- Care: Use a sharp knife to take cuttings and plant in a light, gritty compost. Lavender requires patience but rewards with aromatic foliage and flowers.
Propagating lavender can be a rewarding experience, offering a way to multiply your beautiful and fragrant plants. Here's how to do it, from gathering materials to monitoring the progress of your new lavender plants.
Taking Lavender Cuttings from an Established Plant:- Timing: The best time to take cuttings is in late spring or early summer when the plant is actively growing.
- Selection: Choose healthy, non-flowering stems from the current or last year's growth.
- Cutting: With your clean, sharp shears, cut a 3-4 inch portion of the stem. Make the cut just below a leaf node (where leaves emerge).
- Trimming: Remove leaves from the bottom half of the cutting to expose the nodes where roots will form. If using rooting hormone, dip the cut end into the powder to encourage root growth.
- Planting: Fill your pots with the prepared potting mix and water lightly. Make a hole in the center of the mix with a pencil or your finger, and insert the cutting about 1-2 inches deep. Gently firm the soil around the cutting.
- Soil: Well-draining, slightly alkaline.
- Moisture: Keep the soil consistently moist but not waterlogged. Covering the pot with a plastic bag or using a propagation dome can help retain humidity.
- Light: Place the cuttings in a bright location but out of direct sunlight to prevent them from drying out too quickly. Temperature: Lavender cuttings thrive at temperatures between 65°F and 75°F (18°C to 24°C).
- Hydrangea (Hydrangea spp.)
- Ideal Climate: Prefers partial shade and moist, fertile soil.
- Care: Keep the cuttings in a humid, bright spot without direct sunlight. Hydrangeas add a splash of old-world charm to any garden.
- Fuchsia (Fuchsia spp.)
- Ideal Climate: Thrives in cooler climates with plenty of moisture.
- Care: Ensure high humidity and indirect light for rooting. Fuchsias are truly versatile, offering both hanging and shrub forms.
- Geranium (Pelargonium spp.)
- Ideal Climate: Enjoys warm, sunny spots and well-draining soil.
- Care: Use a sterile, sandy compost mix and keep moist. Geraniums are drought-tolerant once established, flaunting vibrant colors all summer.
Tools and Materials You’ll Need:
- Sharp Pruning Shears or Knives: Ensure they're clean to prevent disease spread.
- Rooting Hormone: This helps stimulate root growth, especially useful for hardwood cuttings.
- Pots or Trays: Filled with a suitable growing medium such as a mix of perlite, vermiculite, and peat moss.
- Plastic Bags or a Propagator: To maintain humidity around softwood cuttings.
- Labels: Never underestimate the importance of labeling your cuttings with names and dates.