Country Versions | Great Britain Flag | USA Flag | Canada Flag
GardenSeeker.Co.Uk Pruning Businesses Search Gardening Gifts

How to, and When do you Prune Fuchsias

Pruning Fuchsias

Fuchsia Mini Rose full of flowers

Fuchsia plants can often look after themselves quite well without any form of pruning. They are naturally floriferous and are rarely without flowers in the summer months. However, to get the best shape and even more flowers than normal a regular pruning (snipping) regime is beneficial in younger plants. Basically, the more shoots or branches your Fuchsia has, the more flowers it will be able to produce.

Firstly, determine what type of Fuchsia you have. This is not always easy with very young plants bought from the garden centre or nursery because a bush and trailing Fuchsia will look very similar with just a few shoots and leaves. Standard Fuchsias of course are very recognisable! Hopefully you can trust the plant label, which should tell you if it is a trailing, bush or hardy fuchsia.

Older flowering plants of Fuchsias will be seen to be either bush or trailing by their habit of growth. Some are borderline plants, between bush and trailing.


Pruning Hardy Fuchsias

Fuchsia-stem

Hardy type Fuchsias are normally pruned on a once-off basis right at the start of the growing season preferably after the hardest of frosts have finished and once the new grow just starts to appear after the winter die-back.

Very little by way of finesse or horticultural expertise is required. Simply cut the bush right back hard near to ground level or to a basic frame of any Fuchsia that you might have been training for some reason. They are normally grown as bushy shrubs.

New shoots will soon start to emerge at the base, and are hardy enough to withstand a few late frosts maybe with as little foliage browning. No need to worry it will grow well as soon as normal gardening season starts. Hardy by name and description; hardy by nature.

That is it. I have cut back older Fuchsias with a pair of loppers, or pruners, and also rendered a younger shrub to the ground with a hedge trimmer. Same result; it soon starts to grow and retain the original height but with fresher, more floriferous foliage. Clear up the old branch prunings. Job done!

Bush Fuchsia Pruning

  • These are the half hardy small perennial that are normally bought each year in early spring or re-grown from over-wintered plants.
  • For young plants, a little formative pruning is good to ensure a bushy plant which will have plenty of scope to produce flowers. Essentially, the more shoots or branches; the more flowers will be produced.
  • No special tools are required other than a pair of snippers, a sharp knife (carefully) or finger nails.

New Fuchsia Plants

Young Fuchsia Plant after pruning

If your new Fuchsia is just a new central stem with few if any side shoots maybe even as a Fuchsia cutting that you have produced prune the stem just above the third or fourth lave joint, but leave all the leaves on the plant below that cut. It will soon send out a pair of side shoots. This is the start of producing your busy, full of flowers, plant.

Now we enter the progressive stage of building a bushy fuchsia plant. Allow the two side shoots to grow to three or four pairs of leaves, then snip them off just above the second leaf joint. Side shoots will emerge from the joint below your cut, and these should be allowed to grow four or five pairs of leaves with possibly a few flower buds showing at the end tip. No matter cut them off this time at slightly above the third pair of leaves, then repeat the operation but at the fourth pair of leaves next set of shoots.

By now you will have the start of a bushy, compact Fuchsia plant that will have a good shape and will be raring to give you a good display of flowers. Many stems equals many flowers. If you are not too impatient to start seeing flowers, repeat the pruning as above, but at five pairs of leaves.

If you want your Fuchsia to be perfection for a particular event wedding, garden party, or flower show, stop all pruning at around 6 to 8 weeks before the event. This will bring the plant into flower for the desired date.

Routine pruning thereafter, is simply removing faded flowers before they are allowed to set their fruits unless you want to make jam! The setting of seeds and fruits really do take a lot of energy out of the plant at the expense of new growth and flowers.

  • Important also through this process, to feed the plant on a weekly basis with a general liquid feed, to compensate for the food-producing leaves that you will be removing, although of course your plant will be much larger with a good canopy of foliage and flowers.

You can adjust this pruning regime to give you the type of plant shape you want bush, pyramid or tower!


Pruning Older Plants after Winter

The same basic principles as above, but taking into account the framework of branches you already have. Start by side-shooting to retain or alter shape, then proceed shortening all the new shoots to around three or four pairs of leaves.

Pruning Weeping or Trailing Fuchsias

Trailing Fuchsias should also be pruned regularly as per the instructions for the bush fuchsias. Do not be in a hurry to see just a few flowers at the end of two or three branches hanging over the edge of your basket. Trim the ends of all shoots to build a good structure of branches. The will soon start to droop or trail, providing you with many more flowers than would be the case with just a few long stems.

  • The only modification, would be to allow all side shoots to grow to enough length to cut at just above the fourth set of leaves.

If planted in hanging basket, ensure regular feeding and watering for the food reserves in a confined hanging basket are much less that would be the case in a large pot or in the garden soil.

Pruning Standard Fuchsias

New or older standard fuchsias bought out of winter dormancy should be treated as above, but of course snipping the shoots at the head of the stem. For the early part of the growing season, you can leave any foliage that appears on the main stem and even new side shoots, for all these will help the plant to generate energy whilst growing. In this case it is a long distance for the food to travel from roots up to the head. However, dont allow any side shoots to continue once the head is starting to grow well and responding to your initial formation pruning.

Pruning and Clipping Fuchsia Hedges

Established hedges of Fuchsias are normally a dense mass of old twigs and branches. Traditional hedge trimming is all that is required with maybe a slightly harder trim for the first spring cut. Thereafter, lightly prune as required to ensure a good supply of new growth and flowers.


Fuchsia Plants - Care and Growing Basics

Fuchsia Plants

Fuchsia Swingtime

Fuchsia Swingtime

Fuchsia plants are either classed as shrubs or perennials, and can be fully hardy or tender – and several other classes between, depending upon where you live and how you are going to grow them. Most of the common bedding plant fuchsias are tender or half hardy perennial shrubs - either small bush or trailing types – together with half or full standard Fuchsias.

For general use, fuchsias can be split into four separate types – Hardy shrub Fuchsias; half hardy bedding fuchsias; trailing and standard fuchsias. There are also various classifications as to flower type. This section is for the varied general garden uses for which Fuchsias are normally bought.

All have common flower attributes – with variation – of drooping or pendant tubular flowers, which can be either single, semi-double, fully double or the longer tubular tryphilla group. There are literally hundreds of varieties to choose from – especially with the half hardy perennial bedding types.

There are Fuchsia Societies in many countries together with which ‘Fuchsia’ is a specific colour in the printing and fashion trade – being best described as a magenta pink. This does a great disservice to the wide range of colours associated with these plants.

The common and botanical name of Fuchsia sometimes gives rise to a variety of misspellings. Easiest way to remember, is that the plants were first discovered by Leonhart Fuchs, the German botanist and plant collector, to whom we are indebted.

Where to Grow Fuchsias

Fuchsia Trailing Mini Rose

Fuchsia Trailing Mini Rose

A basic requirement for a continuing display is a sunny place – though preferably with some shade from the hottest midday sun. Alternatively an area which has plenty of light, but the hardy shrub fuchsias are happy in full sun or dappled shade.

Fuchsia resent being grown in windy, exposed, draughty or heavy shade, and if planted in the garden, a medium soil type is fine – but never waterlogged.

Most of the semi-hardy types of Fuchsia plants make good container plants and are also suited to window boxes – but preferably not on an exposed wall – or one that faces the midday sun. The popular trailing types of Fuchsias are perfect in outdoor hanging baskets and make superb cascades of long lasting flowers if used beneath pergola beams.

The hardy types are often used as hedging plants - particularly in seaside areas. Once established they can form a dense hedge up to 6ft (1.8m tall).

Walls or good sturdy fence panels or trellis bedecked with assorted Fuchsias is a great way to utilize space – vertical gardening at its most basic and masses of colour for most of the summer.

Trailing Fuchsia baskets and pots can also be grown hanging from the low ranches of light foliaged trees such as Birch, Sorbus and Robinia if placed to the outer perimeter where they will normally get good light and at rhe same time a modicum of dappled shade.

Why Grow Fuchsia Plants

Bronze foliage of Fuchsia Thalia

Bronze foliage of Fuchsia Thalia

Once you have grown Fuchsias, the question ‘why?’ does not arise. They are amongst the most sought after summer flowering plants for gardens, window boxes, baskets and patio pots and containers.

They need minimal attention and care for success; which is not to say that they can be planted and forgotten.

The main attractions of fuchsias are their longevity of flowering period – normally from early summer through until frosts of autumn; easy to grow, and ‘renewable’ by keeping them through the winter to plant out again the following year.

Fuchsias are non-demanding garden plants or shrubs which can be grown in garden beds, shrub borders, hedging plants, patio containers in all manner of garden pots and of course their popular use in hanging baskets and window boxes.

Not to be forgotten, is the fact that as well as providing a super flowering display, there are some notable foliage feature fuchsias that are worth growing – variegated, golden or deep bronze foliage form good contrast to the drooping cascade of the brightly coloured flowers.


When to Plant Fuchsias

Fuchsia riccartonii 'Thompsonii'

Fuchsia riccartonii 'Thompsonii'

The bedding or half hardy fuchsias which are the mainstay of the fuchsia group should not be planted out in the garden until frosts have finished in late spring. The same goes if you happen to buy hardy types full of flower in early spring, for these would have been grown in protected conditions in the nursery in order to get them flowering and looking good for the traditional Easter gardening trade.

Other than the true hardy fuchsias, any plants that you wish to ‘preserve’ for the following year should be lifted from the garden before harsh winter weather starts. In milder areas some borderline varieties can be left in the garden and simply protected at ground level with a good covering of retentive mulch. An area that it traditionally wet during the winter would not be suitable so lifting and storing for the winter would be the best option.

Basic Fuchsia types

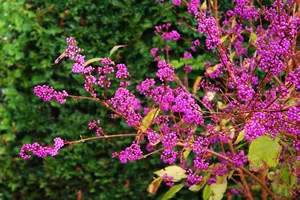
Hardy Shrub Fuchsias These are suitable for growing in the garden all year round – though deciduous and lying dormant for the winter. Normally cut to ground level each spring, they will soon re-form a shrub which is several feet high and full of flower from midsummer onwards; absolutely excelling in the later months and through until autumn frosts.

Half Hardy Bush or Bedding Fuchsia As the name suggests, this group are small woody stemmed plants which are sold in garden centers during spring and early summer – or can be bought online – for use in bedding plant schemes in the garden or more popularly as container plants for the patio or window ledges. They are not reliably hardy so can either be discarded at the end of summer, propagated for use the following year or over-wintered in frost free conditions – ready to start life anew the following spring.

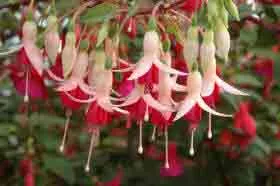
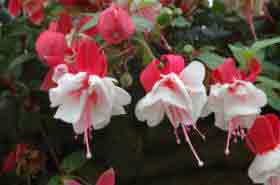
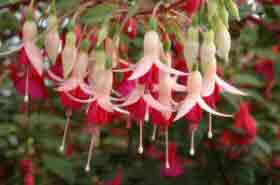
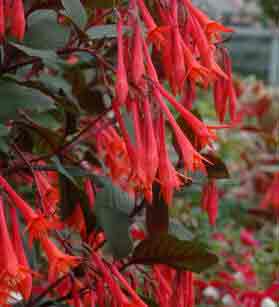
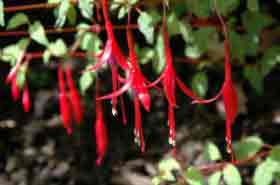
Trailing or Hanging Fuchsias These are much the same as the bedding or bush varieties with the added attraction of a loose habit of growth ranging from drooping branches to fully pendant weeping steams that – when planted in a hanging basket – can from a drooping cascade of colourful flowers down from the basket – as much as 2ft (60cm). They can also be planted quite effectively in pots atop a pedestal, though need to be firmly anchored to cater for the sheer weight of flowers – especially in a sudden breeze!

Standard Fuchsias These spectacular forms are normally of the bush types above, which have been grown for a year or more at the nursery and trained to grow up one central stem – somewhat akin to a standard rose. They are not hardy, so will require winter cosseting – and if planted in a patio pot will need support and shelter to ensure they stay upright. If they fall over, the heads often suffer considerable damage – though soon re-form their former glory.

If planting in the garden – such as a mid-bed feature, consider just plunging the pot below earth level rather than removing the pot and plating as per normal shrub. This will make them much easier to ‘harvest’ in the autumn when they will need to be bought under cover for the winter months.

Problems and Pests of Fuchsias Other than the main cultural aspects covered above, Fuchsias are susceptible to aphids – whether grown indoors or outdoors.

Red Spider mites and whitefly in particular can be a pest when grown indoors – especially at the start of the growing season in a greenhouse.

When grown in pots, they can suffer from vine weevil beetle larvae nibbling away at the root system – leading to a collapsed plant. Potted plants which have been overwintered under cover are also prone to this invidious pest.

The main disease – though not common is that of Botrytis or grey mould – especially in the early part of the year or with plants emerging from winter dormancy in the greenhouse.


Propagating Fuchsias

How to take Fuchsia Cuttings

make the cut directly below a leaf joint - leaving 3-4in (7 - 10cm) of shoot with 2 or 3 pairs of leaves

Fuchsia Cutting

Fuchsias are amongst the most popular of summer flowering plants for hanging baskets and containers. There are of course the hardy Fuchsias that flower a little later - often well into the Autumn.

The big plus for Fuchsia propagation is that they can be increased by taking cutting - very easily!

Take cuttings from well-grown young Fuchsia plants, to increase your stock and also to 'pinch out' the growing tip of your Fuchsia.

This will help the existing Fuchsia to grow with a 'bushy' habit, rather than having a single spindly stem with few side shoots. Cuttings from Fuchsias are easy to take - we give you the advice and information on how to take Fuchsia cuttings.

Young Fuchsia plant

Young Fuchsia plant

Young Fuchsia plants, bought from the garden centre or nursery, can be a good source of 'cuttings' material to give you new plants. The following steps also apply to established plants growing in the garden. Cuttings are best taken between late April through to early September. Formative Fuchsia pruning in early spring can also provide useful material for cuttings.

Most Fuchsias -or Fuchsias - benefit from being 'pinched out', by nipping off the growing shoots after five pairs of leaves have developed. This forces the Fuchsia plant to send out new side shoots. More shoots = More flowers!

So you will see, that it is easy to build up a good stock of Fuchsia plants just by having a sharp knife (or scissors), some cuttings compost and a suitable container (Propagator) where you can grow the cuttings into rooted plants.

The Important Points in Taking Cuttings from Fuchsia

  • Use a sharp knife - carefully - or a sharp pair of secateurs.
  • Only take cuttings from healthy Fuchsia plants.
  • Cutting taken later in the year will need over-wintering protection.
  • Always make the cut for the actual 'cutting' directly below a leaf joint.
  • Use hormone rooting powder - if you wish.
  • Any seed and potting compost will do - add a little sand to 'open up' the compost.
  • There should be no flowers or flower buds on the cutting.
  • Remove the bottom leaves - just leaving perhaps 2 or 3 pairs of mature leaves on the stem.

All of the images can be clicked for enlarged detail to show the way to success with Fuchsia Propagation.

Young Fuchsia plant bought from the garden centre. It has a long main shoot, that is suitable for taking a cutting

Young Fuchsia plant bought from the garden centre. It has a long main shoot, that is suitable for taking a cutting

Take the cutting from the main stem - or side shoot if it is long enough. Use a sharp knife or secateurs, being careful not to bruise the plant - or cut yourself!

Take the cutting from the main stem - or side shoot if it is long enough. Use a sharp knife or secateurs, being careful not to bruise the plant - or cut yourself!

Your existing plant is now better placed to grow into a nice bushy specimen

Your existing plant is now better placed to grow into a nice bushy specimen


Fuchsia Propagation by cuttings procedure

First image left, you will see a Fuchsia plant which needs 'pinching out' to make the plant grow side shoots and therefore turn into a bushy plant. The top shoot is cut from the plant - just above a pair of healthy leaves. This is where the plant will send out new shoots - as well as further down the main stem.

The top stem that has been cut off will be used for the first of many cuttings from this plant. Second image shows the cut being made - with a carpenter's knife - very sharp! and then the resultant plant, which will be used as a stock plant to produce many more cutting over the next few weeks or months.

The removed stem is now cut cleanly below a pair of leaves, and the bottom pair of leaves removed. This will give a cutting of about 4in (10cm) long with just two pair of full leaves and a few other small leaves at the top of the cutting to be.

make the cut directly below a leaf joint - leaving 3-4in (7 - 10cm) of shoot with 2 or 3 pairs of leaves

make the cut directly below a leaf joint - leaving 3-4in (7 - 10cm) of shoot with 2 or 3 pairs of leaves

This is where the cut should have been!

This is where the cut should have been!

Trim off the bottom pair of leaves. Don't just rip them off!

Trim off the bottom pair of leaves. Don't just rip them off!

Push cutting down into a pot of compost, taking care not to bend or damage the stem

Push cutting down into a pot of compost, taking care not to bend or damage the stem

Place in a propagator case and water well. If you do not have a propagator, then simply put a clear plastic bag over pot and secure with an elastic band. Keep out of direct sunshine!

Place in a propagator case and water well. If you do not have a propagator, then simply put a clear plastic bag over pot and secure with an elastic band. Keep out of direct sunshine!

The cutting is inserted into a 3in pot of prepared cuttings compost - actually just normal multi purpose compost is ok for this. The pots of prepared and potted cuttings are then placed into the base of the propagator case and well watered in.

We have not bothered with hormone rooting powder. If you decide to use it - a good idea - then do not overdo it. Simply dip the end of the cutting into the hormone rooting powder and gently tap the cutting to get rid of any surplus powder. As most rooting powders a fungicide included, then it is a good idea to use - especially if you are new to taking cuttings.

The propagator top is replaced, and placed in a light place - with no direct scorching sun. If in a greenhouse, then simply cover the top of the propagator with a light milky white sheet of plastic. If you do not have a propagator, Fuchsia can be rooted by putting the pots inside a light plastic bag - and sealing the top so that no air can get in.

Once rooted - start checking after two weeks - the plastic or propagator top can be removed in stages to allow a little air in - bit by bit. After a week of this treatment, the rooted Fuchsia can be removed for its protection and then grown on into a new potted Fuchsia Plant.

Fuchsia cuttings should root in 2-3 weeks. Gradually remove the propagator lid or plastic bag over 4 - 6 days to allow the young Fuchsia plants to acclimatise to the non-humid environment.

Also See | Taking geranium Cuttings.


Most Read Pruning Articles are

Pruning Japanese Acers

Abelia

Pruning Acers - Japanese Maples


Copyright © Gardenseeker.garden - 2000 - 2021

/ Advertising listing / Privacy Policy
Contact Us

| DMCA.com Protection Status