How and When to Prune Berberis Darwinii Shrubs
An Overview of growing and maintaining Berberis Darwinii Shrubs in the UK
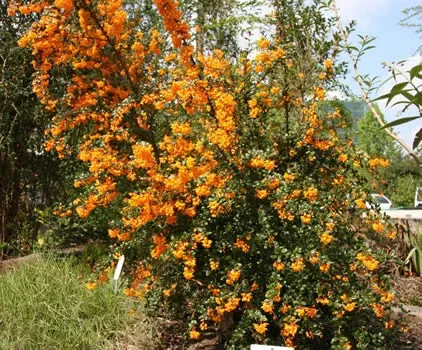
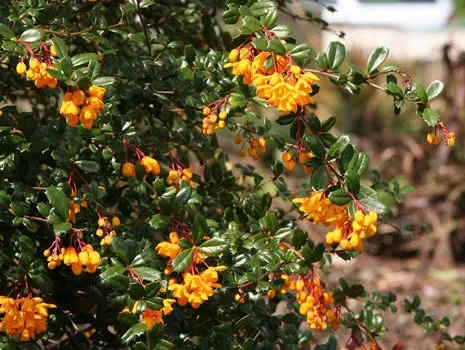
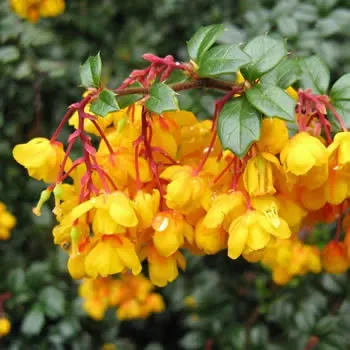
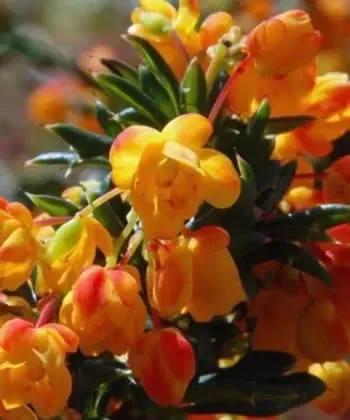
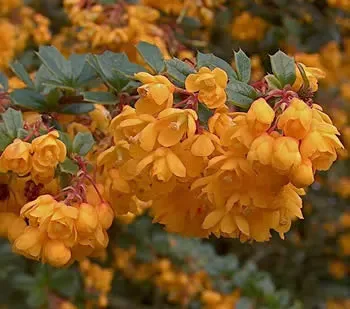
If you're looking for a unique shrub to add colour, texture and dimension to your garden, then the Berberis Darwinii might be exactly what you need! This evergreen shrub is native to much of the Northern Hemisphere including parts of Europe, which makes it ideal as an ornamental plant in British gardens. With its striking foliage and vibrant yellow flowers that bloom from spring through autumn, this plant will be sure to create a beautiful centrepiece in any outdoor space. In this blog post we'll look at how best to grow and maintain these shrubs so that you can enjoy them for many years come. So let's get started exploring everything there is about Berberis Darwinii!
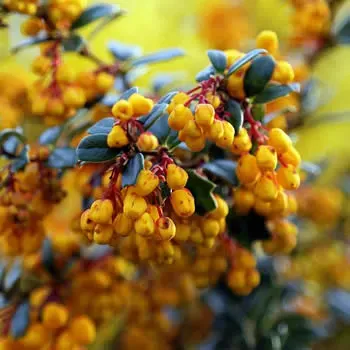
Berberis darwinii, commonly known as the Darwin's barberry, is an evergreen shrub native to Southern Chile and Argentina. It is a spreading shrub with short woody stems, small glossy green leaves, yellow flowers in late spring and reddish-purple berries that become bluish-black when ripe. They are well suited for hedging or screening because of their dense growth habit and compact shape. They grow best in sheltered areas with moist but well drained acidic soil although they will tolerate some drought conditions. Full sun can be tolerated although they prefer light shade. Berberis darwinii can reach over 6 feet tall when mature and propagate easily due to their ability to self seed. Pruning will ensure a denser more regular form and also encourage a heavier fruit crop. In its natural climate these shrubs show very hardy characteristics making them an attractive addition to most gardens throughout the world.
The Berberis Darwinii Shrub in the UK: A Historical Analysis

Berberis Darwinii, also known as Darwin's Barberry, is a species native to southern Chile and Argentina that has found a unique place in the United Kingdom's horticultural history.
Origins and Arrival in the UK The Berberis Darwinii was discovered by Western science during Charles Darwin's voyage on the 'Beagle' in 1835. Its vibrant orange flowers and evergreen nature made it an attractive specimen for botanists and gardeners alike. After its discovery, the plant was brought to the UK, where it quickly became a popular feature in gardens across the country.
Cultivation and Distribution Over time, the Berberis Darwinii has been widely cultivated across Britain, often as a planted shrub in gardens and public spaces due to its aesthetic appeal and hardy nature. It has a vigorous growth rate and can thrive in a variety of conditions, making it a versatile addition to many landscapes.
Impact and Controversies However, the introduction of non-native species like the Berberis Darwinii can sometimes lead to ecological imbalances. As the shrub seeds readily, it has the potential to spread beyond its intended location and become invasive. This has raised some debates about its cultivation and management.
Uses and Significance Despite these concerns, the Berberis Darwinii has had a significant impact on the UK's botany and horticulture. Its striking appearance has made it a staple in ornamental horticulture. Furthermore, the plant has medicinal properties: the roots and bark have been used for their antiseptic qualities, and the berries are rich in vitamin C.
In conclusion, the history of the Berberis Darwinii shrub in the UK is a testament to the complex relationship between human cultivation and ecological balance. Since its introduction in the early 19th century, this South American native has become a part of the UK's horticultural landscape, despite the debates surrounding its impact on local ecology. Its continued presence indicates our enduring fascination with the beauty and utility of botanical species, even as we navigate the challenges they present.
Choosing the right soil and location for your Berberis Darwinii shrub
When planting a Berberis Darwinii shrub, finding the right spot is essential to ensure that the shrub can grow and thrive. Choosing sandy loam or loamy soil with good drainage will help provide adequate space for the root system, while areas that get some sunlight throughout the day are ideal. While these plants can survive in partial shade conditions, they tend to do better when exposed to more sunlight. In any case, thought should be given to how much water and shade each plant receives (as well as air circulation) when choosing your location for your Berberis Darwinii shrub.
Outdoor Maintenance – regular trimming, pruning and watering
Learning how to maintain your outdoor space is essential for keeping it fresh and vibrant. Regular trimming, pruning and watering will help you keep your landscape looking its best and can even prevent dangerous or costly problems from arising. Not only will this ensure a beautiful environment, but it also helps protect the soil from erosion, encourages healthy plant growth, conserves water, saves you time and money in the long-run, and provides a wealth of other benefits. So start regular maintenance as soon as your yard is set up, so that you can enjoy its beauty for years to come.
Indoor Maintenance – pruning, fertilizing and checking for pests
Indoor maintenance is an important part of keeping your home in tip-top shape. Pruning plants helps create a fuller, healthier look and can even promote the growth of new blooms. Fertilizing indoor plants weekly or bi-weekly is also essential to their flourishing. Finally, it's important to regularly check that all indoor plants are free from pests, as this can severely hinder their growth and leave you with discolored foliage. Stay on top of your indoor maintenance to make sure your home is always looking its best!
Useful tips to keep your Berberis Darwinii healthy and thriving
Taking care of a Berberis Darwinii can be rewarding if done correctly! To keep the plant healthy and thriving, make sure you are providing it with enough water; it should be watered every two to three weeks and receive an additional one to two inches of water during the summer. It is best to water deeply once a week rather than provide light amounts more often as this encourages deep root growth. Sunlight is also important - ensure your Berberis gets at least 8 hours of direct sunlight every day, but be careful not to put it in an area which is too exposed as strong winds could damage its delicate leaves. Finally, fertilize the soil around your Berberis once or twice a year with a balanced fertilizer for maximum health. With these easy tips, your gorgeous Berberis Darwinii will remain healthy and thrive!
Common problems you may encounter with your Berberis Darwinii shrub
The Berberis Darwinii shrub is a hardy, ornamental deciduous shrub that is ideal for creating a beautiful addition to any garden. However, some common problems to look out for with these types of plants include Leaf Spot and rust. These fungal diseases occur when the leaves become wet in damp weather and can cause spotting and blotches on the leaves. Once established, treating these types of issues requires fungicide treatments as well as pruning away infected parts of the plant. Additionally, if your shrub lacks water it may start to wilt which could lead to further issues down the line, so making sure it has adequate water supply is important in maintaining its health.
Common Problems Affecting Berberis Darwinii in the UK
Berberis Darwinii, or Darwin's Barberry, is generally a hardy and resilient plant. However, like all plants, it can be affected by certain diseases, pests, and environmental issues. Here are the most common problems and how to prevent or treat them:
-
Diseases
1. Powdery Mildew: This fungal disease appears as a white powdery coating on leaves and stems. It thrives in warm, dry climates and can be exacerbated by poor air circulation.
- Prevention: Ensure good air circulation around the plant and avoid overhead watering.
- Treatment: Use a fungicide suitable for powdery mildew as per manufacturer's instructions.
-
2. Rust: Rust is a fungal disease that causes bright orange or yellow pustules on the undersides of leaves.
- Prevention: Maintain good hygiene by clearing up fallen leaves, as the spores can overwinter in leaf litter.
- Treatment: Prune affected areas and apply a fungicide.
-
1. Aphids: These small insects suck sap from the plant, causing distorted growth and a sticky residue which can lead to sooty mould.
- Prevention: Encourage natural predators such as ladybirds, hoverflies, and lacewings.
- Treatment: Use a water spray to dislodge aphids or apply an insecticidal soap or systemic insecticide.
-
2. Vine Weevil: Adult vine weevils eat notches in the leaves, while their larvae can cause more serious damage by feeding on the roots, potentially killing the plant.
- Prevention: Regularly inspect plants and keep the area clear of leaf litter where adults may hide.
- Treatment: Use a nematode or chemical control specifically designed for vine weevils.
-
1. Poor Drainage: Berberis Darwinii prefers well-drained soil and can suffer in waterlogged conditions, leading to root rot.
- Prevention: Plant in well-draining soil and avoid overwatering.
- Treatment: If signs of waterlogging are evident, consider improving drainage or relocating the plant to a more suitable area.
-
2. Incorrect pH: Berberis Darwinii prefers slightly acidic to neutral soil. Alkaline soil can lead to chlorosis (yellowing of leaves).
- Prevention: Check soil pH before planting and amend as necessary with appropriate soil amendments.
- Treatment: If chlorosis appears, apply a soil acidifier or iron chelates following package instructions.
By monitoring your Berberis Darwinii for these common problems and taking preventative measures, you can ensure a healthy and vibrant shrub. If issues do arise, quick action for treatment will help your plant recover swiftly.
To conclude, Berberis Darwinii shrubs are a great addition to any garden or indoor space. By selecting the right soil and location for your Berberis Darwinii you can ensure it will thrive in its environment. You should also be sure to regularly trim and prune as necessary while watering it as needed. Additionally, when growing indoors, check your plant often for pests and fertilize periodically. If you follow these tips closely, you’ll have a beautiful and healthy Berberis Darwinii that will bring life to your outdoor or indoor space. It is important to remember that while some common issues may arise with your plant such as dieback or fungal diseases, regular maintenance should help you keep these problems under control. With just a few steps and care, you can ensure that this ornamental shrub will remain healthy for years to come!
Detecting signs of disease or pests
- look out for yellowed leaves or small holes in the leaves, which could indicate a pest infestation While plants naturally yellow and shed their leaves as they reach the end of their life cycle, it is important to stay vigilant while caring for them. If a plant begins exhibiting any signs of disease or pest infestation such as yellowing leaves or small holes in them, it is best to address the issue right away. By tending to these issues right away, you can nurse your plants back to health and stop the spread of disease or pests. Be sure to check your plants regularly for any potential problems, so you can take action before any damage is done.
In conclusion, ensuring that your Berberis Darwinii has favorable sunlight, wind, and soil pH levels is the first step in successfully growing this shrub. Furthermore, it's important to make sure your soil is healthy and organic matter is added prior to planting it. In addition to general care such as making sure it’s well-watered and trimmed properly, regular detection of signs of disease or pests is also essential for its health. With proper care from the beginning stages of planting all the way through to its growth years, your Berberis Darwinii can become an incredibly gorgeous addition to any landscape. So don't be afraid to branch out and plant one of these often-overlooked plants — you won't regret it!
Understanding the Different Variations of Species of a Berberis Darwinii, ideal for UK Conditions
There's primarily one main species of Berberis Darwinii that's popular in the UK due to its hardiness, vibrant orange flowers, and evergreen nature. However, it does have a notable cultivar:
Berberis Darwinii 'Nana': This is a dwarf variety that reaches a maximum height of around 1 meter. It's an excellent choice for smaller gardens or for use as ground cover.
While the Berberis Darwinii itself is a distinct species within the Berberis genus, there are numerous other species within this same genus that display a variety of characteristics. Here, I've compiled a list of several noteworthy species related to Berberis Darwinii:
- 1. Berberis Vulgaris (Common Barberry): This deciduous shrub native to Europe has yellow flowers and red berries. It's known for its medicinal uses and is also grown as an ornamental plant.
- 2. Berberis Thunbergii (Japanese Barberry): A native of Japan and eastern Asia, this species is popular for landscaping due to its resistance to deer and pests. It has small thorns and produces bright red berries in autumn.
- 3. Berberis Aquifolium (Oregon Grape): This North American native has holly-like leaves and produces clusters of yellow flowers and blue-black berries. It thrives in various conditions but prefers well-drained soil and partial shade.
- 4. Berberis Julianae (Wintergreen Barberry): Known for its evergreen leaves and long thorns, this Chinese native is often used as a hedging plant. It produces yellow flowers and dark blue berries.
- 5. Berberis Koreana (Korean Barberry): Native to Korea, this species has a dense, bushy growth habit. It displays vibrant autumn colours and produces black berries.
- 6. Berberis Buxifolia (Magellan Barberry): This species native to southernmost South America, especially in Chile and Argentina, is a thorny shrub producing blue-black berries.
- 7. Berberis Microphylla (Box-leaved Barberry): This evergreen shrub from southern Argentina and Chile produces dark blue berries and has small, box-like leaves.
Each of these species requires slightly different growing conditions, but most thrive in well-drained soil and full sun to partial shade. Note that some Berberis species can become invasive outside their native range, so care should be taken when introducing them into new environments.
Step-by-Step Guide on How to Grow a Berberis Darwinii from Seed
Growing Berberis Darwinii from seed can be a rewarding process, but it does require patience and careful attention. Here's a comprehensive guide on how to do it:
-
Step 1: Seed Preparation
Berberis Darwinii seeds have a hard outer shell, so they need to undergo stratification - a process that simulates natural winter conditions to break dormancy. To stratify the seeds:
- 1. Soak the seeds in water for 24 hours.
- 2. Mix the seeds in a bag with moist sand or vermiculite.
- 3. Place the bag in the refrigerator for about 3-4 months.
- Step 2: Soil Preparation Choose a well-draining soil mix. You can use a standard potting mix, but adding some perlite or coarse sand can improve drainage. The ideal soil pH for Berberis Darwinii is slightly acidic to neutral.
- Step 3: Sowing the Seeds After stratification, sow the seeds in your prepared soil. They should be planted about 2-3 times as deep as the seed is wide. Water the soil thoroughly after planting.
- Step 4: Germination Place the pot in a location where it will receive plenty of indirect light. The ideal germination temperature for Berberis Darwinii is between 15-20 degrees Celsius. Germination can take several weeks to a few months, so patience is key.
- Step 5: Seedling Care Once the seedlings have sprouted, make sure they receive plenty of light. A sunny south-facing window is ideal, or you can use fluorescent lights if natural light is insufficient. Keep the soil consistently moist but ensure it's well-draining to prevent waterlogging.
- Step 6: Transplanting When the seedlings have at least two sets of true leaves and are robust enough to handle, they can be transplanted into individual pots. Continue to provide plenty of light and regular watering.
- - Poor Germination: If seeds fail to germinate, it may be due to insufficient stratification or unsuitable temperature. Ensure you stratify seeds properly and maintain the right temperature range.
- - Damping Off: This fungal disease can kill seedlings. Prevent it by avoiding overwatering and ensuring good air circulation around your plants.
Remember, growing Berberis Darwinii from seed is a long-term project. It will likely take a few years before your seedlings mature into flowering shrubs. However, the satisfaction of growing these beautiful plants from seed makes the wait worthwhile!
Step-by-Step Guide on How to Propagate a Berberis Darwinii Using the Cutting Method
Propagating Berberis Darwinii using cuttings is a great way to multiply your plants. Here's a step-by-step guide to do it:
Tools and Materials Needed- - Sharp, clean pruning shears or knife
- - Rooting hormone powder (optional)
- - A small pot or container
- - Potting mix or sand
- - Clear plastic bag or propagator
- Step 1: Taking the Cutting The best time to take cuttings from Berberis Darwinii is in late summer or early autumn. Choose a healthy, vigorous branch from the current year's growth. The cutting should be about 10-15 cm long with several sets of leaves at the top.
- Step 2: Preparing the Cutting Use your shears to make a clean cut just below a leaf node (where a leaf joins the stem). Remove the lower leaves, leaving only the top two or three. This helps to reduce moisture loss while the cutting is developing roots.
- Step 3: Applying Rooting Hormone While not always necessary, applying rooting hormone can improve success rates. Dip the cut end of your stem in water, then into the rooting hormone powder, shaking off any excess.
- Step 4: Planting the Cutting Fill your pot with a well-draining potting mix or sand. Make a hole with a pencil or your finger, then insert the cutting, making sure the node where you removed the leaves is buried. Gently firm the soil around the cutting.
- Step 5: Creating a Humid Environment Place a clear plastic bag over the pot or use a propagator to maintain high humidity. Ensure the plastic doesn't touch the leaves, as this can encourage rot.
- Step 6: Care During Rooting Place the pot in a location with bright, indirect light. The ideal temperature is between 15-20 degrees Celsius. Keep the soil lightly moist but not waterlogged, and ensure the air inside your plastic bag or propagator stays humid.
- Step 7: Transplanting After 4-6 weeks, gently tug on the cutting. If you feel resistance, it means roots have formed. At this point, you can remove the plastic bag and gradually acclimate the new plant to normal humidity levels before transplanting into a larger pot or directly into the garden.
Tips for Caring for Newly Propagated Plants Keep the newly propagated plants in partial shade and ensure they are well-watered until they establish. Be patient, as Berberis Darwinii is a slow grower. With proper care, your propagated plants will mature into beautiful, flowering shrubs over time.
Growing Berberis Darwinii: A Step-by-Step Guide
Growing Berberis Darwinii is a very rewarding and beautiful experience for any gardener. Not only does this sunny yellow flowering shrub provide eye-catching color to gardens of all sizes, but thanks to its natural resistance to drought and pests it's easy to take care of year round. In this guide we'll give you step-by-step instructions on how to best cultivate Berberis Darwinii in your own garden, from soil prep and planting tips all the way through pest control and general maintenance. So let's get started!
Choosing the right spot for your Berberis Darwinii
- consider sunlight, wind, and soil pH levels When choosing the best spot in your garden for a Berberis Darwinii, there are several factors to consider beyond just aesthetic appeal. To ensure the healthiest possible plant, recognize that it requires sunlight exposure throughout the day, protection from powerful winds, and potential acidic soil conditions. The perfect place to plant a Berberis Darwinii is one providing all these necessities for growth. Shade and limited wind access allows its foliage to thrive, as does soil with an acidity level of 5.8 to 6.0 that most efficiently absorbs essential nutrients from compost or manure-enriched topsoil. Ultimately, if all these conditions are met then you will be rewarded with a thriving, eye-catching addition to your outdoor surroundings.
Preparing the soil
- adding organic matter to enrich it and creating a ring of mulch around the plant
When it comes to successful gardening, taking the time to enrich the soil is essential. One way of doing this is by adding organic matter, such as compost or leaf mold, to the soil in order to increase its nutrients and help retain water. Another helpful soil preparation step is to create a ring of mulch around the plants. This helps insulate the roots and keeps them from drying out or becoming too hot. It also suppresses weeds so that plants don't need to compete for resources, allowing them to grow stronger and healthier over time. Taking the time to prepare the soil can really pay off with bigger harvests!
Planting your Berberis Darwinii
- make sure to water deeply after planting Planting Berberis Darwinii can be a great way to add interest and color to your yard or garden. When planting, bear in mind that like most shrubs with shallow roots, they should be planted in well-drained soil, with their crown above the soil line. Once you’ve done so, be sure to water deeply as regular watering can help promote deep root growth and establishing your plant's long term health. Give them plenty of warmth when growing in a pot so as to avoid Root Rot, and ensure that you prune out any dead wood to prevent disease from affecting the entire plant. A yearly application of fertilizer will also go a long way toward providing optimum nutrition for your Berberis Darwinii.
An easy-to-follow step-by-step guide on planting out a Berberis Darwinii
- Step 1: Selecting a Suitable Location Berberis Darwinii thrives in full sun but can also tolerate partial shade. Choose a location with well-draining soil to prevent waterlogging, which can lead to root rot. This plant is quite hardy and can adapt to a variety of soil types.
- Step 2: Digging the Hole Once you've chosen your location, dig a hole that is twice as wide and just as deep as the root ball of your plant. This allows the roots to spread out easily in their new environment.
- Step 3: Preparing the Plant Remove your Berberis Darwinii from its current container carefully to avoid damaging the roots. Spread the roots out gently, trimming any that are damaged or excessively long. This will encourage healthier growth once planted.
- Step 4: Planting the Berberis Darwinii Place your plant into the hole, ensuring it's level with the surrounding soil. It's important not to plant it too deep as this can cause the stem to rot.
- Step 5: Backfilling the Hole Backfill the hole with a mixture of the original soil and compost. Compost will provide essential nutrients and improve soil structure. As you backfill, water the soil to ensure it settles properly and removes any air pockets that could harm the roots.
Aftercare Water the plant thoroughly after planting and keep the soil moist (but not waterlogged) for the first few weeks until the plant establishes. A layer of mulch around the base of the plant can help retain moisture and suppress weeds.
Monitor the plant for any signs of stress, such as wilting or yellowing leaves. Remember, Berberis Darwinii is a slow grower, so be patient and give your plant time to establish itself.
In the following spring, feed with a general-purpose fertilizer to support healthy growth. Prune after flowering to maintain shape and encourage bushy growth. With proper care, your Berberis Darwinii should thrive and become a beautiful addition to your garden.
Feeding and watering your Berberis Darwinii
- give water when needed, always in the morning, using a soaker hose or a bucket
Keeping your Berberis Darwinii healthy is an essential part of plant care and keeping it in a good condition. Watering them correctly is key; they should only be watered when needed during the cool part of the day such as the morning. This prevents the foliage from burning due to excessive sunlight and heat. One option for watering is using a soaker hose which slowly release water at low pressure, particularly useful if you have multiple plants. Alternatively, you can use a bucket or watering can to give each individual plant more precise amounts of water - however, this might require more effort as it can be difficult to get the water in hard-to-reach areas around your Berberis Darwinii.
How and When to Prune Berberis Darwinii Shrubs
For any gardener, pruning is an essential skill to master; however, pruning certain plants can be a bit tricky. If you have Berberis Darwinii shrubs in your garden and you're wondering when and how to prune them correctly, then this article is just what you need! In this blog post we'll cover everything from which tools are best for pruning berberis shrubs to helpful hints on timing the job so that your precious plants stay healthy and look their best all season long. Let's get started!
Understanding the Basics of Pruning Berberis Darwinii Shrubs
Pruning Berberis Darwinii shrubs is an important part of maintaining their health and beauty. It is necessary to prune or trim these plants regularly to shape them properly and prevent overcrowding; this encourages air circulation and helps keep the root system healthy. The best time to prune Berberis Darwinii shrubs is during the late spring or summer, once the threat of frost has passed. First, remove dead and diseased branches using sharp bypass pruners. Next shape the shrub by cutting back any suckers, along with excess twigs, stems, and leaves that have outgrown the desired form. Finally, inspect the shrub for any remaining twiggy growth that needs to be trimmed back in order to encourage a nice uniform shape. With regular care and maintenance pruning, your Berberis Darwinii shrubs will remain beautiful!
Pruning and training your shrub
- trim branches that are crossing each other or too long, and use horizontal supports for espaliering Pruning and training your shrubs is an important part of garden maintenance. It helps to maintain the aesthetic beauty of a garden, while also supporting the overall health of your plants. To ensure that your shrubs develop properly, you should select strategic branches to trim like those that are crossing each other or too long. You can also use horizontal supports, such as wires and posts, for espaliering in order to increase the symmetry and form of your shrubbery. With the right pruning methods, you will be able to achieve a sleek, beautiful garden palette.
When and How to Prune Berberis Darwinii Shrubs
Pruning Berberis Darwinii shrubs is an essential part of their growth and development. While they do not need to be pruned annually, it's important to keep up with maintenance on occasion throughout the year. Pruning should take place in the late winter or early spring while they are still dormant; avoid pruning in the summer or fall as this can lead to a decrease in flower production as well as increased susceptibility to diseases. When you are ready to prune, be sure to use sharp bypass pruners, cut at least half of last year's growth (or all if overgrown), and remove any dead wood by making cuts just outside the branch collar. Following these simple steps will ensure that your Berberis Darwinii shrubs stay healthy and thriving for years to come!
Step-by-Step Guide to Pruning Berberis Darwinii Shrubs
Pruning berberis darwinii shrubs is an excellent way to keep them growing healthy and looking great. To make sure you get the best results, follow these simple steps. First, begin pruning before they enter their active growth period in spring. Next, use sharp and clean shears or scissors when making any cuts to ensure a good clean cut and prevent disease from seeping into the vulnerable branches. You should then look for dead or unhealthy branches and remove them from the bush. If you want your shrub to bush out, pinch back the non-flowering side shoots after flowering has finished but before June. This will encourage the bush to produce a denser habit ideal for flowering gardens. Finally, remember not to prune more than one third of a plant's total growth in any given year as this can stress the plant. Following these easy steps should ensure that your berberis darwinii shrub stays looking attractive and blooms reliably every year!
Pruning Berberis darwinii shrubs is important for keeping these attractive and low-maintenance plants looking neat and tidy. Here’s your step-by-step guide to get you started:
- Begin pruning in late winter, before the new growth appears - this is when Berberis darwinii shrubs develop their flowers, so any pruning done at this time will not disrupt flowering later on.
- Start by removing any dead, damaged, or diseased branches from the base of the shrub – thinning out overcrowded branches may also be necessary to promote healthier growth.
- If desired, you can then begin shaping your shrub by gently cutting back extra length from long branches at an angle of 45 degrees - this will give it a more aesthetically pleasing appearance while still allowing it to fill out more evenly in summertime.
- After shaping, prune away any lower hanging or drooping branches so that they don’t obstruct pathways or interfere with other plants in your garden or landscape – take care not to overprune as this may cause harm to overall health of your shrub!
- Finally, finish up by removing any unsightly suckers at ground level – these are shoots that emerge directly from the roots and need to be removed otherwise they could eventually overtake all other parts of your plant!
Benefits of Pruning Berberis Darwinii Shrubs
Pruning Berberis Darwinii shrubs can bring many advantages, and should be done annually for optimal health. Regular pruning helps to control the size and shape of the shrub, so it does not overwhelm its environment or become unruly. Removing dead branches also encourages new growth, allowing for better foliage density and more movement in the plant's form. In addition to these aesthetic benefits, regular pruning can reduce disease and insect vulnerability that come with overcrowding and overgrowth while promoting winter hardiness. Taking a pragmatic approach to trimming older wood can yield impressive results; with proper care and pruning Berberis Darwinii shrubs will live longer and look healthier throughout their lifespans.
Aftercare Tips for Pruned Berberis Darwinii Shrubs
Pruned Berberis Darwinii shrubs require proper aftercare to thrive. Give them a regulated watering schedule, as they need more water than most other shrubs, in particular right after pruning and during prolonged dry periods. Applying fertilizer each spring can also give these beautiful shrubs the nutrients they need to reach their full potential. If flowers have been removed during pruning, you may wish to add mulch around the plant’s base. The best time to trim your pruned Berberis Darwinii Shrubs is summer but they may require occasional light trimming throughout the growing season. All in all, with some simple aftercare measures in place, this type of shrub should lend an eye-catching addition to any garden!
Common Mistakes When Pruning Berberis Darwinii Shrubs
Pruning Berberis darwinii shrubs requires precision and care to ensure the longevity and beauty of these vivid, bright blooming barberries. One common mistake made when pruning is cutting back branches too drastically, causing an imbalance in the shrub's shape or size. Additionally, removing more than one-third of the plant in a single trimming session can shock the system; a better approach is to trim small amounts over several seasons. Making cuts too close to the bud nodes can set the plant back due to damage of potential growth sites. A good tip for optimal pruning techniques is to use sharp, clean tools that promote healthy regrowth and avoid making jagged incisions that can take longer to heal properly. Being well informed and aware of these common mistakes while pruning will ensure Berberis darwinii gets all the care it needs!
Pruning your Berberis Darwinii shrubs will produce large, healthy yields of bright yellow flowers that create stunning paths and garden areas. Pruning requires careful attention to the age and growth pattern of the shrub, as well as its general health and size. Timing is important when pruning – too early or too late can result in improper growth and lost blooms in the spring. The main benefit to pruning Berberis Darwinii Shrubs properly is increased flowery abundance, accompanied by a neater shape that’s easier to care for. Additionally, doing so will help avoid common mistakes related to over-pruning, wrong cutting technique, or starting to prune at the wrong time of year. With proper preparation, knowledge and a clear objective in mind, you can ensure your Berberis Darwinii shrub receives the maximum benefit from pruning with minimal effort on your part.
How to Prune Climbing Vines
List by Variety
- How to Prune Actinidia
- How to Prune Akebia
- How to Prune Bougainvillea
- How to Prune Campsis
- How to Prune Celastrus
- How to Prune Chilean Glory Vine
- How to Prune Clematis Armandii
- How to Prune Clematis Montana
- How to Prune Climbing Rose
- How to Prune Hedera GoldHeart
- How to Prune Honeysuckle
- How to Prune Hydrangea Petiolaris
- How to Prune Ivy
- How to Prune Japanese Wisteria
- How to Prune Morning Glory
- How to Prune Parthenocissus
- How to Prune Persian Ivy Hedera Colchica
- How to Prune Schisandra
- How to Prune Star Jasmine
- How to Prune Sweet Peas
- How to Prune True Jasmine
- How to Prune Virginia Creeper
- How to Prune Wisteria
How to Prune Hedges
List by Variety
- How to Prune an Arborvitae Hedge
- How to Prune a Barberry Hedge
- How to Prune a Beech Hedge
- How to Prune a Boxwood Hedge
- How to Prune a Butterfly Bush Hedge
- How to Prune a Cotoneaster Hedge
- How to Prune an English Lavender Hedge
- How to Prune an Escallonia Hedge
- How to Prune an Euonymus-Hedge
- How to Prune a Firethorn Hedge
- How to Prune a Forsythia Hedge
- How to Prune a Griselinia Hedge
- How to Prune a Hawthorn Hedge
- How to Prune a Holly Hedge
- How to Prune a Hornbeam Hedge
- How to Prune a Juniper Hedge
- How to Prune a Laurel Hedge
- How to Prune a Leylandii Hedge
- How to Prune a Lilac Hedge
- How to Prune a Maple Leaf Viburnum Hedge
- How to Prune a Photinia Hedge
- How to Prune a Pink Ramanus Rose Hedge
- How to Prune a Privet Hedge
- How to Prune a Pyracantha Hedge
- How to Prune a Spirea Hedge
- How to Prune a Thuja Hedge
- How to Prune a Viburnum Hedge
- How to Prune a Western Red Cedar Hedge
- How to Prune a Yew Hedge
How to Prune Shrubs
List by Variety
- How to Prune an Abelia Shrub
- How to Prune an Abutilon
- How to Prune an Acer / Japanese-Maple
- How to Prune an Amelanchiers
- How to Prune an Apple-Tree
- How to Prune an Arbovitae Shrub
- How to Prune an Arbutus
- How to Prune an Aucuba
- How to Prune a Azalea Mollis
- How to Prune Azaleas
- How to Prune a Bay Tree Shrub
- How to Prune a Berberis Darwinii
- How to Prune Berberis Deciduous Types
- How to Prune a Boxwood Shrubs
- How to Prune a Brachyglottis Senecio
- How to Prune a Buddleia Alternifolia
- How to Prune Buddleias Butterfly Bushes
- How to Prune a Buddleja Globosa
- How to Prune a Callicarpa
- How to Prune a Camellia
- How to Prune a Caryopteris
- How to Prune a Catalpa Bignonioides Aurea
- How to Prune Ceanothus Deciduous Types
- How to Prune Ceanothus Evergreen Types
- How to Prune a Ceratostigma
- How to Prune a Chaenomeles
- How to Prune a Choisya
- How to Prune a Cistus
- How to Prune a Clematis
- How to Prune a Cornus
- How to Prune a Cotinus Royal Purple
- How to Prune a Cytisus Scoparius
- How to Prune a Exochorda x Macrantha
- How to Prune a Forsythia
- How to Prune a Hebe
- How to Prune a Hydrangeas
- How to Prune Juniper Shrubs
- How to Prune a Lavatera
- How to Prune Lilac Bushes
- How to Prune a Mugo Pine
- How to Prune Rose Bushes
- How to Prune Ribes
- How to Prune Spirea Shrubs
- How to Prune Viburnum Shrubs
- How to Prune a Weigela
- How to Prune a Yew
How to Prune Trees
List by Variety
- How to Prune a Apple Tree
- How to Prune a Apricot Tree
- How to Prune a Ash Tree
- How to Prune a Birch Tree
- How to Prune a Cherry Tree
- How to Prune a Elm Tree
- How to Prune a Fig Tree
- How to Prune a Grape Tree
- How to Prune a Hickory Tree
- How to Prune a Maple Tree
- How to Prune a Oak Tree
- How to Prune an Olive Tree
- How to Prune a Peach Tree
- How to Prune a Pear Tree
- How to Prune a Plum Tree
- How to Prune a Poplar Tree
- How to Prune a Walnut Tree
Gallery
Necessitatibus eius consequatur ex aliquid fuga eum quidem sint consectetur velit


Michael Carter
Vestibulum ante ipsum primis in faucibus orci luctus et ultrices posuere cubilia curae; Donec vel erat in nulla efficitur tempor non ut nisl. Integer venenatis eros ut dui viverra fermentum.
Sophie Wilson
Nam ut turpis hendrerit, varius nunc vel, elementum dui. Morbi vulputate dolor sit amet scelerisque egestas. Vestibulum eleifend nunc ut bibendum fermentum.
Alex Morgan
Cras non velit nec purus tempor rhoncus. Sed non mauris vitae erat consequat auctor eu in elit. Class aptent taciti sociosqu ad litora torquent per conubia nostra.