How and When to Prune A Yew Tree
A Complete Guide to Planting and Caring for the Yew Shrub

Gardening is an art that comes with its set of challenges, but the rewards are plentiful. For many gardeners, learning about and caring for unique plants can be a source of great satisfaction. If you're looking to start caring for one of the most common yet captivating shrubs around – yew – then you've come to the right place! This complete guide explores what makes yews so special and provides tips on how to effectively plant and care for them in your own backyard or public space. Let's get started!
What is the Yew Shrub and How Does it Differ from Other Plants
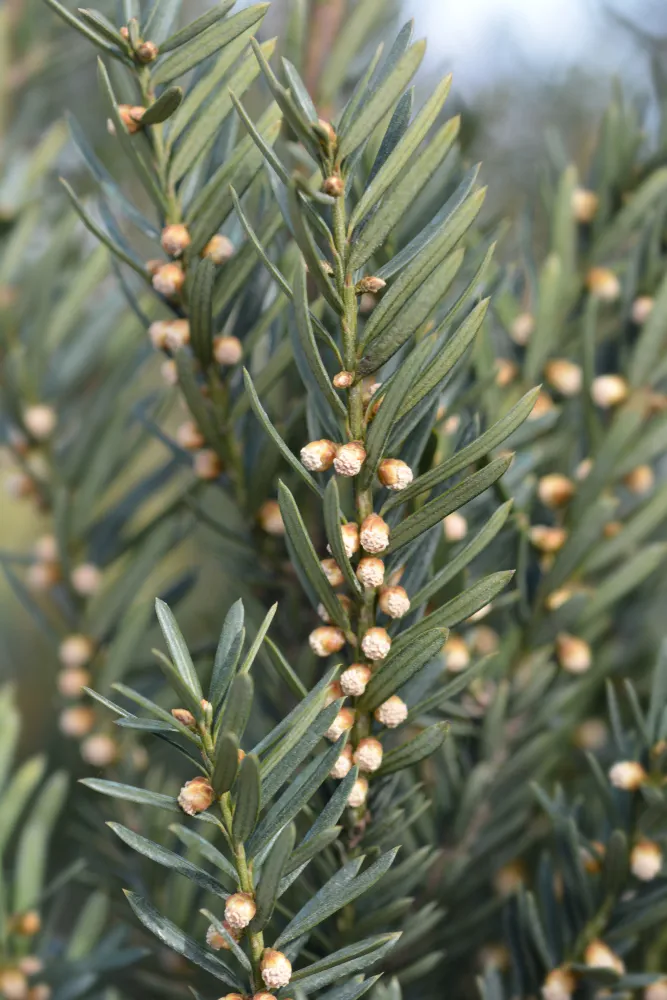
The yew shrub is a unique and ancient plant with an impressive lifespan. This shrub can live for hundreds of years, even up to a thousand years in some cases. The yew shrub is also distinct from other plants because of its poisonous nature. It contains several toxic compounds that have been used in traditional medicines for centuries.
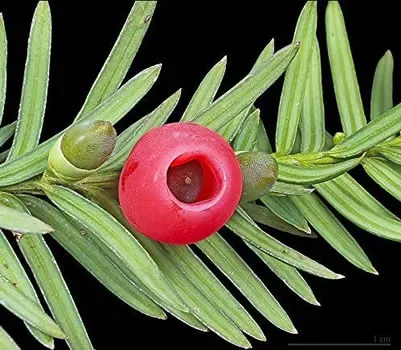
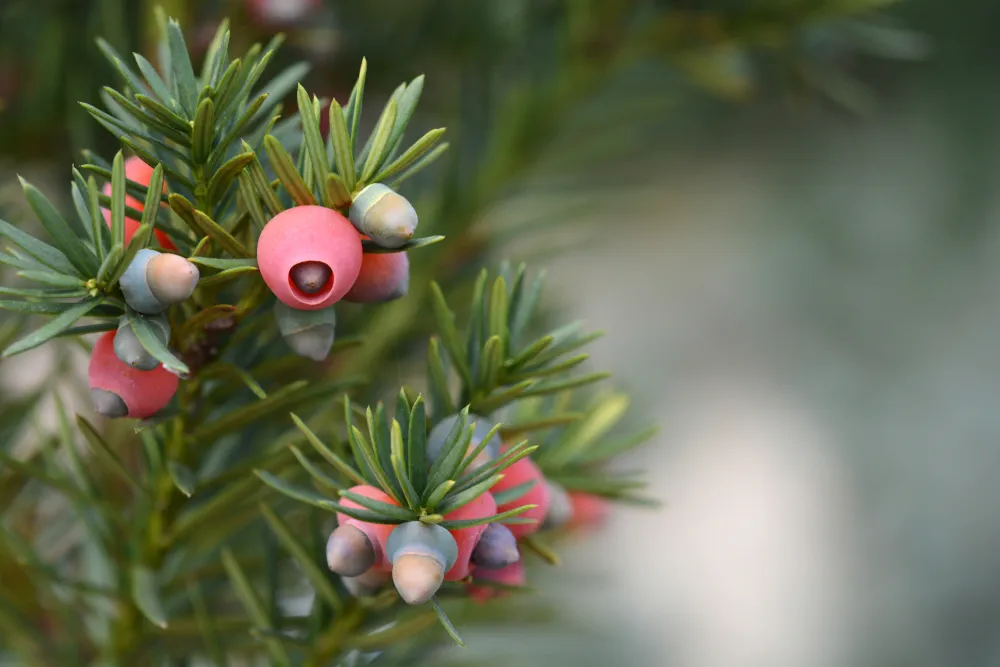
Additionally, while most plants produce their seeds in fruits, the yew shrub produces them in a fleshy structure called an aril. This makes it stand out from other plants and adds to its intriguing characteristics.
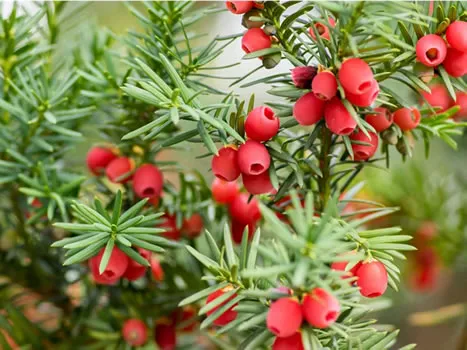
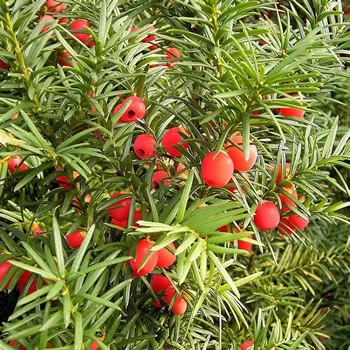
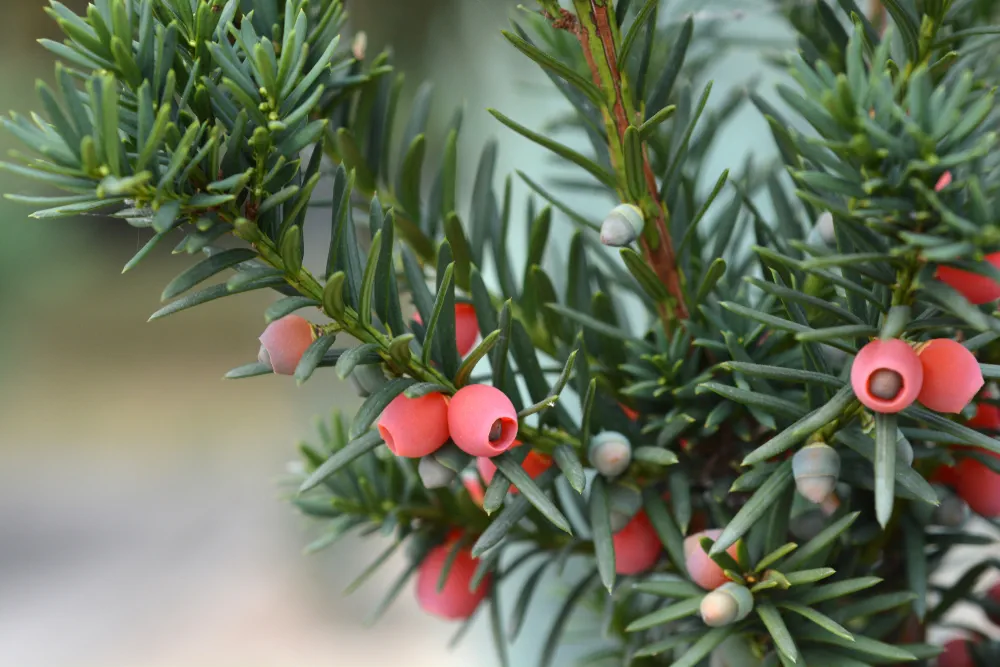
I can provide information on the poisonous parts of a yew tree. All parts of the yew tree, including its needles, bark, and seeds, contain a toxic substance called Taxine. The highest concentration of Taxine is found in the needles and seeds.
Yew tree poisoning can be very harmful to both human beings and animals. Eating even a small amount of the tree's poisonous needles or seeds can cause severe symptoms, leading to convulsions, heart failure, and eventually, death. Symptoms of yew tree poisoning in humans include nausea, sweating, shortness of breath, seizures, dizziness, and even coma.
In case someone has been poisoned by a yew tree, it is important to seek immediate medical attention. There are antidotes available to treat yew tree poisoning, but they are most effective when administered within the first hour of ingestion.
To avoid poisoning when dealing with yew trees, individuals should take precautions such as wearing gloves and protective clothing when handling the tree, washing their hands thoroughly after contact with the tree, keeping yew tree parts away from children and pets, and avoiding using yew tree wood for barbecues or other open fires.
In conclusion, it's essential to be aware of the poisonous parts of yew trees and their harmful effects on human beings and animals. By taking necessary precautions and knowing what to do in case of poisoning, we can continue to appreciate these trees without putting ourselves at risk.
The History of the Yew in the UK
The yew tree has a long and fascinating history in the United Kingdom. Ancient yew trees can be found in many parts of the country and are often associated with sacred sites and burial grounds. It is believed that yew trees were planted in churchyards during the Middle Ages, and some of these trees still stand today. The wood from yew trees has been used for many purposes over the centuries, including for making longbows, furniture, and even medicine. Despite being poisonous to humans and animals, the yew tree has become a beloved symbol of longevity and renewal. Its resilience and ability to survive for thousands of years make it a living link to the past that continues to fascinate us today.
The Yew tree (Taxus baccata) has a rich and captivating history in the United Kingdom, with some of its ancient specimens dating back thousands of years. The yew is native to the UK, and it's hard to pinpoint exactly when it first arrived. However, archaeological evidence shows that yew wood was used to create the Meare Heath bow during the Middle Stone Age, which indicates its presence in Britain for at least several millennia.
In ancient times, the yew tree held significant importance in various cultures and societies. In Celtic mythology, yew trees symbolised death and resurrection due to their ability to form new trunks from drooping branches. This tree also had a strong association with immortality, likely due to its longevity and evergreen nature.
Yew trees have also played a substantial role in religious ceremonies and symbolism. Many ancient yews are found in churchyards across the UK, such as the Fortingall Yew in Perthshire, Scotland, considered one of the oldest living things in Europe. There's a belief that churches were often built next to these ancient yews, which predate Christianity.
The yew tree has also contributed to Britain's economy and culture. Its wood was highly prized for making longbows, a weapon that played a key role in English military history. In literature and art, the yew tree has often been used to evoke themes of death, rebirth, and eternity.
Scientifically, the yew tree is known for its toxicity, with nearly all parts of the tree containing taxine alkaloids. However, this 'tree of death' also harbours life-saving properties. The bark of the Pacific Yew (a close relative of the European Yew) is a source of the drug paclitaxel, used in the treatment of several forms of cancer.
Today, the yew tree is recognised for its ecological and environmental significance. It's an integral part of the UK's woodland ecosystems, providing habitat for various species. However, many ancient yews are unprotected and face threats from disease and climate change.
Efforts are being made to conserve these majestic trees. The Ancient Yew Group is one organisation dedicated to the protection and recording of ancient yews in Britain. Their work, along with others, is vital in ensuring that the legacy of the yew tree continues for future generations.
In conclusion, the history of the yew tree in the UK is a fascinating blend of mythology, religion, warfare, medicine, and ecology. This 'tree of the dead' has been a silent witness to the unfolding of British history and continues to stand as a symbol of endurance and rebirth.
The Main Advantages of the Yew - Is the Yew a Shrub, a Tree or a Hedge?
The Yew is a versatile plant that offers multiple benefits in any garden or landscape. This evergreen plant is perfect as a hedge or an ornamental tree. Its narrow, dense shape makes it easy to maintain and allows it to grow in small spaces. Not only does it add a touch of sophistication to any garden, but the Yew is also useful in creating privacy. Its thick, evergreen foliage makes it suitable for screening and keeping the wind at bay. And let's not forget that the Yew is also incredibly hardy, with the ability to withstand harsh weather conditions and resist pests and diseases. In summary, the Yew is a plant that is both beautiful and practical and should not be overlooked when landscaping your garden.
How to Choose a Suitable Location for Planting the Yew Shrub
Choosing the right location for planting your yew shrub is crucial for its growth and health. Before digging a hole, consider factors such as soil type, sun exposure, and climate. Yews prefer acidic soil with good drainage, so avoid planting them in areas with heavy clay soil. They also thrive in partial shade to full sun, but hot afternoon sun can scorch the leaves.
Additionally, yews are tolerant to cold weather, making them a great option for areas with harsh winters. If you're looking to add a touch of elegance to your landscape, the versatile and adaptable yew shrub may be the perfect choice - just be sure to choose the right spot!
Preparing the Soil for Planting the Yew Shrub
As gardening enthusiasts can attest, preparing the soil for planting is a critical step in ensuring the success of any shrub. The same principle applies when it comes to planting a yew shrub. These plants require nutrient-rich soil that drains well, and the soil should be sufficiently loosened to enable the roots to take hold. Before planting, it's essential to test the soil's pH level and adjust it accordingly to provide the optimal environment for the yew shrub to thrive. With proper preparation, the yew shrub will grow strong and healthy for years to come.
Preparing Soil for Planting Yew Shrubs: A Step-by-Step Guide
Before planting a yew shrub, it is essential to prepare the soil carefully to ensure optimal growth and development. Here's a step-by-step guide on how to prepare the soil to plant your yew shrub.
Tools and Materials- Garden fork or spade
- Compost or organic matter
- Fertilizer (optional)
- Soil pH tester (optional)
-
Step 1: Choose the Right Location
Yew shrubs are quite adaptable and can grow well in a range of soil types. However, they prefer slightly acidic soil that is well-draining. Choose an area that receives at least six hours of direct sunlight per day to help the yew shrub grow lush and healthy.
-
Step 2: Remove Weeds and Debris
Before preparing the soil, remove weeds, rocks or any debris from the planting site. Weeds are especially harmful to young yew shrubs, so ensure that you remove them entirely. Clear the area at least one meter in radius from the planting site to avoid competition for nutrients and water.
-
Step 3: Test Soil pH (Optional)
If you don't know the soil pH, testing the soil's pH level can be useful to determine the balance of nutrients the yew shrub needs. Yew shrubs prefer slightly acidic soil, with a pH between 6.0 and 7.0.
-
Step 4: Loosen the Soil
Using a garden fork or spade, loosen the soil in the planting area to a depth of around 30-40cm, breaking up the soil clumps, and removing any rocks or debris.
-
Step 5: Add Organic Matter
To improve the soil's structure, add some compost or organic matter such as well-rotted manure to the soil. Distribute the organic matter evenly across the planting area before digging it in with the fork or spade. This will improve the soil's aeration, drainage, and nutrient content.
-
Step 6: Add Fertilizer (Optional)
If the soil is deficient in nutrients, consider adding a general-purpose fertilizer that is balanced for nitrogen, phosphate, and potassium. Distribute it evenly over the planting site before incorporating it into the soil with the garden fork or spade.
-
Step 7: Level the Soil
Once organic matter and fertilizers have been incorporated, level the soil by using the rake evenly and break any large clumps of soil.
-
Step 8: Water
Once the soil is levelled, water the site generously. This will help to settle the soil into place and will allow the new yew shrub to establish itself more quickly.
By following these eight basic steps, you can prepare the soil correctly and create an environment for a healthy yew shrub that will grow and thrive for years to come.
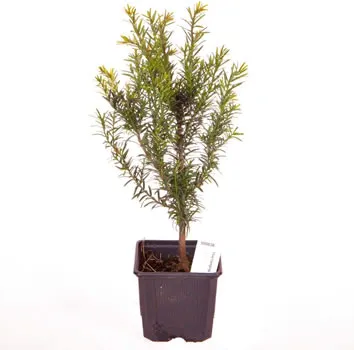
A Step-by-Step Guide on How to Plant a Yew Tree
If you're looking to add a touch of elegance to your backyard, a yew tree might just be the perfect addition! Planting a yew tree might sound like a daunting task, but with our step-by-step guide, you'll be able to do it with ease. The first thing you need to do is choose the perfect location for your tree, ensuring it receives full or partial sunlight. Next, dig a hole that's twice as wide as the yew tree's rootball. Be sure to loosen the soil at the bottom of the hole to allow for the tree's roots to properly spread out. Then, carefully place the tree in the hole, positioning it straight and making sure the top of the rootball is level with the surrounding soil. Finally, fill in the hole with soil, gently packing it down, and water your new tree thoroughly. With these simple steps, you'll have a beautiful yew tree to enjoy in no time!
Planting out a Yew Tree: A Step-by-Step Guide
Planting a yew tree properly can help ensure its healthy growth and development for years to come. Here's a step-by-step guide on how to plant out a yew tree:
Tools and Materials- Yew tree sapling
- Shovel
- Compost or organic matter
- General-purpose fertilizer
- Water
-
Step 1: Choose the Right Location
Select a suitable planting site for your yew tree. Yews prefer well-drained soil but will tolerate most soil types. The site should be exposed to direct sunlight for at least six hours a day. If planted under a tree, ensure that it's not competing with the tree roots for nutrients.
-
Step 2: Dig a Hole
Dig a hole that is twice as wide and deep as the yew tree's root ball. This allows the roots to spread easily and anchor the tree securely.
-
Step 3: Amend the Soil
If the soil is poor, consider adding compost or organic matter to boost the soil's nutrient content. Incorporate the compost or organic matter into the soil evenly.
-
Step 4: Add Fertilizer
If required, add a general-purpose fertilizer that is balanced for nitrogen, phosphate, and potassium, and incorporate it into the soil evenly.
-
Step 5: Position the Yew Tree
Place the yew tree into the hole, ensuring that the top of the root ball is level with the soil surface.
-
Step 6: Backfill the Hole
Fill the hole with soil and gently pack it around the root ball, being careful not to compact the soil too tightly as it reduces water retention.
-
Step 7: Water the Tree
Water the tree thoroughly to help settle the soil around the root ball. Add enough water to keep the soil evenly moist but not waterlogged.
-
Step 8: Mulch the Area
Add a 2- to 3-inch layer of mulch like bark or grass clippings around the tree. This can help retain moisture, regulate soil temperature, and inhibit weed growth.
-
Step 9: Prune the Tree
Remove any broken or damaged branches using pruning shears. Ensure that the cuts are clean to avoid damaging the tree.
By following these nine basic steps for planting out your yew tree, you can ensure its long-term growth and health. Adequate watering, nutrient-rich soil, and proper pruning are essential to help the yew tree thrive and become a beautiful addition to your garden.
What Type of Fertilizer is Best for Nourishing the Yew Shrub
If you're looking to maintain a healthy yew shrub, you may be wondering what type of fertilizer is best suited for your needs. The good news is that yews are relatively easy to care for, and can thrive with a variety of different fertilizer types. Some gardeners prefer to use a slow-release granular fertilizer, which can supply a steady dose of nutrients over the course of several months. Others find success with a liquid fertilizer that can be applied directly to the roots or foliage of the plant. Ultimately, the key to nourishing your yew shrub is to choose a fertilizer that is rich in nitrogen, phosphorus, and potassium, as these are the primary nutrients that yews require for optimal growth and health. With a little bit of research and experimentation, you can find the perfect fertilizer for your yew shrub and enjoy a healthy, vibrant plant for years to come.
Essential Watering Techniques for Caring for the Yew Shrub
Caring for your yew shrub to ensure it thrives throughout the year requires attention to detail and knowledge of essential watering techniques. Knowing how much water your yew shrub needs can help you avoid overwatering or underwatering, which can both be damaging to the plant. It's important to water the yew shrub deeply, allowing the water to penetrate the soil and reach the roots, rather than just the surface.
Additionally, timing is key with yew shrubs; they do well with morning watering during the growing season to allow for adequate uptake of water before the heat of the day sets in. By mastering these watering techniques, you can help ensure that your yew shrub stays healthy and vibrant throughout the year.
Tips on Pruning and Trimming Your Yew Shrub
If you're looking for ways to keep your yew shrub healthy and beautiful, pruning and trimming are essential steps in its care. But where do you start? First, make sure you have the right tools that are sharp and clean to prevent damage to the plant. Then, assess the shrub's structure and remove any dead or diseased branches. It's also important to thin out the interior of the shrub to promote air circulation and light penetration. Don't forget to maintain a natural shape, and avoid overpruning as it can lead to growth issues. With these tips, your yew shrub will thrive and bring life to your garden for years to come!
The Recommended Propagation Methods of the Yew Shrub

The yew shrub can be a beautiful addition to any garden, but it's important to know the recommended propagation methods to ensure successful growth. One popular method is through layering, where you encourage the shrub's branches to grow roots before cutting them away from the main plant.
Another option is to take cuttings from the shrub in the early summer and plant them in a well-draining soil. Regardless of the method chosen, it's important to carefully monitor the shrub's growth and provide ample water and sunlight for optimal growth.
With proper care and attention, your yew shrub is sure to thrive for years to come!
Propagating a Yew Tree from a Cutting: A Step-by-Step Guide
Propagation of a yew tree from a cutting can be an effective way of producing more trees that have the same characteristics of the parent tree. Here's a step-by-step guide on how to propagate a yew tree from a cutting:
Tools and Materials
- Sharp pruning shears/scissors
- Clean, sharp knife
- Rooting hormone treatment
- Pot/container
- Potting mix
- Water
- Clear plastic bag
-
Step 1: Collect the Cutting
Choose a healthy, mature yew tree to take a cutting from. Locate a branch growth that is soft and young, bendy, and with a diameter of around ¼ inch to 1 inch. Cut the shoot from the parent plant via sharp pruning shears/scissors or by using a clean sharp knife, making sure that the cutting is at least 4-6 inches long and has at least 3 nodes below the cutting.
-
Step 2: Trim the Cutting
Next, remove any lower needles or leaves from the lower half of the cutting to prevent rot, and make a straight cut across the base, just below the last node.
-
Step 3: Apply a Rooting Hormone Treatment
To aid root growth from the cutting, dip it in a rooting hormone solution. Follow the manufacturer's instructions for the right amount of the treatment to be applied.
-
Step 4: Plant the Cutting
Insert the cutting into a pot or container filled with potting mix. Gently firm the soil around the stem to ensure it has good soil contact, but don't compact the soil.
-
Step 5: Water the Cutting
Water the cutting thoroughly, and place the container in a position that provides a bright, indirect light, and moderate to high humidity.
-
Step 6: Cover with a Plastic Bag
Insert a clear plastic bag over the top of the container/pot and keep it in place using a rubber band or twine. This will create a humidity-rich environment for the cutting while it develops roots.
-
Step 7: Maintain the Cutting
Keep the container in a warm and protected location out of direct sunlight and maintain moderate moisture levels in the soil. After 4-8 weeks, you'll see new growth from little buds on the lower part of the cutting.
-
Step 8: Replant the Cutting
Once the roots have grown to at least two inches, the cutting can be transplanted into a new container with fresh potting soil or planted directly in the desired spot outdoors.
Propagation of a yew tree from a cutting is a simple process, and by following these steps, you can give your plant the best chance of success. It is an excellent way to propagate and enjoy many yew trees with identical characteristics.
Propagating a Yew Tree through Layering: A Step-by-Step Guide
Propagation of a yew tree through layering can be a useful method of producing new plants that have the same characteristics as the parent tree. Here's a step-by-step guide on how to propagate a yew tree through layering:
Tools and Materials- Sharp pruning shears/scissors
- Clean, sharp knife
- Rooting hormone treatment
- Pot/container (optional)
- Trowel (optional)
- Garden twine or wire
- Potting mix (optional)
- Water
-
Step 1: Choose the Branch
Choose a flexible and healthy lower branch on the yew tree that you want to propagate. Select a branch that is close to the ground, and preferably close to the main stem.
-
Step 2: Prep the Area
Prepare the area around the selected branch by removing any weeds, grass, or debris. If the soil is dense and compacted, loosen it using a trowel, making sure it is not too dry.
-
Step 3: Scrape the Branch
Position the branch by bending it down close to the ground. Next, using a knife, carefully scrape a 2-inch portion of the bark and cambium layer around the bottom of the branch where it meets the soil.
-
Step 4: Apply a Rooting Hormone Treatment
To promote root growth, apply a rooting hormone treatment to the scraped part of the branch. Dip it in the rooting hormone solution, making sure to cover the area thoroughly.
-
Step 5: Secure the Branch
Place garden twine or wire securely around the scraped part of the branch, and tie it to a support stake or peg in the soil to prevent it from rising. Cover the wound in the branch with some moist sphagnum moss.
-
Step 6: Water the Branch
Water the soil generously to sustain moisture, which is important for root formation. Do this daily and always maintain moisture in the soil.
-
Step 7: Monitor Progress
Monitor the rooted stem for progress by gently tugging it after about two months. If the stem appears to be secured, snip it off the parent plant.
-
Step 8: Transplanting
Transplant the new rooted yew plant into a pot, container, or directly to the garden soil. If using a container or pot, add either store-bought potting mix to the container or create your own mix. Water the soil immediately after planting to ensure it is moist.
Propagation of a yew tree through layering is a relatively straightforward process. By following these steps, you can get similar results to that of propagating through cutting, but with less stress and labour.
Growing a Yew Tree from Seed: A Step-by-Step Guide
Growing a yew tree from seed can be a cost-effective and rewarding way to produce a new tree. Here's a step-by-step guide on how to grow a yew tree from seed:
Tools and Materials
- Yew tree seeds
- Seed-starting trays or small pots
- Potting soil
- Fertilizer
- Water
- Clear plastic bags
- Grow lights (optional)
-
Step 1: Collect the Seeds
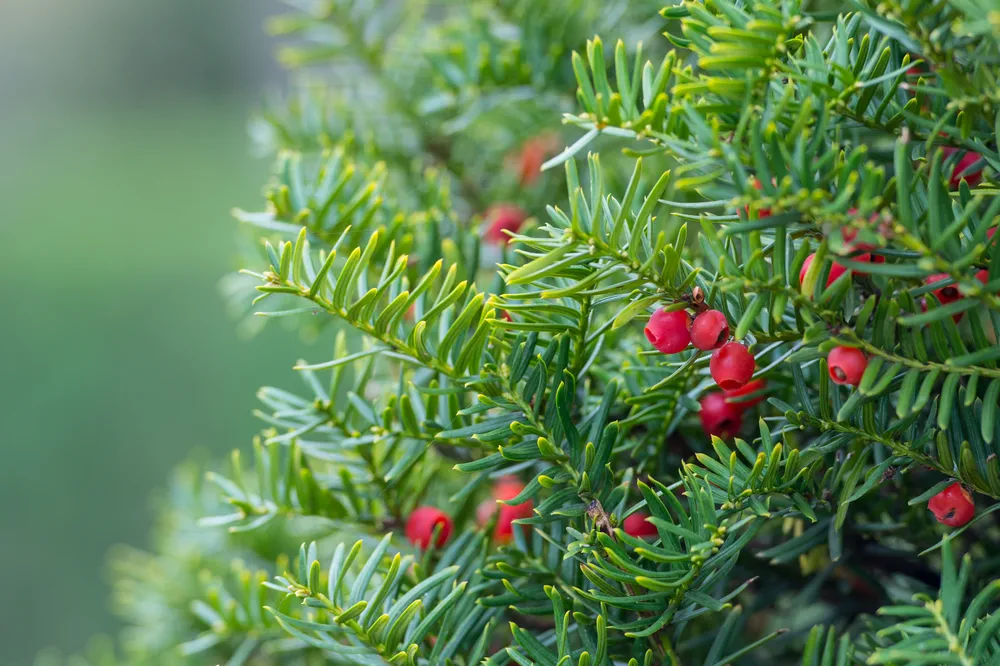
Collect fresh yew tree seeds directly from the tree in the autumn season when they are ripe. The seeds resemble red berries and are soft and fleshy.
-
Step 2: Remove the Fleshy Coating
Use a clean, sharp knife to remove the fleshy covering around the seeds. This can be done by slicing open the seeds, being careful not to damage the inside seeds.
-
Step 3: Soak the Seeds
Soak the yew tree seeds in water for one day to help remove any residues on the seeds.
-
Step 4: Pot the Seeds
Fill small pots or seed-starting trays with good quality potting soil. Plant the seeds by placing them into the soil, with the pointy side of the seed pointing downwards, and cover with an inch of soil.
-
Step 5: Add Fertilizer
Add small amounts of liquid fertilizer to stimulate growth. Avoid applying too much fertilizer as it can lead to nitrogen burn, which can stunt the seedlings.
-
Step 6: Water the Seeds
Water the soil immediately after planting to saturate the soil completely. Avoid overwatering as it can suffocate the seedlings.
-
Step 7: Cover the Seedlings
Cover the seeds with clear plastic bags to create a mini-greenhouse effect. This will trap heat and moisture, which will really help germination.
-
Step 8: Wait for Germination
Place the pots/single seed starter tray in a warm and dark location. Check the soil daily to ensure that it remains moist, and the seeds have germinated within 8-12 weeks.
-
Step 9: Remove Cover
Once the seeds have germinated and the seedlings have emerged from the soil, remove the plastic bags and place them in a well-lit area. If natural sunlight is not available, use grow lights to provide sufficient light.
-
Step 10: Transplant to a Bigger Pot
Once the seedlings have two sets of leaves, transplant them to a larger pot, and add more soil mix to their container. Water them as needed to keep the soil evenly moist.
By following these 10 basic steps, you can grow your yew tree from seed successfully. Growing yew trees from seeds may take longer compared to other propagation methods, but it's an exciting and rewarding process.
The Varieties of the Yew - Their Characteristics
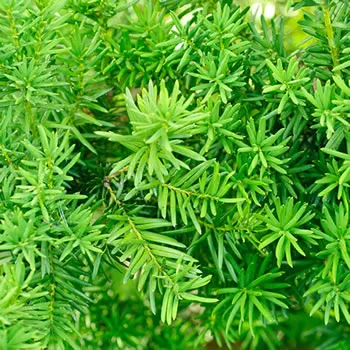
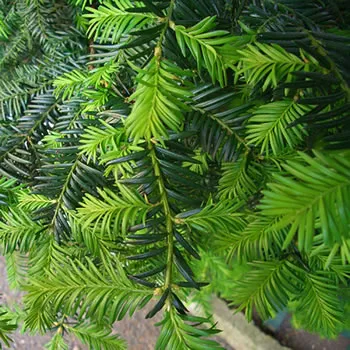
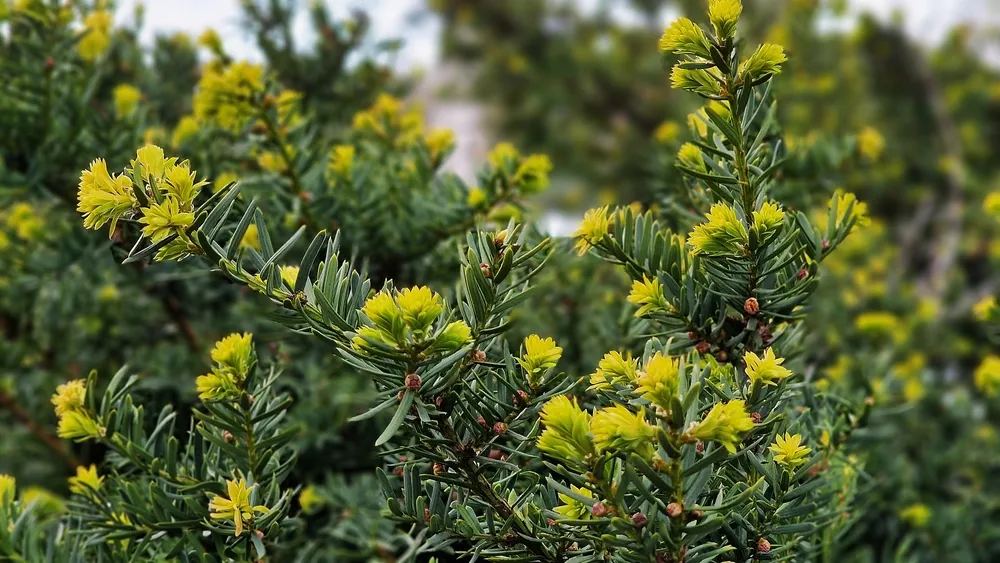
The yew tree, native to Europe, North Africa, and western Asia, is not only a stunning ornamental plant, but also a natural source of chemotherapy drugs. Yews have a variety of species, each with their unique characteristics. The English yew, commonly found in the UK and Ireland, has a striking and dense foliage, while the Japanese yew stands out with its lush green needles and upright growth habit. The yews also vary in size and shape, with the Irish yew being a narrow and columnar tree, and the Pacific yew being a large and spreading shrub. Despite their differences, what unites these varieties is their remarkable resilience and longevity. Yew trees can live for hundreds, and even thousands of years, making them both a beautiful addition to any landscape and a symbol of timelessness.
The Yew tree (Taxus spp.) has numerous varieties available, each with unique characteristics. Here is a list of the most commonly known yew tree varieties:
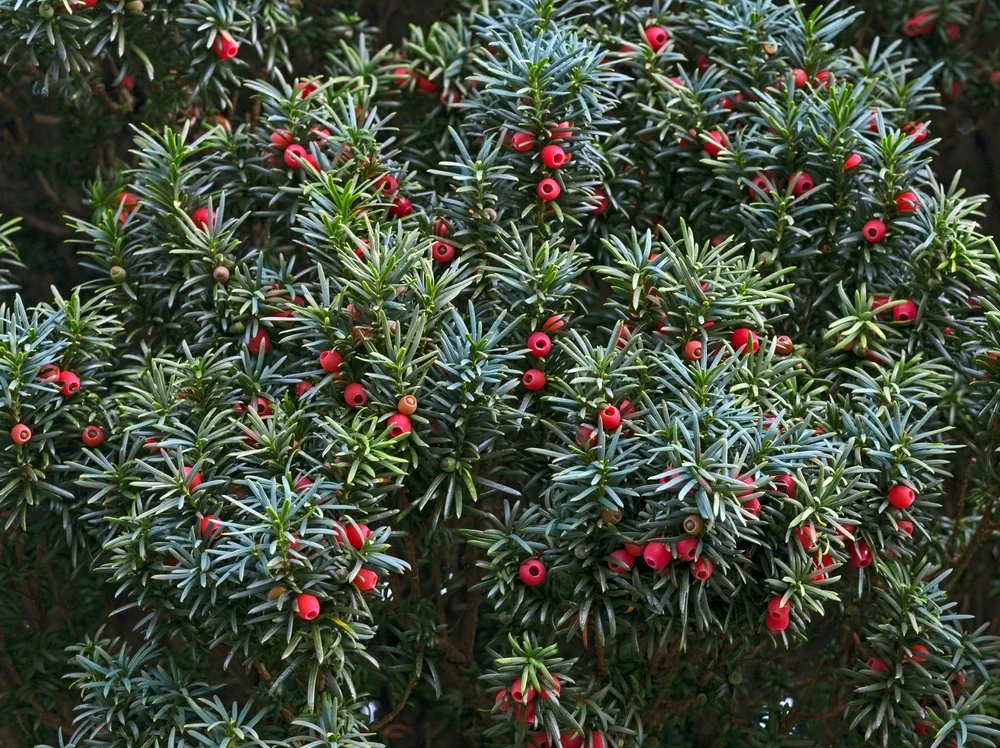
- Taxus baccata or the English Yew: This variety is the most popular of all. It grows in a pyramid shape, reaching 50 to 90 feet tall and 20 to 40 feet wide. It has dark green foliage that is soft and elegant and can tolerate partial to full shade.
- Taxus x media or the Anglojap Yew: This is a popular hybrid variety. It forms a densely branched shrub or small tree, reaching 6 to 20 feet high and wide. It has dark green foliage that is coarse in texture and prefers partial to full sun exposure.
- Taxus cuspidata or the Japanese Yew: This variety is native to Japan, with a columnar or pyramidal growth habit. It reaches 30 to 40 feet high and 10 to 20 feet wide and has a dark green needle-like foliage. It prefers partial shade and well-drained soil.
- Taxus x media 'Hicksii' or the Hick's Yew: This variety has a tightly columnar growth pattern, growing up to 10 to 15 feet tall and two feet wide. It has bright green needle foliage and prefers partial to full sun exposure.
- Taxus x media 'Densiformis' or the Dwarf Anglojap Yew: As the name implies, this is a dwarf variety reaching only 3 to 4 feet tall and wide, making it perfect for small spaces and hedges. It is slowly growing and has an upright growth habit, with dark green foliage.
- Taxus canadensis or the Canadian Yew: This variety is native to eastern North America. It grows as a spreading shrub and reaches 1 to 5 feet high and 5 to 8 feet wide. It has dark green needle-like leaves and prefers partial shade and moist soil.
- Taxus floridana or the Florida Yew: This variety is native to Florida and is an evergreen shrub that grows up to 10 to 20 feet tall and 10 feet wide. It has reddish-brown bark and needle-like foliage. It prefers partial shade and moist soil.
Generally, yew trees are slow-growing, with most varieties only growing an average of 6 inches per year. The growth rate can be affected by environmental factors like soil condition, light, and moisture.
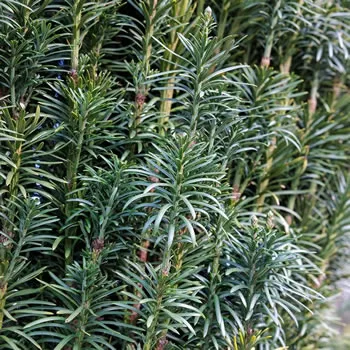
Different Varieties (spot the differences)
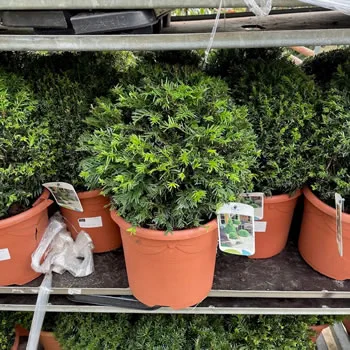
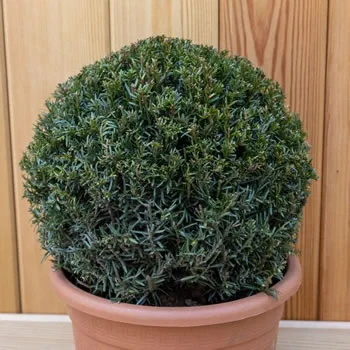
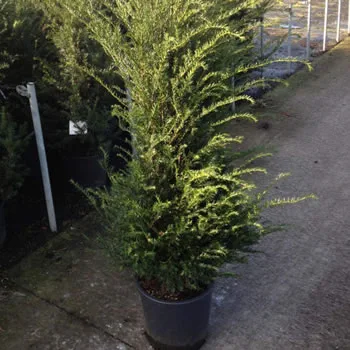
Growing Yew Shrubs in Containers
Growing yew shrubs in containers is a great way to add some greenery to a small space or patio. These easy-to-care-for plants provide year-round visual interest with their deep green foliage and unique texture. Plus, with the ability to control the soil and watering conditions, container-grown yew shrubs can thrive in a variety of environments. Whether you're new to gardening or a seasoned pro, yew shrubs are a low-maintenance option that is sure to add some natural charm to your home. With a little bit of patience and attention, you can watch your yew shrubs grow and flourish in their cozy container homes.
Yew trees are generally adaptable to a variety of growing conditions, including containers. However, some varieties are better suited to container growing than others due to their smaller size or slower growth rate. Here are some yew tree varieties that are well-suited for container growing:
- Dwarf Anglojap Yew (Taxus x media 'Densiformis'): This dwarf variety is slow-growing, and grows to be only three to four feet tall and wide, making it a great choice for container growing.
- Hicksii Yew (Taxus x media 'Hicksii'): This variety has a narrow, columnar shape that makes it ideal for container growing. It can reach up to 10 to 15 feet tall but only grows two feet wide.
- Taunton Spreading Yew (Taxus x media 'Tauntonii'): This variety is a low-growing spreading shrub that reaches only three to four feet tall and eight to 10 feet wide, making it ideal for large container planting.
- Dward Bright Gold Yew (Taxus baccata 'Dwarf Bright Gold'): This yew tree variety has a slow growth rate, growing to about four feet tall and wide over many years. It has golden-yellow foliage, which makes it a unique choice for container gardening.
Remember to choose a container that is deep, at least 18 inches, as yew trees have relatively large and deep root systems. Ensure the soil is well-draining and fertilize regularly during the growing season. Place the container in an area that gets sun exposure of at least six hours per day. With proper care, these yew tree varieties can make excellent additions to container gardens.
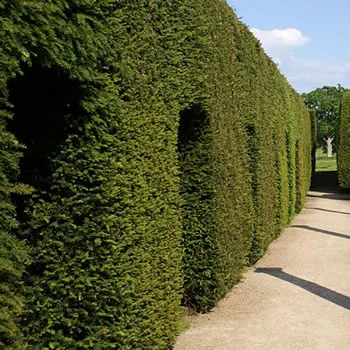
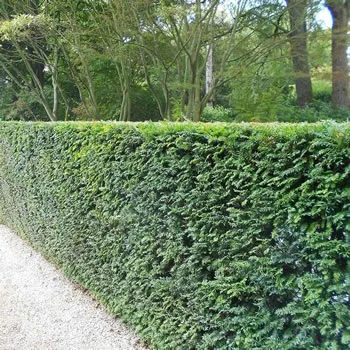
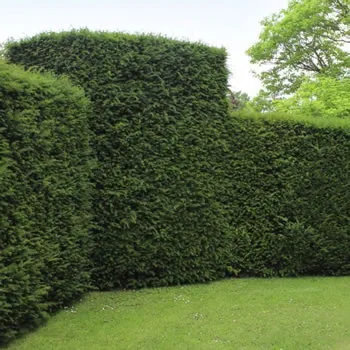
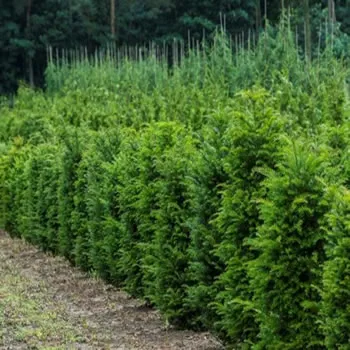
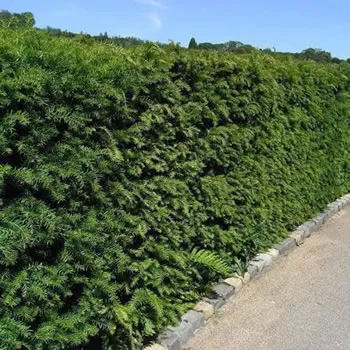
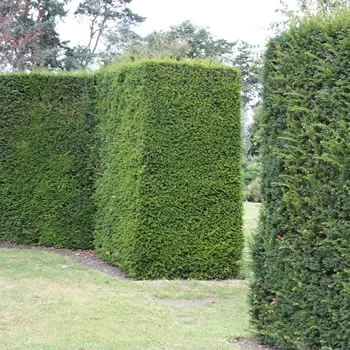
Growing Yew Shrubs as a Hedge
Yew shrubs make for an excellent hedge option thanks to their dense foliage and ability to be shaped into various forms. Unlike other shrubs, yew shrubs can grow in almost any soil type and require minimal maintenance once established. However, it's important to note that yew shrubs are toxic, so if you have young children or pets, it may be best to choose a different hedge type. Overall, growing yew shrubs as a hedge is a great option for those looking for a low-maintenance and visually appealing addition to their outdoor space.
Planting a yew shrub as a hedge requires planning, patience and attention to detail. Here is a comprehensive step-by-step guide to help you plant a yew shrub hedge.
Materials Needed:- Yew shrub plants
- Garden forks or shovels
- Measuring tape
- Water hose
- Compost or organic matter
- Garden stakes
- String
- Pruning shears
Step-by-Step Guide to Planting a Yew Shrub Hedge
-
1. Site Selection
Before planting, choose a site that is well-drained and in partial to full sun exposure. The soil should be free of rocks, weeds, and grass to ensure that the yew shrubs have enough space to grow healthily.
-
2. Measuring and Marking
Measure the length of the hedge line and determine the required spacing of the yew shrubs. The recommended spacing between plants is generally 12-18 inches apart on center, depending on the variety. Mark the locations with garden stakes and string to ensure a straight and accurate row.
-
3. Dig the Holes
Using garden forks or shovels, dig holes that are wide enough to accommodate the root balls of the yew shrubs. The depth should be twice the size of the ball, and the base of each hole should be loosened to allow for proper drainage.
-
4. Plant the Yew Shrubs
Place the yew shrubs into the holes, ensuring that the soil level of the plants is even with the surrounding soil. Fill the holes with soil, compost or organic matter, and gently tamp down around the roots to remove any air pockets.
-
5. Water Your Shrubs
After planting, water your new yew shrubs thoroughly to saturate the soil and promote healthy root growth.
-
6. Pruning and Maintenance
Pruning your yew shrubs is important to keep them looking neat and tidy. Prune the tops of the shrubs to encourage bushy growth, and remove any damaged or diseased branches as needed.
-
7. Fertilizer Application
Apply a balanced fertilizer after the first year of planting in spring to promote healthy growth. Spread the fertilizer at the base of each yew shrub according to the package instructions.
By following these seven simple steps, your yew shrubs will become established and will grow into a beautiful and sturdy hedge. Remember to maintain your hedge regularly by pruning and applying fertilizers as needed.
Growing a Yew Tree
Growing a yew tree can be a fulfilling and rewarding experience. These evergreen trees are known for their majestic appearance and can thrive in a variety of climates and soils. To start, choose a location that receives ample sunlight and has well-draining soil. Yew trees can be planted in the fall or spring, and will require consistent watering until established.
Pruning is essential to maintain the desired shape and size of the tree, and should be done in late winter or early spring. Yew trees are also easy to maintain and can live for centuries, making them a great addition to any landscape or garden. With a little patience and care, your yew tree can grow into a beautiful and impressive feature in your outdoor space.
Overall, the Yew shrub is an enchanting, diverse and timeless addition to any garden or landscape. With its captivating look and vast array of colours, it can create a stunning focal point in any outdoor space. This article has introduced you to the beautiful yew shrub, its various varieties and their different characteristics. You have also seen how some of the common methods for planting and caring for the yew such as soil preparation, choosing a suitable planting location, propagating it through seeds and cuttings, fertilizing it with suitable nutrient mixtures and watering techniques like deep root watering can be implemented.
Finally, this article has offered handy tips on pruning, trimming and creating hedges with your yew trees or growing them in containers if they don’t get enough light or space outdoors in the landscape. Whether you’re looking to renovate your back yard oasis with a magnificent centerpiece or you simply want an elegant addition to your walled garden that provides unparalleled allure year round, remember there’s nothing quite like growing a majestic Yew bush!.
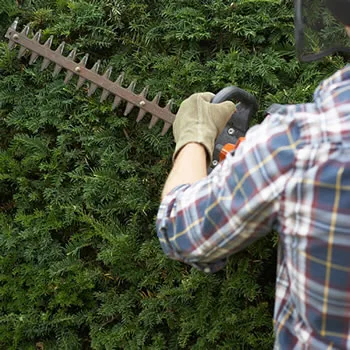
A Complete Guide to Pruning the Yew Shrub in the UK
Are you looking for the right way to prune your yew shrub in order to keep it healthy and thrive here in the UK? If so, this guide is just what you need! Pruning a yew shrub correctly can be tricky, but with these simple tips and tricks from an experienced gardener, you'll be able to help your plant flourish like never before. You'll learn about when is the best time to prune your yew shrub in our temperamental weather conditions, which tools are essential for undertaking this task safely and effectively, as well as some planting techniques that will provide further protection against disease or pest attacks.
Pruning a yew shrub is essential to maintain its shape, encourage bushy growth, and remove diseased or dead branches. Here are step-by-step instructions on how to properly prune your yew shrub:
Materials Needed- Pruning shears
- Loppers
- Garden gloves
- Disinfectant spray
Step-by-Step Guide to Pruning a Yew Shrub
-
1. Wait for the Ideal Time
The best time to prune your yew shrub is in late winter or early spring, while the plant is still dormant. This is before new growth begins.
-
2. Inspect the Shrub
Inspect your yew shrub and identify the areas that need pruning. Make sure to remove any diseased, damaged, or dead branches.
-
3. Disinfect the Pruning Tools
Before you begin pruning, clean your pruning tools with a disinfectant spray. This will help prevent the spread of diseases from one plant to another.
-
4. Begin Pruning
Start by pruning any damaged or diseased branches using pruning shears. Cut the branch off as close to the main stem as possible, making a clean cut at an angle. In general, it’s best to remove up to 1/3 of the shrub's growth each year.
-
5. Prune for Shape
To shape your yew shrub, prune the top of the shrub at an angle. This will encourage branching and create a more compact shape. It is recommended to use loppers to cut larger branches.
-
6. Consider Plant Growth Pattern
It’s important to consider the growth pattern of the yew shrub when pruning. Yew shrubs grow new growth from old wood, so if you cut directly into the wood, it won’t produce new growth.
-
7. Dispose of Debris
After pruning your yew shrub, clean up all debris, including diseased or dead branches, and dispose of them properly to avoid spreading any potential diseases or pests.
By following these simple steps, you can properly prune your yew shrub and keep it healthy and beautiful year after year.
Identify the type of yew shrub you have - English, Irish, or Japanese
If you're an avid gardener, or simply have a fondness for beautiful foliage in your outdoor space, you may want to identify the type of yew shrub that graces your garden. Yew shrubs are hardy, evergreen plants that add a touch of elegance and sophistication to any landscape. While they all possess similar qualities, such as their deep green, needle-like leaves, there are distinct differences between the English, Irish, and Japanese varieties. Knowing which type you have can help you care for your shrub properly and better appreciate its unique characteristics. So, let's take a closer look at how to identify each one.
There are a few distinct differences between the English Yew, Irish Yew, and Japanese Yew varieties that set them apart from each other. Here are some notable differences:
English Yew (Taxus baccata):
- Native to Western, Central, and Southern Europe, Western Asia, and North Africa
- Has a broad and spreading habit and can grow up to 50-60 feet tall
- Has dark green foliage and red berries
- Has a high degree of shade tolerance
- Grows well in moist and fertile soils
Irish Yew (Taxus baccata Fastigiata):
- A variety of the English Yew tree, but it has a distinct columnar shape
- Is an evergreen tree that grows up to 20-30 feet tall
- Has dark green foliage that turns bronze in winter
- Needs well-draining soil to grow well
- Is commonly used for ornamental purposes in gardens and for hedgerows
Japanese Yew (Taxus cuspidata):
- Native to Japan, China, and Korea
- Has an upright, narrow habit and can grow up to 50-60 feet tall
- Has dark green, glossy foliage that is more lustrous than the English Yew
- Is more tolerant of clay and alkaline soils compared to other yew varieties
- Contains less toxic material than other yew varieties
Overall, each yew variety has its own unique characteristics that make it suitable for different landscaping purposes. Understanding the differences between these varieties can help you select the best variety for your specific needs.
Understand the best time to prune your yew shrub - autumn or winter months
Pruning your yew shrub can be a daunting task, especially when it comes to timing. It's essential to know the right time to prune to ensure your shrub remains healthy and well-maintained. While some may suggest pruning during autumn, experts suggest that winter is the best time to prune your yew shrub. During this time, the shrub is dormant, and there's little to no new growth, making it easier to spot dead or damaged branches and remove them.
Additionally, pruning during winter allows the shrub to recover during the spring when it begins to grow again. By following this advice, your yew shrub will thrive and provide the perfect accent for your outdoor space.
Have the right tools on hand - secateurs, loppers, and saws

When it comes to maintaining your garden, having the right tools on hand can make all the difference. Secateurs, loppers, and saws are essential for keeping your bushes, trees, and shrubs in top shape. Whether you're trying to prune back overgrown branches or create a more structured and appealing landscape, having quality tools is key. Plus, when you invest in high-quality equipment, you'll enjoy greater precision and control, allowing you to achieve the results you want with less effort. So why wait? Get your hands on the right tools today and start transforming your outdoor space.
Secateurs, loppers, and saws are essential tools for maintaining healthy bushes, trees, and shrubs. Each tool has its own unique purpose and can be used for different pruning needs:
Secateurs: Secateurs, also known as pruning shears, are hand-held cutting tools used for pruning small branches and stems up to ¾ inch in diameter. They come in various sizes and types, including bypass, anvil, and ratchet. Bypass secateurs are the most common, and they work like scissors with two curved blades that slide against each other. Secateurs are useful for precise cuts in tight spaces, such as when pruning shrubs or roses.
Loppers: Loppers are also cutting tools, but they are used for pruning thicker branches up to 2 inches in diameter. They feature long handles and come in bypass, anvil, and ratchet styles. Bypass loppers work like secateurs, but with longer handles, making it easier to reach higher branches. Anvil loppers use a blade that cuts against a flat surface, much like a knife on a cutting board. Ratchet loppers use a mechanism that multiplies the user's strength, making it easier to cut through thick branches.
Saws: Pruning saws come in various shapes and sizes, but they all have serrated blades that can be used to cut larger branches or stems that are too thick for secateurs or loppers. There are two main types of pruning saws: hand-held saws and pole saws. Hand-held pruning saws are similar to regular handsaws but with a narrow blade. Pole pruning saws have a long handle that can reach faraway branches without the need for a ladder.
Having all three of these tools in your gardening arsenal will help you keep your bushes, trees, and shrubs in top shape. Each tool has its own unique strengths and uses, and knowing when and how to use them will make your pruning tasks much easier and efficient.
Check for signs of disease and damage before you start pruning
Before starting any pruning, it is crucial to check for signs of disease and damage on the plants you want to trim. One of the significant risks of pruning diseased or damaged plants is that these afflictions could spread more quickly and hurt the plant further. Therefore, if you notice any signs of disease or damage, such as discoloured, withered leaves, branches with lesions or cracks, or dead wood, it is essential to prune with care.
You may need to consult with an expert or research the best methods of pruning diseased or damaged plants. Always remember that prevention is better than cure when it comes to gardening, and this means taking care of your plants to promote a healthy and thriving garden.
The yew shrub is relatively resistant to most pests and diseases, making it a low-maintenance option for gardeners. However, there are a few pests and diseases that can still affect the plant. Here are some of the most common pests and diseases that afflict the yew shrub:
Pests
- Yew scale insects: These pests cause yellowing and defoliation of the yew foliage. They can be controlled by horticultural oils or insecticidal soaps.
- Spider Mites: These pests cause discoloration of the yew foliage and webbing. They can be controlled with insecticidal soaps or miticides.
- Bagworms: These pests cause browning and defoliation of yew foliage. They can be prevented by removing and destroying affected branches or using insecticides.
Diseases
- Phytophthora Root Rot: This disease is caused by waterlogged soil and can cause death of the plant. It can be prevented by ensuring well-draining soil and proper watering.
- Needle Blight: This fungal disease affects the foliage, causing browning and defoliation. It can be prevented by removing and disposing of affected branches or using fungicides.
- Canker: This fungal disease causes sunken areas on the bark and can cause death of the plant. It can be prevented by ensuring good air circulation and removing affected branches.
Regular monitoring and inspection of the yew shrub can help prevent and control pest and disease infestations. Prompt treatment when necessary can also help maintain the health and vitality of the shrub.
Follow the right trimming techniques when cutting branches

When it comes to trimming branches, it's important to use the right techniques to ensure that the job is done correctly. Not only does this help to keep your trees healthy, but it also reduces the risk of injuries and damage to property. One of the key things to keep in mind is to avoid cutting the branch too close to the trunk, as this can cause serious damage. Instead, make your cuts at a 45-degree angle, about a quarter inch away from the collar of the branch.
Additionally, it's important to only remove branches that are dead or dying, as cutting healthy branches can harm the tree and leave it vulnerable to disease and pests. By following these tips and using the right trimming techniques, you can help to ensure that your trees remain strong and healthy for years to come.
Apply mulch and compost to ensure healthy growth after pruning
Pruning can promote healthy growth and encourage new blooms, but it can also leave plants vulnerable to damage from the elements. Applying mulch and compost after pruning can provide the necessary nutrients and protection needed for optimal growth. Mulch can help retain moisture, regulate soil temperature, and prevent weed growth, while compost enriches the soil with essential organic matter and beneficial microorganisms.
Together, mulch and compost create a nourishing environment to support healthy plant growth and keep your garden thriving. So, if you want to ensure your plants thrive after pruning, make sure to apply a generous layer of mulch and compost!
Mulch and compost are both excellent additions to a garden as they can help retain moisture, suppress weeds, and feed the soil with essential nutrients. Here are some different types of mulch and compost that you can use after pruning to ensure healthy growth:
Types of Mulch
- Wood Chips: Wood chips are a common type of mulch and are useful for suppressing weeds and retaining moisture. They also slowly break down over time, releasing nutrients into the soil.
- Pine Needles: Pine needles are acidic and can be used as mulch around acid-loving plants such as azaleas and blueberries. They also decompose slowly, making them a long-lasting option.
- Straw: Straw is an excellent mulch for vegetable gardens, as it is low in nutrients but retains moisture well. It can also help suppress weeds.
- Shredded Leaves: Shredded leaves are a natural and free mulch that many gardeners use in their gardens. They add organic material to the soil as they decompose, and they also help suppress weeds.
Types of Compost
- Kitchen Compost: Kitchen compost is made from food scraps and other organic waste generated in the kitchen. It is an excellent source of nutrients and can be added to garden beds to enrich the soil.
- Manure Compost: Composted animal manure is a rich source of nutrients, making it an excellent addition to garden soil. However, it should be well-composted before use to avoid burning plants.
- Leaf Compost: Leaf compost is created by decomposing leaves and plant matter and can be used on its own or added to garden soil. It is rich in nutrients and also helps improve soil structure.
- Vermicompost: Vermicompost is made from worm castings and is one of the richest sources of plant nutrients. It can be added to garden soil or used as a potting mix for houseplants.
By incorporating different types of mulch and compost into your garden after pruning, you can help promote healthy growth and improve the overall health of your plants. Always choose high-quality, organic materials to ensure the best results.
What is the Best Time of the Year to Prune the Yew
When it comes to pruning the yew, timing is essential. Experts suggest that the best time to do so is during the dormant season, which typically runs from late autumn to early spring. During this time, the plant is not actively growing, making it less susceptible to damage and stress caused by pruning.
Additionally, pruning during the dormant season can help encourage more vigorous growth come springtime. However, it's important to avoid pruning during very cold or wet weather, as this could lead to disease or other potential issues. Overall, taking the time to carefully prune your yew during the right season can help ensure a healthier, happier plant for years to come.
Pruning Overgrown Yew Trees - How much can you Cut Back?
Pruning overgrown yew trees is not just necessary for their aesthetics, but also for their health. However, before reaching for those pruning shears, it's important to know how much you can cut back. It might be tempting to go all out and get rid of everything that looks out of place, but yews have a unique way of responding to pruning.
A good rule of thumb is to remove no more than one-third of the tree's foliage at a time.
Anything more than that can shock the tree, leaving it vulnerable to pests and diseases. So, take your time and trim slowly but surely to ensure your yew tree stays healthy and happy.
How to Prune a Yew Hedge
Yew hedges are a classic choice for adding structure to your garden or creating a boundary around your property. However, without proper pruning, these bushes can become overgrown and lose their shape. Luckily, pruning a yew hedge is a simple process that can be easily mastered. First, use sharp shears to remove any dead or damaged branches. Then, trim the top and sides of the hedge to your desired shape. Remember to cut at an angle so water can run off easily. Regular pruning throughout the year will ensure that your yew hedge remains healthy and vibrant, making it a stunning addition to your outdoor space.
Pruning a yew hedge is an important task to keep the hedge looking neat and healthy. Here is a comprehensive list on how to properly prune your yew hedge:
Materials Needed
- Pruning shears
- Loppers
- Hedge shears
- Garden gloves
- Disinfectant spray
Step-by-Step Guide to Pruning a Yew Hedge
-
1. Wait for the Ideal Time
The best time to prune a yew hedge is in late winter, just before new growth begins. This will help ensure that new growth is regulated and the plant is kept to the desired size.
-
2. Inspect the Hedge
Inspect your yew hedge and identify the areas that need pruning. Prune off any dead branches or any unhealthy looking areas to keep your hedge looking healthy.
-
3. Disinfect the Pruning Tools
Before starting, clean your pruning tools carefully with a disinfectant spray. This will prevent the transfer of diseases from one shrub to another.
-
4. Trimming the Top
To trim the top of your yew hedge, use loppers to cut branches that are too thick for pruning shears. Afterward, use hedge shears for trimming the top of the hedge evenly.
-
5. Trimming the Sides
Start by trimming the sides of the hedge by removing any branches jutting out. Ensure the sides are straight, and every branch slightly slants to the edge of the hedge to increase light to all parts of the hedge.
-
6. Prune for Shape
To shape your yew hedge, trim the top and sides to create the desired shape. This will encourage branching and create a more compact, uniform hedge.
-
7. Rуmovе Dеbrіѕ
After pruning your yew hedge, clean up all debris, including diseased or dead branches, and dispose of them properly to avoid spreading any potential diseases or pests.
By following these simple steps, you can properly prune your yew hedge, keeping it healthy and beautiful for a long time.
Yew trees are often used as hedgerows because they are slow-growing, long-lived, and easy to maintain. Additionally, yew trees have dense foliage that provides excellent coverage and privacy. Here are some different varieties of yew trees that are best used as hedgerows:
- Common Yew (Taxus baccata): The most well-known and commonly planted yew tree for hedgerows. It has dark-green foliage and can grow up to 50 feet tall if left unpruned.
- Irish Yew (Taxus baccata Fastigiata): This variety of yew tree has a columnar shape and is used for creating a formal, narrow hedge. It has dark-green foliage that turns bronze in winter.
- Dwarf Yew (Taxus baccata Repandens): This low-growing variety of yew tree is perfect for creating a low hedge or groundcover. It grows to a height of about 3 feet.
- Japanese Yew (Taxus cuspidata): This variety of yew tree is native to Japan and is commonly used for creating low hedges or foundation plantings. It has dark-green foliage that is softer and more lustrous than the common yew.
- Spreading Yew (Taxus × media): This hybrid yew tree is a cross between the English yew and the Japanese yew. It has an open, spreading habit and is commonly used for creating low hedges or groundcovers.
When selecting a yew tree for a hedgerow, it's important to consider the specific needs and characteristics of your landscape. Choose a variety that will thrive in your climate and soil conditions, and make sure it fits the desired height and width for your hedge.
Can you Trim a Yew in the Summer without Causing Damage
Summer is a time for relaxation, outdoor activities, and maintaining your garden. However, it can be a confusing time for gardeners who are wondering whether it's okay to prune their yew trees. Yew trees are a popular choice for hedges and boundary trees, but many gardeners are unsure about the right time to trim them.
The good news is that trimming a yew tree in the summer won't cause any damage, as long as you take the right approach. Experts suggest that trimming should be done in the early summer when the new growth has fully emerged. This ensures that the tree has time to produce enough energy to sustain itself through the winter months.
So if you're thinking about pruning your yew tree this summer, go ahead and do it! Just remember to follow the guidelines to ensure you don't damage your beautiful tree.
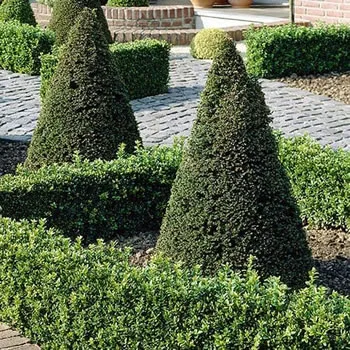
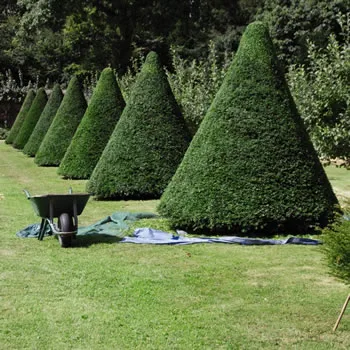
Topiary Shaping - A Guide to Pruning of the Yew Shrub
There's nothing quite like the art of shaping topiary, and when it comes to pruning the yew shrub, the possibilities are endless. A well-maintained yew hedge or topiary can add a touch of class to any garden or park. But shaping and pruning these evergreen plants can be a daunting task for even the most experienced gardeners. It's important to understand the yew's growth patterns and how they respond to pruning.
With patience and practice, however, you can create a beautiful, well-manicured work of art that'll be the envy of all your neighbors. Whether you're aiming for a traditional topiary shape or a more avant-garde design, mastering the art of yew pruning is the key to stunning topiary.
Pruning yew shrubs requires a lot of skill and knowledge in order to be successful. Researching the type of shrub you have, understanding the best time to prune it, having the right tools on hand, checking for disease and damage, following the correct trimming techniques, and applying mulch and compost afterwards are all important steps when pruning your yew shrub. It is vital to remember that some types of yews can be pruned any time of year without causing damage, but other types should only be pruned during autumn or winter months when branches are hardest. By following this guide and using careful tending practices, you will have a beautifully shaped yew in no time!
How to Prune Climbing Vines
List by Variety
- How to Prune Actinidia
- How to Prune Akebia
- How to Prune Bougainvillea
- How to Prune Campsis
- How to Prune Celastrus
- How to Prune Chilean Glory Vine
- How to Prune Clematis Armandii
- How to Prune Clematis Montana
- How to Prune Climbing Rose
- How to Prune Hedera GoldHeart
- How to Prune Honeysuckle
- How to Prune Hydrangea Petiolaris
- How to Prune Ivy
- How to Prune Japanese Wisteria
- How to Prune Morning Glory
- How to Prune Parthenocissus
- How to Prune Persian Ivy Hedera Colchica
- How to Prune Schisandra
- How to Prune Star Jasmine
- How to Prune Sweet Peas
- How to Prune True Jasmine
- How to Prune Virginia Creeper
- How to Prune Wisteria
How to Prune Hedges
List by Variety
- How to Prune an Arborvitae Hedge
- How to Prune a Barberry Hedge
- How to Prune a Beech Hedge
- How to Prune a Boxwood Hedge
- How to Prune a Butterfly Bush Hedge
- How to Prune a Cotoneaster Hedge
- How to Prune an English Lavender Hedge
- How to Prune an Escallonia Hedge
- How to Prune an Euonymus-Hedge
- How to Prune a Firethorn Hedge
- How to Prune a Forsythia Hedge
- How to Prune a Griselinia Hedge
- How to Prune a Hawthorn Hedge
- How to Prune a Holly Hedge
- How to Prune a Hornbeam Hedge
- How to Prune a Juniper Hedge
- How to Prune a Laurel Hedge
- How to Prune a Leylandii Hedge
- How to Prune a Lilac Hedge
- How to Prune a Maple Leaf Viburnum Hedge
- How to Prune a Photinia Hedge
- How to Prune a Pink Ramanus Rose Hedge
- How to Prune a Privet Hedge
- How to Prune a Pyracantha Hedge
- How to Prune a Spirea Hedge
- How to Prune a Thuja Hedge
- How to Prune a Viburnum Hedge
- How to Prune a Western Red Cedar Hedge
- How to Prune a Yew Hedge
How to Prune Shrubs
List by Variety
- How to Prune an Abelia Shrub
- How to Prune an Abutilon
- How to Prune an Acer / Japanese-Maple
- How to Prune an Amelanchiers
- How to Prune an Apple-Tree
- How to Prune an Arbovitae Shrub
- How to Prune an Arbutus
- How to Prune an Aucuba
- How to Prune a Azalea Mollis
- How to Prune Azaleas
- How to Prune a Bay Tree Shrub
- How to Prune a Berberis Darwinii
- How to Prune Berberis Deciduous Types
- How to Prune a Boxwood Shrubs
- How to Prune a Brachyglottis Senecio
- How to Prune a Buddleia Alternifolia
- How to Prune Buddleias Butterfly Bushes
- How to Prune a Buddleja Globosa
- How to Prune a Callicarpa
- How to Prune a Camellia
- How to Prune a Caryopteris
- How to Prune a Catalpa Bignonioides Aurea
- How to Prune Ceanothus Deciduous Types
- How to Prune Ceanothus Evergreen Types
- How to Prune a Ceratostigma
- How to Prune a Chaenomeles
- How to Prune a Choisya
- How to Prune a Cistus
- How to Prune a Clematis
- How to Prune a Cornus
- How to Prune a Cotinus Royal Purple
- How to Prune a Cytisus Scoparius
- How to Prune a Exochorda x Macrantha
- How to Prune a Forsythia
- How to Prune a Hebe
- How to Prune a Hydrangeas
- How to Prune Juniper Shrubs
- How to Prune a Lavatera
- How to Prune Lilac Bushes
- How to Prune a Mugo Pine
- How to Prune Rose Bushes
- How to Prune Ribes
- How to Prune Spirea Shrubs
- How to Prune Viburnum Shrubs
- How to Prune a Weigela
- How to Prune a Yew
How to Prune Trees
List by Variety
- How to Prune a Apple Tree
- How to Prune a Apricot Tree
- How to Prune a Ash Tree
- How to Prune a Birch Tree
- How to Prune a Cherry Tree
- How to Prune a Elm Tree
- How to Prune a Fig Tree
- How to Prune a Grape Tree
- How to Prune a Hickory Tree
- How to Prune a Maple Tree
- How to Prune a Oak Tree
- How to Prune an Olive Tree
- How to Prune a Peach Tree
- How to Prune a Pear Tree
- How to Prune a Plum Tree
- How to Prune a Poplar Tree
- How to Prune a Walnut Tree
Gallery


Michael Carter
Vestibulum ante ipsum primis in faucibus orci luctus et ultrices posuere cubilia curae; Donec vel erat in nulla efficitur tempor non ut nisl. Integer venenatis eros ut dui viverra fermentum.
Sophie Wilson
Nam ut turpis hendrerit, varius nunc vel, elementum dui. Morbi vulputate dolor sit amet scelerisque egestas. Vestibulum eleifend nunc ut bibendum fermentum.
Alex Morgan
Cras non velit nec purus tempor rhoncus. Sed non mauris vitae erat consequat auctor eu in elit. Class aptent taciti sociosqu ad litora torquent per conubia nostra.